
Use and Care / Installation Manual

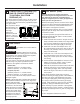


Table Of Contents

12 31-2000814 Rev. 1
Installation
8
LEVEL THE RANGE
WARNING
The range must be level and be
supportedbythelegs—notthewheels.Therangecould
moveifthewheelsmakecontactwiththefloor.Besure
alllegsmakecontactwiththefloorinanyinstallation.
■Alllegsmustbeleveledaftertheproductisinstalled.
■Checktobesuretheadjoiningcabinets/countertops
arelevel,fronttobackandlefttorightacrossthe
opening of the range.
■
Measure the distance from the floor to the top of the
countertop in the left and right rear corners.
■
Adjust the height of the range to countertop height
or higher.
IMPORTANT:Thisrangeshouldalwaysbeinstalled
at countertop height or higher. DO NOT INSTALL THE
RANGE LOWER THAN ADJACENT COUNTERTOP
HEIGHT.Therangemustbesupportedbyall4legs,
regardless of countertop height.
FRONT LEG ADJUSTMENT
■Alevelinglegwrenchissupplied.Reachunderthe
front of the range near the right leg. Locate and
removeathumbscrew,thenslidewrenchoutof
the slot.
■Slidefrontcylindersuptoaccessfrontlevelinglegs.
Be careful not to damage cylinder.
■Usethesuppliedwrenchtoadjustthefrontleveling
legs.Turnclockwisetoextendthelegstoliftand
stabilizetherange.Turncounterclockwisetoretract
thelegsandallowtherangetorestonitsrollers.
■Besuretoreturnthewrenchtoitsstorageslotfor
future use.
8
LEVEL THE RANGE (cont.)
REAR LEG ADJUSTMENT
WARNING
To reduce the risk of fire or electric
shock,alwaysreplacethespillplugsintheleveling
rod holes.
■
Removetwoscrewsfromrearventtrim.Slidevent
trimforward,thenliftuptoremove.
■
Remove the 2 spill plugs to locate the rear leg
extensionlevelingrods.Usea1/4”driverorsocket
wrenchtoadjusttheleftorrightrearlegs.
■
Findthetworearlegextensionrods.Usea1/4”driver
orwrenchtoadjusttheleftorrightrearlegs.
■
Replace the 2 spill plugs and then replace the rear
venttrimusingtheoriginalscrews.
9
REPLACE OVEN DOOR(S)
Skip this step if oven doors are in place.
IMPORTANT: Do not lift the door by the handle.
To replace the oven doors:
■Firmlygraspthedoorat the top sides. This is
critical.
■Approachtherangewiththedoorangledina
vertical position.
■Guidethehingesintotheslots.
■Pushthedoorinfirmlywhileopening.
■Onceinposition,openthedoorcompletely.Push
thehingelocksbackintowardthefrontframe.
CAUTION
Takecarewhenreplacingtheoven
doors. If the hinge latch
isnotsecurelylocked,
the hinge may snap back
and separate. If the hinge
separates,youmustapply
pressure(possiblywith
your foot) to press it back
together and then engage
the hinge latch.
Spill Plugs
Rear Leg
Extension
Rods
Slide leg
cylinder up.
ThumbScrew