
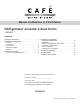
Owner's Manual

49-1000129 Rev. 2 11
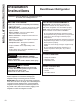
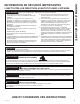
INSTALLATION INSTRUCTIONS
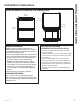
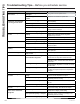
DUAL-DRAWER REFRIGERATOR DIMENSIONS
Installation Instructions
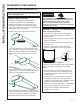
REMOVE PACKAGING
NOTE: The drawer handles are included in the
packaging which covers the top of the unit. A wrench
for the handle installation is included in the accessory
bag located in the upper drawer.
• Remove tape and glue residue from surfaces before
turning on the dual-drawer refrigerator. Rub a small
amount of liquid dish soap over the adhesive with
your fingers. Wipe with warm water and dry.
NOTE: Do not use sharp instruments, rubbing
alcohol, flammable fluids, or abrasive cleaners to
remove tape or glue. These products can damage
the surface of your dual-drawer refrigerator. For
PRUHLQIRUPDWLRQVHH³'XDO'UDZHU5HIULJHUDWRU
6DIHW\´
• Dispose of/recycle all packaging materials.
CLEAN BEFORE USING
After you remove all of the packaging materials,
clean the inside of the dual-drawer refrigerator before
XVLQJLW6HHWKHFOHDQLQJLQVWUXFWLRQVLQ³'XDO'UDZHU
5HIULJHUDWRU&DUH´
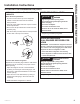
PREPARE DUAL-DRAWER
REFRIGERATOR FOR INSTALLATION
1. Pull open the upper drawer. Remove the crisper
bins and set aside.
8VLQJWZRKDQGVOLIWXSRQWKHPHWDOGUDZHUGLYLGHU
rod to remove it from the slots in the front and rear
of the drawer.
3. Once the drawer divider rod is out of the slots,
turn the rod so that it is at an angle to the front of
the drawer. Lift the rod slowly out of the drawer to
avoid bumping into the control panel, and then set
aside the divider assembly.
4. Close the upper drawer to avoid damage during
installation.
Ǝ
(60.6 cm)
Ǝ
(87 cm)
Ǝ
(60.3 cm)
Ǝ
(107.4 cm)