TM Owner's Manual Self-Cleaning Double Oven Gas Ranges Models: CGS750P, CGS750M, and CGB550P Contents Safety Information. . . . . . . . . . . . . . . . . . . . . . . . . . . . . . . 3 Using the Range In Case of a Power Failure . . . . . . . . . . . . . . . . . . . . . . . 8 Surface Burners. . . . . . . . . . . . . . . . . . . . . . . . . . . . . . . . 8 Griddle. . . . . . . . . . . . . . . . . . . . . . . . . . . . . . . . . . . . . . 10 Oven Controls . . . . . . . . . . . . . . . . . . . . . . . . . . .
THANK YOU FOR MAKING CAFÉ A PART OF YOUR HOME. We take pride in the craftsmanship, innovation and design that goes into every Café product, and we think you will too. Among other things, registration of your appliance ensures that we can deliver important product information and warranty details when you need them. Register your Café appliance now online. Helpful websites are available in the Consumer Support section of this Owner’s Manual.
READ ALL INSTRUCTIONS BEFORE USING THE APPLIANCE WARNING Read all safety instructions before using the product. Failure to follow these instructions may result in fire, electrical shock, serious injury or death. WARNING If the information in this manual is not followed exactly, a fire or explosion may result, causing property damage, personal injury or death. - Do not store or use gasoline or other flammable vapors and liquids in the vicinity of this or any other appliance.
SAFETY INFORMATION IMPORTANT SAFETY INFORMATION READ ALL INSTRUCTIONS BEFORE USING THE APPLIANCE WARNING GENERAL SAFETY INSTRUCTIONS WARNING NEVER use this appliance as a space heater to heat or warm the room. Doing so may result in carbon monoxide poisoning and overheating of the oven. ■ Use this appliance for its intended purpose as described in this owner’s manual. ■ H ave your range installed and properly grounded by a qualified installer in accordance with the provided installation instructions.
READ ALL INSTRUCTIONS BEFORE USING THE APPLIANCE WARNING KEEP FLAMMABLE MATERIALS AWAY FROM THE RANGE Failure to do so may result in fire or personal injury. ■ Do not store or use flammable materials in an oven or near the cooktop, including paper, plastic, pot holders, linens, wall coverings, curtains, drapes and gasoline or other flammable vapors and liquids. ■ Never wear loose-fitting or hanging garments while using the appliance.
SAFETY INFORMATION IMPORTANT SAFETY INFORMATION READ ALL INSTRUCTIONS BEFORE USING THE APPLIANCE WARNING COOKTOP SAFETY INSTRUCTIONS (Cont.) ■ D o not use a wok with a round metal support ring. The ring may trap heat and block air to the burner resulting in a carbon monoxide hazard. ■ D o not attempt to lift the cooktop. Doing so may damage the gas tubing to the surface burners resulting in a gas leak and risk of fire.
READ ALL INSTRUCTIONS BEFORE USING THE APPLIANCE Remote Enable Equipment This device complies with part 15 of the FCC Rules. Operation is subject to the following two conditions: (1) This device may not cause harmful interference, and (2) this device must accept any interference received, including interference that may cause undesired operation.
USING THE RANGE: In Case of a Power Failure / Surface Burners In Case of a Power Failure In the event of a power failure, the oven is inoperable and no attempt should be made to operate it. However, the surface burners may be lit with a match. Using extreme caution, hold a lit match near the ports beneath Surface Burners Lighting a Surface Burner WARNING Burners should be operated only when covered by cookware. Burner flames not covered by cookware present a risk of fire or clothing ignition.
Multi-Ring Burner (some models) For large cookware, activate all rings by setting set the burner between Hi and Med. For small cookware or low heating applications, only activate the inner rings by setting the burner between Lo and Sim. Side View Of The Multi-Ring Burner Knob Top-of-Range Cookware Aluminum: Medium-weight cookware is recommended because it heats quickly and evenly. Most foods brown evenly in an aluminum skillet.
USING THE COOKTOP: Griddle Griddle (on some models) WARNING Fire Hazard ■ U se care when cooking greasy foods. Spilled grease may result in fire. ■ Never place any items on the griddle when it is not in use. Heat from surrounding burners can heat the griddle and may result in fire. ■ Place and remove the griddle only when griddle is cool and all surface burners are turned OFF. Using Your Cast Iron Griddle The ribbed side of the reversible griddle can be used for food normally grilled.
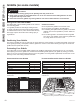
3 10 7 9 10 1 6 1 6 4 2 1. Upper Oven and Lower Oven: Designates which oven the controls will operate. Select an oven before following the steps for starting a cooking or cleaning mode. 2. Convection Cooking Modes: Convection cooking modes use increased air circulation to improve performance. See the Cooking Modes section for more information. 3. Traditional Cooking Modes: Your oven has the following traditional cooking modes: Bake, Broil, and Warm.
USING THE RANGE: Options/Settings Options The options pad opens up a menu of more cooking modes when the oven is off. It opens a menu with additional features if a cooking mode is already in process. You can exit the menu at any time by pressing the Options pad again. You must first select a mode (bake, convection bake, convection roast) and then select Options to get to the following functions. Cook Time Counts down cooking time and turns off the oven when the cooking time is complete.
WiFi Connect and Remote Enable (cont.) Auto Conv (Auto Conversion) 4. If the connection light does not turn on or is blinking, follow the instructions on the app to reconnect. If issues continue, please visit cafeappliances.com/connect and ask for assistance regarding oven wireless connectivity. Note that any changes or modifications to the remote enable device installed on this oven that are not expressly approved by the manufacturer could void the user’s authority to operate the equipment.
USING THE RANGE: Sabbath Mode Sabbath Mode The Sabbath mode includes the disabling of tones, disabling of oven lights, and delays of about 30 seconds to one minute on display changes. Only continuous baking or timed baking is allowed in the Sabbath mode. Cooking in the Sabbath mode is a two-step process; first the Sabbath mode must be set and then the bake mode must be set. Setting the Sabbath Mode Press the Settings pad, select Sabbath, and select Turn on.
Rack Positions Your oven has two rack positions in the upper oven (A, B) and four rack positions in the lower oven (R, 1, 2, 3). Recommended rack positions for various types of foods are provided in the Cooking Guide. Adjusting rack position is one way to impact cooking results. For example, if you would prefer darker tops on cakes, muffins, or cookies, try moving food one rack position higher. If you find foods are too brown on top try moving them down next time.
USING THE RANGE: Aluminum Foil and Oven Liners / Cookware / Cooking Modes 16 Aluminum Foil and Oven Liners CAUTION Do not use any type of foil or oven liner to cover the oven bottom. These items can trap heat or melt, resulting in damage to the product and risk of shock, smoke or fire. Damage from improper use of these items is not covered by the product warranty. Foil may be used to catch spills by placing a sheet on a lower rack, several inches below the food.
Frozen Snacks Convection Bake Multi Rack The Frozen Snacks modes are designed to cook frozen foods such as potato nuggets, French fries, and similar frozen snacks and appetizers. Most foods will cook within package recommended time. Adjust cooking time according to individual preferences. Press Options and select Frozen then follow any display prompts to access this mode. The Convection Bake mode is intended for baking on multiple racks at the same time.
USING THE RANGE: Oven Probe Oven Probe WARNING Consuming undercooked food can result in foodborne illness. Use probe according to the following instructions to ensure all portions of the food reach minimum safe cooking temperatures. Recommendations for minimum safe food temperatures can be found at foodsafety.gov or IsItDoneYet.gov. Internal food temperature is frequently used as an indicator of doneness, especially for roasts and poultry.
FOOD TYPE RECOMMENDED MODE(S) OVEN (Upper/Lower) RECOMMENDED RACK POSITION(S) ADDITIONAL SUGGESTIONS Baked Goods Layer cakes, sheet cakes, bundt cakes, muffins, quick breads on a Single Rack Bake Upper Lower 2 3 Bake Goods Upper Lower 2 3 Layer cakes* on Multiple Racks Bake Convection Bake Lower 2 and 4 Ensure adequate airflow (see illustration below). Bake Goods Lower 1 Use shiny cookware. Bake Upper Lower 2 3 Use shiny cookware.
CARE AND CLEANING: Range – Exterior Range – Exterior WARNING Be sure all controls are off and all surfaces are cool before cleaning any part of the range. Tip-Over Hazard If your range is removed for cleaning, servicing or any reason, be sure the AWARNING child or adultanti-tip can tip the range and beproperly killed. when the range is replaced.
The interior of your new oven can be cleaned manually or by using Steam Clean or Self Clean modes. Spillage of marinades, fruit juices, tomato sauces and basting liquids containing acids may cause discoloration and should be wiped up immediately. Let hot surfaces cool, then clean and rinse. Manual Cleaning Do not use oven cleaners, strong liquid cleansers, steel wool, or scouring pads on the interior of the oven.
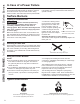
CARE AND CLEANING: Cooktop Cooktop Removal of Surface Burners for Cleaning Turn all controls OFF. Allow cooktop to cool before removing grates and burner parts. When removing the burner caps and heads, remember their size and location. Replace them in the same location after cleaning. CAUTION Do not attempt to remove oval or dual oval burner caps from the burner heads.
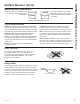
Burner Grates Manual Cleaning Grates should be washed in hot, soapy water and rinsed with clean water. To soften burned-on food, place grates in a solution containing ¼-cup of household ammonia for several hours. Afterward, scrub grates with a plastic scouring pad soaked in hot, soapy water. Rinse well and dry. Self Clean Mode (on some models) If your grates do not have rubber bumpers on their bottom surface, they may be cleaned in the oven using the self-clean cycle.
CARE AND CLEANING: Door / Oven Probe Door Cleaning the Oven Door Cleaning the Door Interior Cleaning the Door Exterior Do not allow excess water to run into any holes or slots in the door. If a stain on the door vent trim is persistent, use a mild abrasive cleaner and a sponge-scrubber for best results. Do not use this method on any other surface. Wipe dish soap over any baked-on spatters on the glass. Use a single sided safety razor blade to clean it off.
Oven Light Replacement WARNING SHOCK OR BURN HAZARD: Before replacing oven light bulb, disconnect the electrical power to the oven at the main fuse or circuit breaker panel. Failure to do so may result in electric shock or burn. CAUTION BURN HAZARD: The glass cover and bulb should be removed when cool. Touching hot glass with bare hands or a damp cloth can cause burns. NOTE: The glass cover should be removed only when cold. Wearing latex gloves may offer a better grip.
CARE AND CLEANING: Oven Door Oven Door Lift-Off Oven Door The door is very heavy. Be careful when removing and lifting the door. Do not lift door by the handle. To Remove the Door: 1. Fully open the door. 2. Pull the hinge locks up and away from the range frame to the unlocked position. 3. Firmly grasp both sides of the door near the top. 4. Close door until the top of the door is approximately 6” from the range frame. 5.
Save time and money! Review the charts on the following pages first and you may not need to schedule service. Problem Possible Cause What To Do My new oven doesn't cook like my old one. Is something wrong with the temperature settings? Your new oven has a different cooking system from your old oven and therefore may cook differently than your old oven. For the first few uses, follow your recipe times and temperatures carefully and use rack positions recommended in the Cooking Guide.
TROUBLESHOOTING TIPS Troubleshooting tips ... Before you schedule service Problem Possible Cause What To Do Oven light does not work Light bulb is loose or defective. Tighten or replace bulb. See the Maintenance section for instructions on how to replace the bulb. Oven will not selfclean The temperature is too high to set a self-clean operation. Allow the oven to cool and reset the controls. Oven controls improperly set. See the Cleaning the Oven section. Excessive soil or grease.
Problem Possible Cause What To Do Top burners do not burn evenly Improper burner assembly. Make sure the burner caps are seated correctly. See the Care and Cleaning of the range section. Burner slots on the side of the burner may be clogged. Remove the burners for cleaning. See the Care and Cleaning of the range section. Burner flames are very large or yellow Improper air to gas ratio. If range is connected to Propane gas, contact the technician who installed your range or made the conversion.
LIMITED WARRANTY Café Gas Range Limited Warranty cafeappliances.com All warranty service is provided by our Factory Service Centers, or an authorized service technician. To schedule service online, visit us at cafeappliances.com/service. Please have your serial number and your model number available when scheduling service. Servicing your appliance may require the use of the onboard data port for diagnostics.
Looking For Something More? Café offers a variety of accessories to improve your cooking and maintenance experiences! Refer to the Consumer Support page for website information.
CONSUMER SUPPORT Consumer Support Café Website Have a question or need assistance with your appliance? Try the Café website 24 hours a day, any day of the year! You can also shop for more great Café products and take advantage of all our on-line support services designed for your convenience. In the US: cafeappliances.