
Installation Guide

31-2000064 Rev. 0 06-18
I. Removing the Handle
1. Locate the set screws on the handle caps (they are usually on the
less visible side).
2. Loosen the set screw on one end with the 1/8” Allen wrench while
supporting the handle. Do not remove the set screw from the
handle cap.
3. Keep supporting the handle while you loosen the set screw on the
other handle cap. Lift the handle from the fasteners on the door
and set aside.
II. Replacing a New Handle
1. Make sure the set screws are loosened. Place the handle over the
fasteners of the door (we recommend putting the screw side of the
handle toward the less visible side). Take care to support the
handle so it doesn’t fall and scratch the appliance finish. Make sure
both the handle caps are resting on the face of the door.
2. Lock one end of the handle into position by tightening the set
screw in the handle cap with the 1/8” Allen wrench. Be sure not to
over tighten.
3. Keep supporting the handle as you lock the other end of the
handle into position by tightening the set screw in the handle cap
with the 1/8” Allen wrench. Be sure not to over tighten.
Repeat these instructions on all other handles.
Instructions for Replacing Appliance Handles
Instrucciones En Español | Instructions En Français:
www.cafeappliances.com/kit-instructions
3/16” Allen Wrench
(not included)
1/8” Allen Wrench
(included with handle)
Tools You Will Need:
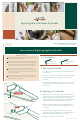
Replacing Your Café Knobs & Handles
LOOSEN
fig. 1
fig. 2
fastener
handle cap
set screw
set screw
The handle on your appliance may have a dierent orientation than what is
shown, but the installation will be the same.
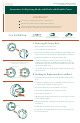
Be extra careful of the appliance finish around the handle area, as it can
scratch. During removal of the handle screws, hold onto the handle tightly
so it won’t fall and scratch the appliance. We recommend having another
person help you hold the handle in place as you remove the screws.
When the handle has been removed, check the fasteners that are
attached to the appliance front to see if they are loose. If so, tighten them
with a 3/16” Allen wrench before attaching the new handle. Note: Fastener
shape may vary by appliance.
For appliances with multiple handles, look at your current configuration
before removing the handles, and make sure the replacement handles
match that logo and set screw position.
IMPORTANT!