Owner’s Manual
TM Owner's Manual Induction Front Control Ranges Models: CHS900M and CHS90XM Contents Safety Information . . . . . . . . . . . . . . . . . . . . . . . . . . . . . . .3 Using the Range Surface Units . . . . . . . . . . . . . . . . . . . . . . . . . . . . . . . . . .7 Precision Cooking . . . . . . . . . . . . . . . . . . . . . . . . . . . . . .8 Cookware for Induction Cooktop . . . . . . . . . . . . . . . . . .12 Oven Controls . . . . . . . . . . . . . . . . . . . . . . . . . . . . . . . .12 Settings . . .
THANK YOU FOR MAKING CAFÉ A PART OF YOUR HOME. We take pride in the craftsmanship, innovation and design that goes into every Café product, and we think you will too. Among other things, registration of your appliance ensures that we can deliver important product information and warranty details when you need them. Register your Café appliance now online. Helpful websites are available in the Consumer Support section of this Owner’s Manual.
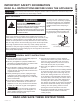
READ ALL INSTRUCTIONS BEFORE USING THE APPLIANCE WARNING Read all safety instructions before using the product. Failure to follow these instructions may result in fire, electrical shock, serious injury or death. ANTI-TIP DEVICE WARNING Tip-Over Hazard • A child or adult can tip the range and be killed. • Install the anti-tip bracket to the wall or floor. • Engage the range to the anti-tip bracket by sliding the range back such that the foot is engaged.
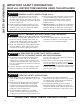
SAFETY INFORMATION IMPORTANT SAFETY INFORMATION READ ALL INSTRUCTIONS BEFORE USING THE APPLIANCE WARNING GENERAL SAFETY INSTRUCTIONS (Cont.) Ŷ 'R QRW XVH DQ\ W\SH RI IRLO RU OLQHU WR FRYHU WKH oven bottom or anywhere in the oven, except as described in this manual. Oven liners can trap heat or melt, resulting in damage to the product and risk of shock, smoke or fire. Ŷ $YRLG VFUDWFKLQJ RU LPSDFWLQJ JODVV GRRUV FRRN tops or control panels. Doing so may lead to glass breakage.
READ ALL INSTRUCTIONS BEFORE USING THE APPLIANCE WARNING GLASS COOKTOP SAFETY INSTRUCTIONS Ŷ 8VH FDUH ZKHQ WRXFKLQJ WKH FRRNWRS 7KH JODVV surface of the cooktop will retain heat after the controls have been turned off. Ŷ 'R QRW FRRN RQ D EURNHQ FRRNWRS ,I JODVV FRRNWRS should break, cleaning solutions and spillovers may penetrate the broken cooktop and create a risk of electric shock. Contact a qualified technician immediately.
SAFETY INFORMATION IMPORTANT SAFETY INFORMATION READ ALL INSTRUCTIONS BEFORE USING THE APPLIANCE WARNING SELF-CLEANING OVEN SAFETY INSTRUCTIONS The self-cleaning feature operates the oven at temperatures high enough to burn away food soils in the oven. Follow these instructions for safe operation. Ŷ ,I WKH VHOI FOHDQLQJ PRGH PDOIXQFWLRQV WXUQ WKH Ŷ 'R QRW WRXFK RYHQ VXUIDFHV GXULQJ VHOI FOHDQ RSHUDWLRQ .HHS FKLOGUHQ DZD\ IURP WKH RYHQ GXULQJ oven off and disconnect the power supply.
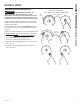
Operating the Cooktop Elements Graphics are representative; your control may have alternate graphic details. WARNING FIRE HAZARD: Never leave the range unattended with the cooktop on. Keep flammable items away from the cooktop. Turn off all controls when done cooking. Failure to follow these instructions can result in fire, serious injury or death. LED Lights Gray Arc Swipe Area Before using the cooktop for the first time, clean it with ceramic cooktop cleaner.
USING THE RANGE: 6XUIDFH 8QLWV 3UHFLVLRQ &RRNLQJ Surface Units (Cont.) Using the Warming Zone WARNING FOOD POISON HAZARD: Bacteria may grow in food at temperatures below 140°F. Ŷ Always start with hot food. Do not use warm setting to heat cold food. Ŷ Do not use warm setting for more than 2 hours. To turn off the WARMING ZONE: Press the WARMING ZONE pad. NOTE: &DQFHO 2II ZLOO 127 WXUQ RII WKH ZDUPLQJ ]RQH For best results, all foods on the WARMING ZONE should be covered with a lid or aluminum foil.
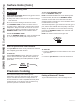
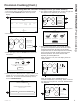
Use Precision Cooking with the Precision Cooktop Sensor (on some models) 1. The front left burner should be turned OFF to begin 2. Touch the TO COOKTOP banner at the top of the display. TO COOKTOP 6. For optimal cooking performance, choose the type that best matches the cookware you are using. COOKTOP 10:35 AM 10:35 AM For optimal performance, select material that best describes your cookware.
USING THE RANGE: Precision Cooking Precision Cooking (Cont.) To Use Two Burners in Sync for Large Cookware (on some models) 1. The front left burner should be turned OFF to begin 2. Touch the TO COOKTOP banner at the top of the display TO COOKTOP 10:35 AM OVEN Bake Broil Convection Precision Cooking Smart Home More GET CONNECTED 3.
Hestan Cue Cookware or Precision Probe (Cont.) 4. When prompted, touch the On/Off button of the desired burner. 10:35 AM SELECT BURNER Press On/O button on desired burner or press Sync Burners button to join the two left burners. CANCEL 9. Activate your Hestan Cue cookware or Precision Probe. Refer to the table for instructions for each device.
USING THE RANGE: Cookware for Induction Cooktop Cookware for Induction Cooktop Using the Correct Size Cookware Pans that are not ferrous or are too small will not allow the induction elements to turn on, and the ON indicator for that element location will flash for 25 seconds and then turn off. If a pan is removed from or not centered on the induction coil for more than 30 seconds, the power for that element will be shut off. For best performance, match the pan size to the element size.
Cookware Recommendations INCORRECT CORRECT Cookware not centered on cooking element surface. Cookware centered correctly on cooking element surface. Curved or warped pan bottoms or sides. Flat pan bottom. Pan does not meet the minimum size required for the cooking element used. Pan size meets or exceeds the recommended minimum size for the cooking element used. Pan bottom rests on cooktop trim or does not rest completely on the cooktop surface. Pan bottom rests completely on the cooktop surface.
USING THE RANGE: Oven Controls Oven Controls TO COOKTOP 10:35 AM OVEN Bake Broil Convection Smart Home More GET CONNECTED Bake Oven Light This option allows the user to access traditional the traditional bake mode. To turn on or off the oven cavity lights, press the . Both cavity lights will be illuminated if using a double oven. Broil Settings Broil can be selected to access Broil Low and Broil High. See the Cooking Modes section for more information. Press the to access the Settings.
There are numerous settings that are accessed by pressing in the top right corner of the main screen. 12:30 PM 12:30 PM SETTINGS SETTINGS Wi-Fi & REMOTE ENABLE SABBATH BLUETOOTH SOUND SET CLOCK DISPLAY LOCK CONTROL COOKING SABBATH SYSTEM Slide up and down to access all the settings Wi-Fi & Remote Enable This appliance is configurable to allow remote operation at any time. Do not store any flammable materials or temperature sensitive items inside or on top of this appliance.
USING THE RANGE: 6HWWLQJV 6DEEDWK Settings (Cont.) Bluetooth® Pairing To pair a new Bluetooth device: Connected features such as the Precision Cooking Probe and Chef Connect enabled products like an over-the-range microwave oven or range hood can be paired using the Bluetooth® feature. To pair those products to the range, press the Settings pad and select Bluetooth®. Select Pair and follow the corresponding instructions included with the mating Bluetooth® enabled product.
Sabbath mode disables the oven lights (the oven light will not turn on when the door is opened), all sounds (the control will not beep when the screen is pressed), Convection modes, Broil modes, Warm, Proof, and all time IXQFWLRQV 6DEEDWK PRGH FDQ RQO\ EH XVHG ZLWK WUDGLWLRQDO %DNH 7KLV IHDWXUH FRQIRUPV WR WKH 6WDU . -HZLVK 6DEEDWK requirements. NOTE: If a power outage occurs during when the oven is in Sabbath Mode, the unit will return to Sabbath Mode when power is restored.
USING THE RANGE: Oven Racks Oven Racks Recommended rack positions for various types of foods are provided in the Cooking Guide. Adjusting rack position is one way to impact cooking results. For example, if you would prefer darker tops on cakes, muffins, or cookies, try moving food one rack position higher. If you find foods are too brown on top try moving them down next time.
CAUTION Do not use any type of foil or oven liner to cover the oven bottom. These items can trap heat or melt, resulting in damage to the product and risk of shock, smoke or fire. Damage from improper use of these items is not covered by the product warranty. Foil may be used to catch spills by placing a sheet on a lower rack, several inches below the food. Do not use more IRLO WKDQ QHFHVVDU\ DQG QHYHU HQWLUHO\ FRYHU DQ RYHQ UDFN ZLWK DOXPLQXP IRLO .
USING THE RANGE: &RRNLQJ 0RGHV 2YHQ 'RRU &DPHUD 20 Cooking Modes (Cont.) Convection Modes Warm These modes utilize heat from the traditional upper and lower elements combined with the convection element and consistent airflow to enhance evenness. Your oven is equipped with Auto Recipe Conversion so that it automatically adjusts the amount of heat to maintain the proper temperature when using the modes with specified temperatures. Preheating is recommended for these modes.
WARNING Consuming undercooked food can result in foodborne illness. Use probe according to the following instructions to ensure all portions of the food reach minimum safe cooking temperatures. Recommendations for minimum safe food temperatures can be found at foodsafety.gov or IsItDoneYet.gov. Internal food temperature is frequently used as an indicator of doneness, especially for roasts and poultry.
CARE AND CLEANING: Cooking Guide Cooking Guide RECOMMENDED MODE(S) RECOMMENDED RACK POSITION(S) ADDITIONAL SUGGESTIONS Bake Bake Goods 3 Use shiny cookware. Bake Convection Bake 2 and 4 Use shiny cookware. Ensure adequate airflow (see illustration below). Chiffon cakes (angel food) Bake Bake Goods 1 Use shiny cookware. Cookies, biscuits, scones on a Single Rack Bake Bake Goods 3 Use shiny cookware. Convection Bake 2 and 4 2, 4, and 6 Use shiny cookware. Ensure adequate airflow.
Be sure all controls are off and all surfaces are cool before cleaning any part of the range. WARNING If your range is removed for cleaning, servicing or any reason, be sure the anti-tip device is reengaged properly when the range is replaced. Failure to take this precaution could result in tipping of the range and can result in death or serious burns to children or adults. Control Lockout If desired, the touch pads may be deactivated before cleaning.
CARE AND CLEANING: Range – Interior Range – Interior The interior of your new oven can be cleaned manually or by using Steam Clean or Self Clean modes. Spillage of marinades, fruit juices, tomato sauces and basting liquids containing acids may cause discoloration and should be wiped up immediately. Let hot surfaces cool, then clean and rinse. IMPORTANT: For models with Oven Camera in the door: If door glass is not clean, camera image clarity may be affected.
Oven Heating Elements Do not clean the bake element or the broil element. Any soil will burn off when the elements are heated. The bake element is not exposed and is under the oven floor. Clean the oven floor with warm, soapy water. Wipe up heavy soil on the oven bottom. Glass Cooktop Normal Daily Use Cleaning For models with Precision Cooktop Sensor on the left front element: ONLY use water and dish detergent on the Precision Cooktop Sensor. Do not use cream based cleaners.
CARE AND CLEANING: Glass Cooktop Glass Cooktop (Cont.) Heavy, Burned-On Residue For models with Precision Cooktop Sensor on the left front element: ONLY use non-scratch pads to clean the surface of the Precision Cooktop Sensor. DAMAGE to the sensor surface may occur if you use scrub pads that are abrasive. 1. Allow the cooktop to cool. 2. Use a single-edge razor blade scraper at approximately a 45° angle against the glass surface and scrape the soil.
The temperature probe may be cleaned with soap and water or a soap-filled scouring pad. Cool the temperature probe before cleaning. Scour stubborn spots with a soap-filled scouring pad, rinse and dry. To order additional temperature probes, see the Accessories and Consumer Support sections at the end of this manual. Ŷ Do not immerse the temperature probe in water. Ŷ Do not store the temperature probe in the oven. Ŷ Do not leave the temperature probe inside the oven during a self or steam clean cycle.
CARE AND CLEANING: 2YHQ /LJKW 2YHQ 'RRUV Oven Light (Cont.) Oven Light Replacement (on some models) To remove: 7XUQ WKH JODVV FRYHU FRXQWHUFORFNZLVH WXUQ XQWLO the tabs of the glass cover clear the grooves of the socket. Wearing latex gloves may offer a better grip. 2. Remove the bulb by turning it counter-clockwise. To replace: 1. Replace bulb with a new 40-watt appliance bulb. Insert the bulb and turn it clockwise until it is tight. 2.
The storage drawer is a good place to store cookware and bakeware. Do not store plastics or flammable material in the drawer. The storage drawer may be removed for cleaning under the range. Clean the storage drawer with a damp cloth or sponge. Never use harsh abrasives or scouring pads. Removing the Push to Open Storage Drawer: 1. Push the center of the drawer in and allow it to slide out. Replacing the Storage Drawer: Left drawer rail guide Right drawer rail guide 2.
TROUBLESHOOTING TIPS Troubleshooting tips ... Before you schedule service Save time and money! Review the charts on the following pages first and you may not need to schedule service. Problem Possible Cause What To Do Surface units do not work properly or flashing power setting. Improper cookware being used. Wrong pan type. Use a magnet to check that cookware is inductioncompatible. Use a flat induction-capable pan that meets the minimum size for the element being used.
Problem Possible Cause What To Do Oven does not work or appears not to work. Plug on range is not completely inserted in the electrical outlet. Make sure electrical plug is plugged into a live, properly grounded outlet. A fuse in your home may be blown or the circuit breaker tripped. Replace the fuse or reset the circuit breaker. Oven controls improperly set. See the Using the Oven section. Oven is in Sabbath Mode. 9HULI\ WKDW WKH RYHQ LV QRW LQ 6DEEDWK 0RGH 6HH WKH 6SHFLDO Features section.
TROUBLESHOOTING TIPS 32 Troubleshooting tips ... Before you schedule service Problem Possible Cause What To Do Display goes blank. A fuse in your home may be blown or the circuit breaker tripped. Replace the fuse or reset the circuit breaker. The clock is turned off. See the Special features section. Oven or cooktop will not stay set. Function error. Disconnect all power for at least 30 seconds and then reconnect power. If repeating, visit cafeappliances.com/ service.
Problem Possible Cause What To Do “Probe” appears in the display. This is reminding you to enter a probe temperature after plugging in the probe. Enter a probe temperature. Probe actual temperature is not stable while charger is inserted Electrical noise is impacting the signal. Probe should be charged before cooking. Do not leave probe plugged in while cooking. My precision probe JXSOUSV1 won't pair Existing precision probes are not compatible Connect a model compatible precision probe.
LIMITED WARRANTY Café Electric Range Limited Warranty cafeappliances.com All warranty service is provided by our Factory Service Centers, or an authorized service technician. To schedule service online, visit us at cafeappliances.com/service. Please have your serial number and your model number available when scheduling service. Servicing your appliance may require the use of the onboard data port for diagnostics.
Looking For Something More? Café offers a variety of accessories to improve your cooking and maintenance experiences! Refer to the Consumer Support page for website information.
CONSUMER SUPPORT Consumer Support Café Website Have a question or need assistance with your appliance? Try the Café website 24 hours a day, any day of the year! You can also shop for more great Café products and take advantage of all our on-line support services designed for your convenience. In the US: cafeappliances.
TM Manual del Propietario Cocinas de Inducción con Control Frontal Modelos: CHS900M and CHS90XM Contenido Información de Seguridad . . . . . . . . . . . . . . . . . . . . . . . .3 Uso de la Cocina Unidades de superficie . . . . . . . . . . . . . . . . . . . . . . . . . .7 Cocción de Precisión . . . . . . . . . . . . . . . . . . . . . . . . . . . .8 Utensilio para la Superficie de Cocción por Inducción .12 Controles del Horno . . . . . . . . . . . . . . . . . . . . . . . . . . . .
GRACIAS POR HACER QUE CAFÉ SEA PARTE DE SU HOGAR. Sentimos orgullo por el nivel de arte, innovación y diseño de cada uno de los electrodomésticos de Café, y creemos que usted también. Entre otras cosas, el registro de su electrodoméstico asegura que podamos entregarle información importante del producto y detalles de la garantía cuando los necesite. Registre su electrodoméstico Café ahora a través de Internet.
LEA TODAS LAS INSTRUCCIONES ANTES DE USAR ESTE ELECTRODOMÉSTICO ADVERTENCIA Lea todas las instrucciones antes de usar el producto. Si no se siguen estas instrucciones se podrán producir incendios, descargas eléctricas, lesiones graves o la muerte. DISPOSITIVO ANTI-VOLCADURAS ADVERTENCIA Riesgo de Caída • Un niño o adulto pueden volcar la cocina y morir. • Instale el soporte anti-volcaduras sobre la pared o el piso.
INFORMACIÓN DE SEGURIDAD INFORMACIÓN IMPORTANTE DE SEGURIDAD LEA TODAS LAS INSTRUCCIONES ANTES DE USAR ESTE ELECTRODOMÉSTICO ADVERTENCIA INSTRUCCIONES GENERALES DE SEGURIDAD (Cont.) Ŷ 1R XVH QLQJ~Q WLSR GH DOXPLQLR R FREHUWRU SDUD FXEULU el fondo del horno o cualquier parte del horno, excepto como se describe en este manual. Los cobertores de horno pueden atrapar el calor o derretirse, ocasionando daños sobre el producto y el riesgo de descargas, humo o incendios. Ŷ 7UDWH GH QR UD\DU R JROSHDU ODV SXHUW
LEA TODAS LAS INSTRUCCIONES ANTES DE USAR ESTE ELECTRODOMÉSTICO ADVERTENCIA INSTRUCCIONES DE SEGURIDAD DE LA SUPERFICIE DE COCCIÓN DE VIDRIO Ŷ Tenga cuidado al tocar la estufa. La superficie de vidrio de la estufa retendrá calor después de que los controles se hayan apagado. Ŷ No cocine sobre una estufa rota. Si la estufa se rompe, las soluciones de limpieza y los derrames pueden penetrar en la estufa rota y crear un riesgo de descarga eléctrica. Comuníquese con un técnico calificado de inmediato.
INFORMACIÓN DE SEGURIDAD INFORMACIÓN IMPORTANTE DE SEGURIDAD LEA TODAS LAS INSTRUCCIONES ANTES DE USAR ESTE ELECTRODOMÉSTICO ADVERTENCIA INSTRUCCIONES DE SEGURIDAD DEL HORNO CON LIMPIEZA AUTOMÁTICA La función de limpieza automática usa el horno en temperaturas lo suficientemente altas como para consumir la suciedad de comida que haya dentro del horno. Para un funcionamiento seguro, siga estas instrucciones. Ŷ 1R WRTXH ODV VXSHUILFLHV GHO KRUQR GXUDQWH HO FLFOR GH limpieza automática.
Uso de los Elementos de la Superficie de Cocción ADVERTENCIA RIESGO DE INCENDIO: Nunca pierda de vista la cocina cuando la estufa esté encendida. Mantenga los ítems inflamables alejados de la estufa. Apague todos los controles cuando finalice la cocción. Si no se siguen estas instrucciones se podrá producir incendios, lesiones graves o la muerte. Los gráficos son representativos; es posible que su control presente detalles gráficos alternativos.
USO DE LA COCINA: 8QLGDGHV GH VXSHUILFLH &RFFLyQ GH 3UHFLVLyQ 8 Unidades de superficie (Cont.) Uso del Área para Calentar ADVERTENCIA RIESGO DE ENVENENAMIENTO CON COMIDA: Se pueden desarrollar bacterias cuando la comida esté a una temperatura inferior a los 140º. Ŷ 6LHPSUH FRPLHQFH FRQ FRPLGD FDOLHQWH 1R XVH OD configuración caliente para calentar comida fría.
Use la función Precision Cooking (Cocción de Precisión) con la función Precision Cooktop Sensor (Sensor de Cocción de Precisión) (en algunos modelos). 1. El quemador frontal izquierdo se deberá apagar para comenzar. TO COOKTOP COOKTOP 10:35 AM Broil Convection 10:35 AM For optimal performance, select material that best describes your cookware. Warming Zone OVEN Bake 6. Para un rendimiento óptimo de la cocción, elija el tipo que mejor se adapte al utensilio que usará.
USO DE LA COCINA: Cocción de Precisión Unidades de superficie (Cont.) Para Usar Dos Quemadores Sincronizados para Utensilios Grandes (en algunos modelos) 1. El quemador frontal izquierdo se deberá apagar para comenzar. TO COOKTOP 10:35 AM OVEN Bake Broil Convection Precision Cooking Smart Home More GET CONNECTED 2. Presione el anuncio TO COOKTOP (Para la Superficie de Cocción) en la parte superior de la pantalla.
USO DE LA COCINA: Cocción de Precisión Cocción de Precisión (Cont.) Utensilio Hestan Cue o Sonda de Precisión (Cont.) 4. Cuando se indique, presione el botón On/Off (QFHQGHU Apagar) sobre el quemador deseado. 10:35 AM SELECT BURNER Press On/O button on desired burner or press Sync Burners button to join the two left burners. CANCEL 5. Si elije los quemadores traseros o el frontal derecho, la cocina buscará su accesorio inteligente emparejado. 6.
USO DE LA COCINA: Utensilios de Cocina para Cocción por Inducción Utensilios de Cocina para Cocción por Inducción Cómo usar el tamaño correcto de recipiente Las ollas que no son ferrosas o que son demasiado pequeñas no permitirán que los elementos de inducción se enciendan, y el indicador ON (Encender) para la ubicación de dicho elemento titilará durante 25 segundos y luego se apagará.
Recomendaciones sobre recipientes de cocción INCORRECTO CORRECTO El recipiente de cocción no está centrado en la superficie del elemento de cocción. El recipiente de cocción está centrado correctamente en la superficie del elemento de cocción. Bases o lados del recipiente de cocción curvados o torcidos. Base de recipiente plana. El recipiente no cumple con el tamaño mínimo requerido para el elemento de cocción utilizado.
USO DE LA COCINA: Controles del Horno Controles del Horno TO COOKTOP 10:35 AM OVEN Bake Broil Convection Precision Cooking Smart Home More GET CONNECTED Bake (Hornear) Settings (Configuraciones) Esta opción le permite al usuario acceder al modo de horneado tradicional. Presione para acceder a la función Settings (Configuraciones). Para más información, consulte la sección de Configuraciones.
Existen numerosas configuraciones que son accedidas presionando en la esquina superior derecha de la pantalla principal. 12:30 PM 12:30 PM SETTINGS SETTINGS Wi-Fi & REMOTE ENABLE SABBATH BLUETOOTH SOUND SET CLOCK DISPLAY LOCK CONTROL COOKING SABBATH SYSTEM Realice el deslizamiento hacia arriba y hacia abajo para acceder a todas las configuraciones Wi-Fi & Remote Enable (Wi-Fi y Acceso Remoto) Este electrodoméstico puede ser configurado para un funcionamiento remoto en cualquier momento.
USO DE LA COCINA: 6HWWLQJV &RQILJXUDFLRQHV 0RGR 6DEiWLFR Settings (Configuraciones) (Cont.) Emparejamiento de Bluetooth® Para emparejar el nuevo dispositivo Bluetooth: Las funciones conectadas tales como Precision Cooking Probe (Sonda para Cocción de Precisión) y los productos permitidos de Chef Connect tales como un horno microondas para uso sobre la cocina o una campana de cocina se podrán emparejar utilizando la función Bluetooth®. .
Settings (Configuraciones) (Cont.) Modo Sabático El modo sabático desactiva las luces del horno (la luz del horno no se encenderá cuando la puerta sea abierta), todos los sonidos (el control no emitirá un pitido cuando se presione la pantalla), los modos los modos de Convection (Convección), los modos de Broil (Asar), Warm (Calentar), Proof (Leudar), y todas las funciones de tiempo. El modo sabático sólo puede ser usado con la función tradicional de Bake (Hornear).
USO DE LA COCINA: Estantes del Horno Estantes del Horno El horno cuenta con seis posiciones de estantes. En la Guía de Cocción, se brindan recomendaciones de posiciones de los estantes para diferentes tipos de comidas. Se ajusta un estante en una dirección para afectar los resultados de cocción. Por ejemplo, si se prefieren partes superiores más oscuras en tartas, panecillos o galletas, pruebe moviendo la comida a un estante que se encuentre una posición más arriba.
PRECAUCIÓN No use ningún tipo de aluminio o cobertor de horno para cubrir el fondo del horno. Estos ítems pueden atrapar el calor o derretirse, ocasionando daños sobre el producto y el riesgo de descargas, humo o incendios. Los daños por uso inadecuado de estos ítems no están cubiertos por la garantía del producto. Se podrá usar aluminio para evitar derrames, colocando una hoja sobre un estante inferior varias pulgadas debajo de la comida.
USO DE LA COCINA: 0RGRV GH &RFFLyQ 9HQWLODFLRQHV GH $LUH GHO +RUQR 20 Modos de Cocción (Cont.) Modos de Convección Calentar Estos modos utilizan calor de los elementos tradicionales superior e inferior, combinados con el elemento de convección y un flujo de aire consistente para mejorar la uniformidad.
ADVERTENCIA El consumo de comida semicruda puede hacer que se contraigan enfermedades producidas por la comida. Use la sonda de acuerdo con las siguientes instrucciones, a fin de asegurar que todas las partes de la comida alcancen temperaturas de cocción mínimamente seguras. Puede encontrar recomendaciones de temperaturas de cocción mínimamente seguras en foodsafety.gov o en IsItDoneYet.gov.
USO DE LA COCINA: Guía de Cocción Guía de Cocción POSICIÓN(ES) DE ESTANTES RECOMENDADA SUGERENCIAS ADICIONALES Hornear Productos Horneados 3 Use utensilios brillantes. Hornear Horneado por Convección 2y4 Use utensilios brillantes. Asegúrese de que haya un flujo de aire adecuado (Vea la ilustración). Tortas de grasa (pastel de ángel) Hornear Productos Horneados 1 Use utensilios brillantes.
Asegúrese de que todos los controles estén apagados y que las superficies estén frías antes de limpiar cualquier parte de la cocina. ADVERTENCIA Si se quita la cocina para efectuar una limpieza, reparaciones o cualquier otra razón, verifique que el dispositivo anti-volcaduras se coloque de manera adecuada cuando vuelva a instalarse la cocina. Si no toma esta precaución, la cocina puede volcarse y provocar lesiones.
CUIDADO Y LIMPIEZA: Cocina - Interior Cocina - Interior El interior de su nuevo horno puede ser limpiado de forma manual o utilizando los modos Steam Clean (Limpieza con Vapor) o Self Clean (Limpieza Automática). El derrame de adobo, jugos de fruta, salsas de tomate y líquidos para humedecer que contengan ácidos pueden ocasionar descoloración y se deberán limpiar de inmediato. Espere a que las superficies calientes se enfríen, y luego limpie y enjuague.
Cocina - Interior (Cont.) Elementos calentadores del horno Placa de Cocción de Vidrio Limpie con un paño los desechos rebeldes acumulados en el piso del horno. Limpieza normal de uso diario Para los modelos con Sensor de la Superficie de Cocción de Precisión sobre el elemento frontal izquierdo: SÓLO use agua y detergentes para platos sobre el Sensor de la Superficie de Cocción de Precisión. No use limpiadores a base de crema.
CUIDADO Y LIMPIEZA: Placa de Cocción de Vidrio Placa de Cocción de Vidrio (Cont.) Sensor de la Superficie de Cocción de Precisión 1. Espere a que la superficie de cocción se enfríe. 2. Aplique agua y jabón sobre una esponja no abrasiva y esparza éstas sobre cualquier residuo que se encuentre en el sensor. 3. Utilizando la esponja, frote el área residual aplicando la presión necesaria. 4. Si queda algún residuo, repita los pasos que figuran más arriba según sea necesario 5.
La sonda de temperatura se puede limpiar con agua y jabón o con una almohadilla de estropajo llena de jabón. Enfríe la sonda de temperatura antes de su limpieza. Fregue las manchas difíciles con una almohadilla de estropajo llena de jabón, enjuague y seque. Para ordenar sondas de temperatura adicionales, consulte las secciones de Accesorios y Soporte al Consumidor al final de este manual. Ŷ No sumerja la sonda de temperatura en agua.
CUIDADO Y LIMPIEZA: Luz del Horno Puerta del Horno Luz del Horno (Cont.) Reemplazo de la bombilla del horno (en algunos modelos) Para quitar la tapa: 1. Dé a la tapa de vidrio un cuarto de giro en contra de las agujas del reloj hasta que las lengüetas de la tapa de vidrio limpien las ranuras de la ficha. Si usa guantes de látex tendrá un mejor agarre. 2. Retire la lámpara girando la misma en dirección contraria a las agujas del reloj. Para volver a colocar la tapa: 1.
El cajón de almacenamiento es un buen lugar para guardar utensilios de cocina y panadería. No guarde plásticos ni materiales inflamables en el cajón. El cajón de almacenamiento se podrá retirar para limpiar debajo de la cocina. Limpie el cajón de almacenamiento con una tela o esponja húmeda. Nunca use abrasivos duros ni almohadillas para fregar. Retire el Elemento de Empuje para Abrir el Cajón de Almacenamiento: 1. Empuje el centro del cajón hacia adentro y deje que el mismo se deslice hacia afuera.
CONSEJOS PARA LA SOLUCIÓN DE PROBLEMAS Consejos para la Solución de Problemas... Antes de solicitar el servicio técnico ¡Ahorre tiempo y dinero! Primero revise los cuadros que aparecen en las siguientes páginas y es posible que no necesite solicitar reparaciones. Problema Causa Posible Qué Hacer Las unidades de superficie no funcionan bien o destella la configuración de energía. Se están utilizando recipientes de cocción inadecuados. Recipiente incorrecto.
Problema Causa Posible Qué Hacer El horno no funciona o parece no funcionar. El enchufe de la cocina no está introducido del todo en el tomacorriente. Verifique que el enchufe eléctrico esté conectado a un tomacorriente con tensión y adecuada conexión a tierra. Es posible que un fusible de su hogar se haya quemado o que el disyuntor se haya desconectado. Reemplace el fusible o reinicie el disyuntor. Controles del horno configurados de forma incorrecta. Consulte la sección Uso del Horno.
CONSEJOS PARA LA SOLUCIÓN DE PROBLEMAS 32 Consejos para la Solución de Problemas... Antes de solicitar el servicio técnico Problema Causa Posible Qué Hacer La pantalla queda en blanco. Es posible que un fusible de su hogar se haya quemado o que el disyuntor se haya desconectado. Reemplace el fusible o reinicie el disyuntor. El reloj está apagado. Consulte la sección Funciones Especiales. El horno o la placa de cocción no permanecerán configurados. Error de función.
Problema Causa Posible Qué Hacer “Probe” (Sonda) aparece en la pantalla. Esto le está recordando que debe ingresar una temperatura de sonda luego de enchufar la misma. Ingrese una temperatura de sonda. La temperatura actual de la sonda no es estable mientras el cargador se encuentra insertado. El ruido eléctrico está afectando la señal. La sonda deberá ser cargada antes de la cocción. No deje la sonda desenchufada mientras esté cocinado.
GARANTÍA LIMITADA Garantía Limitada de la Cocina Eléctrica de Café cafeappliances.com Todo el servicio de garantía es provisto por nuestros Centros de Servicio de Fabricación, o un técnico de servicio autorizado. Para programar una visita del servicio técnico a través de Internet, visítenos en cafeappliances.com/service. Tenga listo el número de serie y número de modelo cuando programe el servicio.
¿Busca Algo Más? ¡Café ofrece una variedad de accesorios para mejorar sus experiencias de cocción y mantenimiento! Consulte la página de Apoyo al Consumidor para información sobre la página web.
SOPORTE PARA EL CONSUMIDOR Soporte para el Consumidor Sitio Web de Café ¿Desea realizar una consulta o necesita ayuda con su electrodoméstico? ¡Intente a través del sitio web de Café las 24 horas del día, cualquier día del año! Usted también puede comprar más electrodomésticos maravillosos de Café y aprovechar todos nuestros servicios de soporte a través de Internet, diseñados para su conveniencia. En EE.UU.: cafeappliances.