
Installation Instructions

31-2000356 Rev.1 7
Flush Mount Installation Preparation
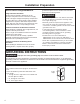
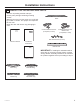
PREPARE THE INTERIOR
Cut and install side cleats:
• Cut side wood cleats to height of cabinet opening
and approx. 2-1/2” in depth. Install, on each side,
Dim. E from the front face of the cabinet.
Cut and install bottom cleat:
• Cut bottom wood cleat to a height of 1-1/8”, a depth
of the cabinet minus Dim. E and a width of 25-1/4”
to fit between side cleats. Install onto the cabinet
floor between the side cleats, push it all the way
back against cabinet wall and make sure its front face
aligns with the front faces of the side cleats (Dim. E
gap from the front cabinet face).
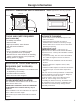
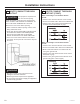
PREPARE THE OPENING
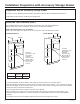
The Advantium Built-In Oven can be installed
in combination with other Advantium Built-In
ovens. Always follow each product’s Installation
Instructions to complete the installation.
Single Advantium Built-In Oven
Installation:
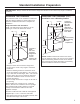
Cut the opening in a cabinet to the dimensions
shown.
**20 1/2”
Construct
solid bottom
- Min. 3/8”
plywood
supported on
all four sides.
Must be able to
support weight
of oven and
contents.
36-3/4”
Min.
F *
23-1/2” min.
• The support must be level and rigidly mounted,
flush with the bottom edge of the cutout.
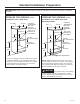
Approved Flush Installation
Dimension F
1/8” Reveal 1/4” Reveal
Single Advantium 30” 30-
1
/4”
Over Warming Drawer 30” 30-
1
/4”
Over Oven
30” 30-
1
/4”
Over Oven and Warming Drawer
30” 30-
1
/4”
** Top and bottom reveals are set to
1
/8”.
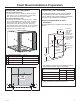
TOP
VIEW
Front Face of Cabinet
EE
A A
C
D
A Side and top cleats depth 2-1/2” min.
B Bottom cleat height 1-1/8”
C Bottom cleat depth Cabinet depth minus Dim. E
D Bottom cleat width 25-1/4”
E All four cleats inset depth 1-1/4”
E
C
B
D
A
A
Oven or
warming
drawer
2” min. (3”
recommended)
Per appliance
specs.