
Installation Instructions

8 31-2000356 Rev. 1
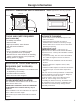
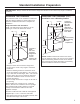
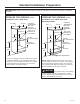
Installation Preparation with Accessory Storage Drawer
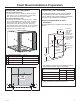
PREPARE THE OPENING (cont.)
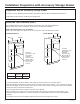
The Advantium Built-In Oven can be installed in combination with other Built-In Appliances.
Always follow each product’s Installation Instructions to complete the installation.
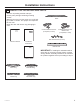
Single Advantium Built-In Oven Installation:
Order a 30Ǝ wide single oven cabinet or cut the opening in a wall to the dimensions shown.
Preparation with an Accessory Storage Drawer
As needed, see the Standard Mount Installation Preparation OR Flush Mount Installation Preparation for
configuration details. Note the modified cutout height below.
• For flush installation, make the bottom cleat height 3/4” when installed over a storage drawer.
$OORZWKHIROORZLQJFOHDUDQFHVDURXQGWKHFXWRXWRQWKHIURQWVXUIDFHRIWKHFDELQHWí´IURPWKHWRSí´
from the side edges, and 3/4” from the bottom. (Note: these refer to minimum clearances required for installation
and do not reflect actual product dimensions.)
• Oven overlaps will conceal cut edges on all sides of the opening.
• When installed over a single oven or a warming drawer, allow at least 2Ǝ between the two openings. This
separation will provide clearance for bottom overlap of the Advantium Built-In Oven and the other appliance
overlaps.
• The support must be level and rigidly mounted, flush with the bottom edge of the cutout.
23-1/2Ǝ
K*
23-5/8Ǝ
36-3/4Ǝ
Min.
Construct
solid bottom - Min.
3/8” plywood
supported
on all four sides.
Must be able to
support weight
of oven and
contents.
Dimension 1/8”
Reveal
1/4”
Reveal
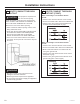
K 30” 30-1/4”
FLUSH MOUNT:
30Ǝ
23-1/2Ǝ
25-1/4Ǝ
Min.
21Ǝ
36-3/4Ǝ
Min.
Construct
solid bottom - Min.
3/8” plywood
supported
on all four sides.
Must be able to
support weight
of oven and
contents.
STANDARD MOUNT: