Owner’s Manual
TM Owner’s Manual & Installation Instructions Electric Warming Drawer Model: CTW900M and CTW900P Contents Safety Information . . . . . . . . . . . . . . . . . . . . . . . . . . . . . . .3 Installation Instructions . . . . . . . . . . . . . . . . . . . . . . . . .10 Using the Warming Drawer Features . . . . . . . . . . . . . . . . . . . . . . . . . . . . . . . . . . . . . .5 Operating Tips . . . . . . . . . . . . . . . . . . . . . . . . . . . . . . . . .6 Troubleshooting Tips . . . . . . . . . . . . . .
THANK YOU FOR MAKING CAFÉ A PART OF YOUR HOME. We take pride in the craftsmanship, innovation and design that goes into every Café product, and we think you will too. Among other things, registration of your appliance ensures that we can deliver important product information and warranty details when you need them. Register your Café appliance now online. Helpful websites are available in the Consumer Support section of this Owner’s Manual.
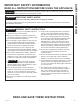
READ ALL INSTRUCTIONS BEFORE USING THE APPLIANCE WARNING Read all safety instructions before using the product. Failure to follow these instructions may result in fire, electrical shock, serious injury or death. WARNING IMPORTANT SAFETY NOTICE All warming drawers can tip and injury could result if not properly installed. To prevent accidental tipping of the warming drawer, attach it to the wall with an anti-tip brace as described in the Installation Instructions.
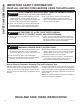
SAFETY INFORMATION IMPORTANT SAFETY INFORMATION READ ALL INSTRUCTIONS BEFORE USING THE APPLIANCE WARNING KEEP FLAMMABLE MATERIALS AWAY FROM THE WARMING DRAWER Failure to do so may result in fire or personal injury. Ŷ 'R QRW VWRUH RU XVH IODPPDEOH PDWHULDOV LQ RU QHDU a warming drawer, including paper, plastic, pot holders, linens, wall coverings, curtains, drapes and gasoline or other flammable vapors and liquids.
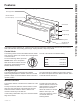
1RW DOO IHDWXUHV DUH RQ DOO PRGHOV $SSHDUDQFH PD\ YDU\ Warming Drawer Moisture Selector (on back of panel) &RQWURO .QRE 21 2)) 6ZLWFK 21 6LJQDO /LJKW Rating Plate 21 6LJQDO /LJKW 9LHZHU /HQV The warming drawer will keep hot, cooked foods at serving temperature. Always start with hot food. Do not use to heat cold food other than proofing yeast dough, crisping crackers, chips or dry cereal. Control Knob The warming drawer controls are hidden with the drawer shut. Open the drawer.
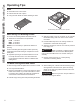
USING THE WARMING DRAWER: Operating Tips Operating Tips Rack Ŷ 5DFN ZLOO ILW IURP IURQW WR EDFN Ŷ 3UHKHDW ZLWK WKH UDFN LQ SODFH Ŷ 8VLQJ WKH UDFN DOORZV IRU GRXEOH VWDFNLQJ RI LWHPV Double stacking items with the rack in position. When Using The Warming Drawer Do not line the warming drawer with aluminum foil. Ŷ $OORZ WLPH IRU WKH GUDZHU WR EH SUHKHDWHG LOW 8 minutes MED 15 minutes HIGH 20 minutes NOTE: It is not necessary to preheat the drawer for proofing.
To Proof Yeast Bread Dough Yeast dough can be proofed in the warming drawer. Ŷ 3ODFH \RXU GLVK RQ WKH ZDUPLQJ GUDZHU ERWWRP Ŷ < RX PXVW DOZD\V WXUQ WKH FRQWURO NQRE WR LOW then immediately back to PROOF. Ŷ &ORVH WKH YHQW Ŷ / LJKWO\ RLO WKH WRS RI WKH GRXJK LQ D ERZO ODUJH HQRXJK to double the dough size. Cover with a cloth. Mo Clo ist se Ven d t Ŷ 3UHKHDWLQJ QRW UHTXLUHG IRU SURRILQJ Ŷ & KHFN WKH GRXJK KHLJKW LQ PLQXWHV $GG WLPH DV needed.
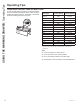
USING THE WARMING DRAWER: Operating Tips 8 Operating Tips Temperature Selection Chart for Moist Foods To keep several different foods hot, set the temperature to the food needing the highest setting. Place the items needing the highest setting on the bottom of the drawer and items needing less heat on the rack.
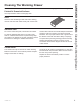
%H VXUH WKH FRQWUROV DUH LQ WKH 2)) SRVLWLRQ DQG DOO VXUIDFHV DUH FRRO EHIRUH FOHDQLQJ DQ\ SDUW RI WKH ZDUPLQJ GUDZHU Painted Or Enameled Surfaces 8VH VRDS DQG ZDUP ZDWHU WR WKRURXJKO\ FOHDQ Rack Clean the rack with detergent and water. After cleaning, rinse the rack with clean water and dry with a clean cloth. Stainless Steel Do not use a steel wool pad; it will scratch the surface. To clean the stainless steel surface, use warm sudsy water or a stainless steel cleaner or polish.
INSTALLATION INSTRUCTIONS Installation Instructions Warming Drawer PKW7000 and PTW9000 If you have questions visit our website at: cafeappliances.com In Canada: cafeappliances.ca BEFORE YOU BEGIN MATERIALS YOU WILL NEED Read these instructions completely and carefully. Ŷ IMPORTANT – Save these instructions for local inspector’s use. Ŷ IMPORTANT – Observe all governing 2 x 4 or 2 x 2 lumber for runners and brace codes and ordinances.
IMPORTANT SAFETY INSTRUCTIONS GROUNDING INSTRUCTIONS IMPORTANT—(Please read carefully) FOR PERSONAL SAFETY, THIS APPLIANCE MUST BE PROPERLY GROUNDED. This warming drawer must be supplied with 120V, 60Hz, and connected to an individual, properly grounded branch circuit, and protected by a 15 or 20 amp circuit breaker or time delay fuse. Recessed receptacle 7" max.
INSTALLATION INSTRUCTIONS Installation Instructions PREPARING CABINET: BELOW A COUNTERTOP Install 2x4 or 2x2 anti-tip block against rear cabinet wall 9” from floor to bottom of block Electrical outlet flush with side of cabinet 7" max. Electrical outlet 42" max. from right side 11/2” Cabinet top 25" 7" Install a solid barrier below D FRRNWRS VHH 1RWH 1" Min.* 36" Countertop height 9" 91/4” Electrical outlet 16” max. from left side Solid barrier 1/4” Air gap Dimension A 231/2” Min.
PREPARING CABINET: BELOW WALL OVENS INSTALLATION BELOW A SINGLE OVEN 23 1/2” Min. 2x2 or 2x4 anti-tip block against rear wall 9” from floor to bottom of block NOTE: Additional clearance between cutouts may be required. Check to be sure that oven supports above the warming drawer location do not obstruct the required interior 23 1/2” depth and 9 1/4” height. Oven cutout 2" Min.
INSTALLATION INSTRUCTIONS Installation Instructions INSTALLING CABINET SUPPORT 2" x 4" or equivalent runners 2" x 4" or equivalent runners 231/2” 231/2” 22" 27" IMPORTANT: When installed below a single or double oven, check to be sure that any oven supports above the cutout do not obstruct the 23 1/2” required depth of the warming drawer cutout. Ŷ A 2" minimum clearance between oven and warming drawer cutouts are required.
INSTALLING WARMING DRAWER 1. Slide the left corner into opening and push power cord into the hole leading to the outlet location. Thread the cord through as drawer is being pushed back into the opening. If the outlet is installed inside the opening, plug the cord into the outlet. In this location, the excess power cord should be coiled and taped to the right side of the unit. Make sure the cord does not get trapped by the drawer.
TROUBLESHOOTING TIPS 16 Troubleshooting tips ... %HIRUH \RX VFKHGXOH VHUYLFH Save time and money! Review the charts on the following pages first and you may not need to schedule service. Problem Possible Cause What To Do Warming drawer will not work A fuse in your home may be blown or the circuit breaker tripped. Replace the fuse or reset the circuit breaker. Warming drawer not plugged in. Plug in. Controls improperly set.
cafeappliances.com All warranty service is provided by our Factory Service Centers, or an authorized service technician. To schedule service online, visit us at cafeappliances.com/service. Please have your serial number and your model number available when scheduling service. Servicing your appliance may require the use of the onboard data port for diagnostics.
LIMITED WARRANTY Mabe Electric Warming Drawer Limited Warranty For the period of Mabe will replace One year From the date of the original purchase Any part of the warming drawer which fails due to a defect in materials or workmanship. During this limited one-year warranty, Mabe will provide, free of charge, all labor and in-home service to replace the defective part. What Mabe will not cover: Ŷ Service trips to your home to teach you how to use Ŷ Ŷ Ŷ Ŷ the product.
Looking For Something More? GE Appliances offers a variety of accessories to improve your cooking and maintenance experiences! Refer to the Consumer Support page for phone numbers and website information. The following products and more are available: Accessories ´ :LGH &XVWRP 3DQHO .LW ACCESSORIES Accessories ´ :LGH &XVWRP 3DQHO .LW ´ 0RQRJUDP 3UR 3DQHO .
CONSUMER SUPPORT Consumer Support Café Website Have a question or need assistance with your appliance? Try the Café website 24 hours a day, any day of the year! You can also shop for more great Café products and take advantage of all our on-line support services designed for \RXU FRQYHQLHQFH ,Q WKH 86 cafeappliances.