Owner’s Manual & Installation Instructions Vented Range Hoods Models: CVW9301 and CVW9361 Contents Safety Information. . . . . . . . . . . . . . . . . . . . . . . . . . . . . . . 3 Installation Instructions. . . . . . . . . . . . . . . . . . . . . . . . . . 8 Using the Hood Controls . . . . . . . . . . . . . . . . . . . . . . . . . . . . . . . . . . . . . . 5 Troubleshooting Tips. . . . . . . . . . . . . . . . . . . . . . . . . . . 20 Care And Cleaning Filter. . . . . . . . . . . . . . . . . . . . . .
THANK YOU FOR MAKING CAFÉ A PART OF YOUR HOME. We take pride in the craftsmanship, innovation and design that goes into every CAFÉ product, and we think you will too. Among other things, registration of your appliance ensures that we can deliver important product information and warranty details when you need them. Register your CAFÉ appliance now online. Helpful websites are available in the Consumer Support section of this Owner’s Manual.
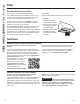
WARNING TO REDUCE THE RISK OF FIRE, WARNING TO REDUCE THE RISK OF INJURY ELECTRIC SHOCK OR INJURY TO PERSONS, OBSERVE THE FOLLOWING: TO PERSONS IN THE EVENT OF A RANGE TOP GREASE FIRE, OBSERVE THE FOLLOWING*: A. U se this unit only in the manner intended by the manufacturer. If you have questions, contact the manufacturer. A. S MOTHER FLAMES with a close-fitting lid, cookie sheet or metal tray, then turn off the burner. BE CAREFUL TO PREVENT BURNS.
SAFETY INFORMATION IMPORTANT SAFETY INFORMATION READ ALL INSTRUCTIONS BEFORE USING WARNING TO REDUCE THE RISK OF FIRE, ELECTRIC SHOCK OR INJURY TO PERSONS, OBSERVE THE FOLLOWING: A. I nstallation work and electrical wiring must be done by qualified person(s) in accordance with all applicable codes and standards, including fire-rated construction. WARNING TO REDUCE THE RISK OF FIRE, USE ONLY METAL DUCTWORK.
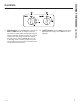
Throughout this manual, features and appearance may vary from your model. 1 1. FAN Control: Turn the FAN speed control to LO, MED LO, MED HI or HI, as needed. Continuous use of the fan system while cooking helps keep the kitchen comfortable and less humid. It also reduces cooking odors and soiling moisture that create a frequent need for cleaning. NOTE: When the fan is operating on the LO setting, it will be very quiet. Always make sure that the fan is turned OFF when you are finished in the kitchen.
CARE AND CLEANING: Filter / Surfaces Filter Be sure the circuit breaker is off and all surfaces are cool before cleaning or servicing any part of the vent hood. Reusable Metal Grease Filters The hood has 2 metal reusable grease filters. To remove: The metal filters trap grease released by foods on the cooktop. They also help prevent flaming foods on the cooktop from damaging the inside of the hood. Grasp the filter handle and pull it up, forward and out.
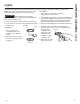
Be sure electrical power is off and all surfaces are cool before cleaning or servicing any part of the vent hood. NOTE: The glass cover should be removed only when cold. Wearing latex gloves may offer a better grip. CAUTION Before replacing your light bulb, disconnect the electrical power to the hood at the main fuse or circuit breaker panel. Be sure to let the light cover and bulb cool completely. For your safety, do not touch a hot bulb with bare hands or a damp cloth. Receptacle To remove: Socket 1.
INSTALLATION INSTRUCTIONS Installation Instructions Range Hoods If you have questions, visit our website at: cafeappliances.com BEFORE YOU BEGIN Read these instructions completely and carefully. IMPORTANT — Save these • instructions for local inspector’s use. IMPORTANT — Observe all governing • codes and ordinances. • Note to Installer – Be sure to leave these instructions with the Consumer. • Note to Consumer – Keep these instructions for future reference.
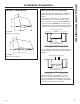
PRODUCT DIMENSIONS INSTALLATION CLEARANCES These vent hoods are designed to be installed onto a wall. They may be installed beneath a soffit or cabinet. 12” • The hoods are designed to fit 12” deep cabinets. When installed onto 15” deep cabinets, a filler panel accessory is available: Order JXS50SS for 30” wide hoods or JXS56SS for 36” wide hoods. 18” • Install these hoods 24” required minimum and 36” recommended maximum above the cooking space. 21” 29-7/8” 30” Models Requires a 30” opening.
INSTALLATION PREPARATION Installation Preparation OPTIONAL ACCESSORIES ADVANCE PLANNING Duct Cover Duct Install Planning A decorative duct cover is available to accommodate 8 to 10 ft. ceiling heights. The duct cover will expand from 12” minimum or 24” to 36” maximum height. • This hood may be vented vertically through upper cabinets, soffit or ceiling. A duct transition piece is supplied for vertical exhaust. Use locally supplied elbows to vent horizontally through the rear wall.
DECORATIVE DUCT COVERS A decorative duct cover is available to fit both model widths. The duct cover conceals the ductwork running from the top of the hood to the ceiling or soffit. The duct cover will fit 8 ft. to 10 ft. ceiling heights. See page 13 for details. POWER SUPPLY IMPORTANT – (Please read carefully) WARNING FOR PERSONAL SAFETY, THIS APPLIANCE MUST BE PROPERLY GROUNDED. Remove house fuse or open circuit breaker before beginning installation.
INSTALLATION PREPARATION Installation Preparation TOOLS AND MATERIALS REQUIRED (NOT SUPPLIED) Pencil and tape measure Phillips and Flat blade screwdrivers REMOVE THE PACKAGING Duct tape Hood Wood Mounting Support 1/4” pivoting hex socket Motor Parts Package Shipping Carton Electric drill with 1/8” and 3/8” bits Safety glasses Spirit level UL Listed Wire nuts Flashlight Wire Nuts Hammer Pliers •R emove the small box housing the motor. • Lift the hood out of the box.
PARTS PROVIDED Locate the hardware accessory box packed with the hood and check contents. Screws, wall fasteners, washers 2 Aluminum Grease Filters 761Dia65 DUCT COVER REQUIREMENTS We recommend that the vent hood and decorative duct cover (if used) be on site before final framing and wall finishing. This will help to accurately locate studs, ductwork, and electrical service. Read these instructions to determine if the duct cover accessory can be used for your installation situation.
INSTALLATION PREPARATION Installation Preparation DETERMINE HOOD, DUCTWORK AND WIRING LOCATIONS •K eep the wood support piece and its screws for later installation. Do not discard. • Measure desired distance from the bottom of the hood to the cooking surface, 24” required minimum and 36” recommended maximum. Refer to the previous page if the accessory duct cover will be used. • Use a level to draw a horizontal line indicating the bottom of the hood.
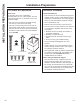
1 I NSTALL HOOD SUPPORT IMPORTANT: Framing must be capable of supporting 100 lbs. 2 I NSTALL TRANSITION •L ocate at least 2 vertical studs at the wood mounting location by tapping drywall with a hammer or use a stud finder. IMPORTANT: Remove shipping tape from damper and check that damper moves freely. •C enter the supplied wood horizontal support, left to right, and below the marked line. •P lace the transition piece over the hood exhaust. Secure transition to hood with 4 screws provided.
INSTALLATION INSTRUCTIONS Installation Instructions 4 ( Alternate Mounting Method) INSTALL HOOD TO SOFFIT OR BENEATH CABINETS SKIP THIS STEP IF USING WALL MOUNTING METHOD IMPORTANT: For additional support and to minimize vibration during operation, we strongly recommend that the hood also be secured to the back wall with wall fasteners. 30” Models 2-9/16” IMPORTANT: Soffit framing must be capable of supporting 100 lbs. When necessary the hood may be installed so that it is supported by the soffit.
5 I NSTALL CEILING BRACKET 6 C ONNECT DUCTWORK The ceiling bracket must be installed when the duct cover is used to span 24” or more height above the hood. The bracket will hold the decorative duct cover in place at the top. •P ush duct over the end of the transition until it reaches the stop tabs. NOTE: The ceiling bracket is not required when using only the 12” section of the duct cover. • Secure joints in ductwork with sheet metal screws.
INSTALLATION INSTRUCTIONS Installation Instructions 7 I NSTALL MOTOR •A lign and engage the slots in the blower assembly to the 3 hooks at the rear of the exhaust opening. •R otate motor upwards until it aligns with the attachment screw location. Motor Attachment Bracket 9 I NSTALL DUCT COVERS To install the 12” duct cover alone: •P lace the 12” section of the decorative duct cover on top of the hood. •S ecure the cover on the top of the hood with 4 screws provided.
11 I NSTALL FILTERS • Remove protective film covering the filters. • I nsert the filter into the “C” clips mounted to the top of the vertical front panel. •T ap the filter against one side to align with outside opening. •P ull the filter down into the lower slots at the bottom of the filter support. Junction Box “C” Clip Filters 12 F INALIZE INSTALLATION • Refer to the operating instructions to test all controls.
TROUBLESHOOTING TIPS 20 Troubleshooting tips ... Before you schedule service Save time and money! Review the charts on the following pages first and you may not need to schedule service. Problem Possible Cause What To Do Fan does not operate when the switch is on A fuse may be blown or a circuit breaker tripped. Replace fuse or reset circuit breaker. The blower connector is loose or not plugged into its mating connector. Disconnect power to the unit. Remove the filters and look up at the blower.
Notes 49-2000061 21
LIMITED WARRANTY CAFÉ Vented Range Hood Limited Warranty cafeappliances.com All warranty service is provided by our Factory Service Centers, or an authorized service technician. To schedule service online, visit us at cafeappliances.com/service. Please have your serial number and your model number available when scheduling service. Servicing your appliance may require the use of the onboard data port for diagnostics.
Looking For Something More? CAFÉ offers a variety of accessories to improve your cooking and maintenance experiences! Refer to the Consumer Support page for website information.
CONSUMER SUPPORT Consumer Support CAFÉ Website Have a question or need assistance with your appliance? Try the CAFÉ website 24 hours a day, any day of the year! You can also shop for more great CAFÉ products and take advantage of all our on-line support services designed for your convenience. In the US: cafeappliances.