
Instructions / Assembly


FOR WARRANTY ISSUES OR QUESTIONS, CONTACT CAHABA AT (205) 702-9101.
2020 CAHABA. ALL RIGHTS RESERVED.
2
30 IN. TILE INSERT LINEAR SHOWER DRAIN
Installation Instructions
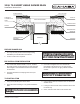
STANDARD 2”
CLAMPING FLOOR
DRAIN
MORTAR
OPTIONAL ADAPTER
(INCLUDED)
DRAIN BODY
LINEAR DRAIN ASSEMBLY
FLEXIBLE SEALANT
THINSET MORTAR
FLOOR TILE
WATERPROOFING
MEMBRANE
SUBFLOOR
MIN. 1-2% SLOPE
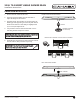
PREPARE SHOWER PAN
1. Pre-slope shower pan and install waterproong
membrane per manufacturers instructions.
2. Perform a leak test as required.
PRE-INSTALLATION PREPARATION
1. The Linear Drain channel width is 3-3/16”. Conrm
the rough opening is approximately 2” wider than the
drain length to accommodate backer board and wall
tile thickness.
2. Install the Standard 2” Clamping Floor Drain (not
included).
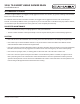
TILE INSTALLATION
1. Using mortar, build up the shower base.
2. Slope the mortar creating a 1-2% grade towards the
drain.
IMPORTANT: Allow the mortar to cure overnight before IMPORTANT: Allow the mortar to cure overnight before
installing tiles.installing tiles.
IMPORTANT: Any waterproong membrane material IMPORTANT: Any waterproong membrane material
or procedure can be used: vinyl, CPE membrane, roll or or procedure can be used: vinyl, CPE membrane, roll or
paint on, metal pan, hot mop, surface sheet membrane.paint on, metal pan, hot mop, surface sheet membrane.
3. Cut a 2x4 to length for use as a Linear Drain
placeholder. This allows for a 1/8” gap around
the channel’s perimeter to apply a bead of flexible
sealant.
NOTE: Channel depths are 1.25” for the Tile Insert NOTE: Channel depths are 1.25” for the Tile Insert
Linear Drain and .78” for the Grate Linear Drains.Linear Drain and .78” for the Grate Linear Drains.
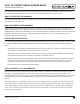
3. Using a thinset mortar, install the floor tile and entire
shower alcove.
4. If using Tile Insert Linear Drain, install the tile into the
tile insert tray.
5. Grout, clean and seal all tile in the shower area.