
Warranty
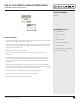


FOR WARRANTY ISSUES OR QUESTIONS, CONTACT CAHABA AT (866) 837-2550.
©2017 CAHABA. ALL RIGHTS RESERVED.
6
5X5 IN. TILE INSERT LINEAR SHOWER DRAIN
Installation Instructions
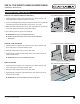
INSTALL FLASHING
1. Lift out ashing. Remove tape, leaving tape over drain hole only. Apply
a 1/8” continuous bead of sealant around chamfer on base ange and
another bead in groove on drain base (N).
2. Apply latex-modied thin-set to mortar bed, walls and curb as needed.
Apply sealant to any preformed corners.
3. Align membrane and rmly press all areas of membrane into adhesive
on walls, oor, curb and sealant on drain base and any pre-formed
corners.
4. Fasten Flashing by nailing through top 1” of ashing to studs and/or
blocking (O).
5. Install clamping collar. Align collar with drain base under ashing.
Press rmly. Starting at one end, insert 5/8” screw through collar, punch
through ashing and screw into base. Repeat for all screws. Do not
over-tighten (O).
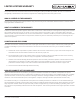
6. Cut Out Flashing. With a razor knife, carefully trim out ashing from
center of collar. Remove tape from drain hole (P).
X CAUTION: Do not puncture flashing outside of collar.
COMPLETE WATERPROOFING
1. Complete installation of bonded waterproong membrane (ANSI
A118.10) on shower oor. Any waterproong membrane material or
procedure can be used (vinyl, CPE membrane, roll/paint on, metal pan,
hot mop, surface Sheet Membrane, etc.).
2. Flood test as required by local codes.
3. Install Backer Board and Wall Waterproong: Install 1/2” backer board
and wall waterproong according to manufacturer’s instructions, local
plumbing codes and TCNA guidelines.
X NOTE: TCNA guidelines require waterproong or a vapor membrane be
installed on all walls.
X CAUTION: Do not puncture flashing.
(N) APPLY SEALANT
(O) FASTEN AND INSTALL CLAMPING COLLAR
(P) TRIM OUT FLASHING FROM COLLAR