
Specifications

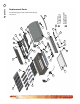

Convection Grills
LTR50001038, Rev. E
Appendix
www. c a l a m e bb q . c om
34
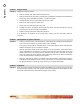
You will need:
6mm socket or nut driver•
Four or ve 1.9mm orices (depending on •
your grill
Pipe compound suitable for natural gas•
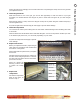
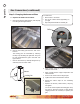
Step2:Changingtheburnerorices
Remove the locking pins from the end of the b.
burners.
The locking pins are accessible by removing
the drip tray and tilting the grill back. They can
be seen underneath the grill in the back. See
gures below.
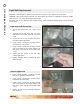
Remove all burners by carefully lifting them up c.
and away from the valve orice.
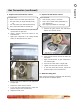
Using a 6mm socket or nut driver, remove the d.
orice for the burner.
Apply a small amount of pipe compound to the e.
orice threads.
Screw in the orice until it is nger tight.f.
Tighten the orice with the 6mm wrench.g.
Repeat the above steps for the remaining h.
burners.
Replace the burners, ame tamers, drip tray, i.
and grates.
You do not need to replace the locking pins. They
are used to keep the burners in place during
shipping and are not necessary to operate your
grill.
Gas Conversion (continued)
W
ID
T
H
W
ID
T
H
W
ID
T
H
W
ID
T
H
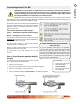
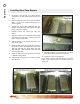
Minimum
Clearance
12” Minimum Distance
Between Grill and Side Burner
Minimum
Clearance
Screen Vents
W
ID
T
H
W
ID
T
H
WIDTH
DEPTH
WIDTH
WIDTH
DEPTH
WIDTH
WIDTH
WIDTH
DEPTH
DEPTH
DEPTH
HEIGHT
HEIGHT
HEIGHT
Burner
Locking Pin
Burner
Locking Pin
Orice
Replacethemainburnerorices1.
Remove the grates, ame tamers, and drip tray a.
from the grill. See gure below.