Assembling the A La Cart . . . . . . . . . . . . 1 Assembling the A La Cart Plus . . . . . . . . 6 Assembling the A La Cart Deluxe . . . . . 18 Adjusting the doors . . . . . . . . . . . . . . . 31 Connecting gas lines . . . . . . . . . . . . . . 32 Limited Warranty . . . . . . . . . . . . . . . . . 33 Copyright 2011 LMS, Inc. All rights reserved. Duplication without written consent is strictly prohibited. Cal Flame™ is registered trademark.
1 Assembling the A La Cart Parts List with Replacement Part Numbers Before you begin, inventory the parts you received to make sure you have everything. After you assemble your cart, you will have six frame extensions you will not need. (If you assemble your cart configured for a five burner grill, for example, you will not need the frame extensions for a three or four burner grill.
Cart Assembly 2 A La Cart www.calflamebbq.com LTR50001091, Rev.
3 Cart Assembly 1. Attach the two cart wheels to the right side frame piece. 2. Attach the left frame piece to the right frame piece with the front and back bottom extensions. Attach the extensions to the outside of of the frames as shown below using the provided metal screws. A La Cart LTR50001091, Rev. A www.calflamebbq.
Cart Assembly 4 3. Attach the top rear extension. Attach the extension to the inside of of the frames as shown below using the provided metal screws. 4. Connect the the outer and inner extensions according to the width of your cart’s size and attach them to the left and right frame pieces. Attach the extensions to the inside of the of the frame. Use screws and nuts. 3 burner 4 burner 5 burner A La Cart www.calflamebbq.com LTR50001091, Rev.
5 6. Set the propane tank holder and the optional basket in place. A La Cart LTR50001091, Rev. A www.calflamebbq.com Cart Assembly 5. Attach shelves and shelf supports to both sides of the cart using screws and nuts. Place the shims between the cart side and the shelf so that they will be held in place by the middle and bottom screws.
4 12 13 17 ACCESSORIES 15 14 16 Assembling the A La Cart Plus 11 3 10 6 5 2 1 9 7 8 Assembling the A La Cart Plus 6 A La Cart www.calflamebbq.com LTR50001091, Rev.
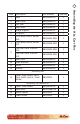
7 Description Part Number 1 Base BBQ09345100 1 2 Rear Panel BBQ09345110 1 3 Left Side BBQ09345120 1 4 Right Side BBQ09345121 1 5 Bridge Support BBQ09345122 1 6 L Support BBQ09345125 1 7 Front Body Plate 3 Burner Grill BBQ09305-KDB 1 7 Front Body Plate 4 Burner Grill BBQ09306-KDB 1 Top Filler Piece 3 Burner Grill BBQ09303-KDB 1 Top Filler Piece 4 Burner Grill BBQ09304-KDB 1 9 Rear Plate BBQ09345112 1 10 Shelf Brackets BBQ09345130 4 11 Doors BBQ09345141 2 1
Assembling the A La Cart Plus 8 NOTE: A three burner grill cart is used as an example to describe the assembly of the A La Cart Plus. Differences between the three cart sizes will be pointed out in these instructions. 1. Attach the casters to the base (if not already attached). 2. Attach the back panel to the base. Attach rear plate to the back panel (if not already attached). 3. Attach the side panels to the base and the back panel. A La Cart www.calflamebbq.com LTR50001091, Rev.
9 Steps 5 through 7 are for three burner and four burner grills only. If you have a five burner grill, skip to step 9. 5. Attach the L support to the bridge assembly and rear panel as shown below. Three burner grill Four burner grill Five burner grill carts do not use the L support, front body plate or top filler piece. These pieces may be discarded. A La Cart LTR50001091, Rev. A www.calflamebbq.com Assembling the A La Cart Plus 4. Attach the bridge support to the side panels.
Assembling the A La Cart Plus 10 Note: The A La Cart Plus comes with all the parts to assemble a three, four, or five burner grill cart. You will only need one flat body panel and one body filler for the side burner cut-out. When your grill is fully assembled, you may dispose of the extra pieces as you see fit. 6. Attach the front body plate. 7. Attach the top filler piece. A La Cart www.calflamebbq.com LTR50001091, Rev.
11 9. Attach front doors. Slide hooks under catch plate. Snap the hinge in place. To release hinge, press the tab on the end. A La Cart LTR50001091, Rev. A www.calflamebbq.com Assembling the A La Cart Plus 8. Slide in the propane tank holder.
Assembling the A La Cart Plus 12 10. Assemble the shelves. a. Attach the shelf spacers and the hinges to the shelf arm. b. Attach the handles to the tray. c. Set each tray on the shelf arms. Turn the adjustable screws to hold the tray in place. A La Cart www.calflamebbq.com LTR50001091, Rev.
13 Assembling the A La Cart Plus 12. Attach shelf brackets. 13. Slide in shelves. A La Cart LTR50001091, Rev. A www.calflamebbq.
Assembling the A La Cart Plus 14 14. Attach accessories. Three and four burner grills Attach the bottle opener and towel hanger as shown. Attach the paper towel holder and spice rack inside the cart door. Five burner grill The five burner grill does not have locations for installing the towel hook and bottle opener. Attach the paper towel holder and spice rack inside the cart door. A La Cart www.calflamebbq.com LTR50001091, Rev.
15 You will need a second person to help you to avoid damaging the grill, the transformer, or the grill cart. If your Cal Flame barbecue grill has lights and a convection fan, you will need to attach the transformer to the under side of the grill before it goes in the cart. Attaching the transformer is described in the owner’s manual that was sent with your barbecue grill. Remove the drip tray before you begin. Pay careful attention to the location of gas lines.
Assembling the A La Cart Plus 16 Make sure the grill is properly seated. The right side lip of the grill will be more or less flush with the top spacer piece. Front View The left side and rear lips of the grill will go over the top of the side and rear panels, as shown in the figure below. Rear View A La Cart www.calflamebbq.com LTR50001091, Rev.
17 Assembling the A La Cart Plus A La Cart LTR50001091, Rev. A www.calflamebbq.
16 4 8 9 13 20 ACCESSORIES 18 19 17 Assembling the A La Cart Deluxe 15 1 5 12 3 11 6 14 7 2 10 9 Assembling the A La Cart Deluxe 18 A La Cart www.calflamebbq.com LTR50001091, Rev.
19 Description Part Number 1 Base BBQ09345200 1 2 Rear Panel BBQ09345210 1 3 Left Side BBQ09345220 1 4 Right Side BBQ09345221 1 5 Bridge Support BBQ09345222 1 6 L Support BBQ09345125 1 7 Divider Panel BBQ09345228 1 Front Body Plate 3 Burner Grill BBQ09305S-KDB 1 Front Body Plate 4 Burner Grill BBQ09306S-KDB 1 Front Body Plate 5 Burner Grill BBQ09307S-KDB 1 Top Filler Piece 3 Burner Grill BBQ09303S-KDB 1 Top Filler Piece 4 Burner Grill BBQ09304S-KDB 1 Top Filler
Assembling the A La Cart Deluxe 20 NOTE: A three burner grill cart is used as an example to describe the assembly of the A La Cart Deluxe. Differences between the three cart sizes will be pointed out in these instructions. 1. Attach the casters to the base (if not already attached). 2. Attach the back panel to the base. Attach the rear plate to the back panel (if not already attached). 3. Attach the side panels to the base and the back panel. A La Cart www.calflamebbq.com LTR50001091, Rev.
21 Assembling the A La Cart Deluxe 4. Attach the divider panel to the base and back panel. 5. Attach the bridge support to the side panels. A La Cart LTR50001091, Rev. A www.calflamebbq.
Assembling the A La Cart Deluxe 22 6. Attach L support to the bridge assembly and rear panel. Note the location of the L support for each grill size. Three burner grill Four burner grill Five burner grill A La Cart www.calflamebbq.com LTR50001091, Rev.
23 7. Attach the flat body panel. Flat body panel 8. Attach the top filler piece with the side burner cut-out. Top filler piece A La Cart LTR50001091, Rev. A www.calflamebbq.com Assembling the A La Cart Deluxe Note: The Al La Cart Deluxe comes with all the parts to assemble a three, four, or five burner grill cart. You will only need one flat body panel and one body filler for the side burner cut-out. When your grill is fully assembled, you may dispose of the four extra pieces as you see fit.
Assembling the A La Cart Deluxe 24 9. Slide in the propane tank holder. 10. Attach the doors. Slide hooks under catch plate. Snap the hinge in place. To release hinge, press the tab on the end. A La Cart www.calflamebbq.com LTR50001091, Rev.
25 Assembling the A La Cart Deluxe 11. Slide in the drawers on their runners. 13. Attach the shelf brackets on both sides of the cart. A La Cart LTR50001091, Rev. A www.calflamebbq.
Assembling the A La Cart Deluxe 26 14. Assemble the shelves. a. Attach the shelf spacers and the hinges to the shelf arm. b. Attach the handles to the tray. c. Set each tray on the shelf arms. Turn the adjustable screws to hold the tray in place. A La Cart www.calflamebbq.com LTR50001091, Rev.
27 Assembling the A La Cart Deluxe 15. Slide the shelves into the shelf brackets. A La Cart LTR50001091, Rev. A www.calflamebbq.
Assembling the A La Cart Deluxe 28 16. Attach the accessories. Three and four burner grills Attach the paper towel holder inside the cart door. Attach the bottle opener, towel hanger and spice rack as shown. Five burner grill Attach the bottle opener and towel hanger as shown. Attach the paper towel holder inside the cart door. Attach the spice rack inside the cart door. A La Cart www.calflamebbq.com LTR50001091, Rev.
29 You will need a second person to help you to avoid damaging the grill, the transformer, or the grill cart. If your Cal Flame barbecue grill has lights and a convection fan, you will need to attach the transformer to the under side of the grill before it goes in the cart. Attaching the transformer is described in the owner’s manual that was sent with your barbecue grill. Remove the drip tray before you begin. Pay careful attention to the location of gas lines.
Assembling the A La Cart Deluxe 30 Make sure the grill is properly seated. The right side lip of the grill will be more or less flush with the top spacer piece. Front View The left side and rear lips of the grill will go over the top of the side and rear panels, as shown in the figure below. Rear View A La Cart www.calflamebbq.com LTR50001091, Rev.
31 To adjust door level, remove the cover on the hinge protecting the adjustment screws. Referring the the figure below, the screw on the left moves the door away from and closer to the cart. The screw on the right adjusts the height and level of the door. A La Cart LTR50001091, Rev. A www.calflamebbq.
Assembling the A La Cart Deluxe 32 Connecting gas lines Remove the rear plate to access the gas connections at the back of the grill. Refer to the grill owner’s manual for description of connecting both LP and NG gas sources. A La Cart www.calflamebbq.com LTR50001091, Rev.
33 All Cal Flame models are manufactured with the highest quality appliances and are warranted to be free from defects in material and workmanship at time of delivery. LMS warrants grill carts and associated hardware from deterioration, corrosion, and defects in material and workmanship for a period of 90 days. Extent of Warranty This limited warranty is only valid on Cal Flame grill carts delivered in the United States or Canada and extends through the selling dealer to the original purchaser.
the control of LMS are not covered by this warranty. Please refer to the owner’s manual for examples of exclusions and common acts invalidating this warranty. This limited warranty applies only to grill carts normally used for personal, family, or household purposes and specifically excludes rental or commercial applications. This warranty does not apply to labor charges. This limitation is retroactive and applies to all grill carts and hardware manufactured from 2000 and hereafter.