Installation / Assembly Cabinet Cut-out Dimensions . . . . . . . . . . . . . . . . . . . . . . . 5 LP Gas . . . . . . . . . . . . . . . . . . . . . . . . . . . . . . . . . . . . . . . . . 6 Natural Gas . . . . . . . . . . . . . . . . . . . . . . . . . . . . . . . . . . . . . 8 Leak Testing Procedure . . . . . . . . . . . . . . . . . . . . . . . . . . .
Safety Instructions 1 Placement and Location The Cal Flame Power Burner is designed for outdoor use only. • Never locate this appliance in an enclosed room, under a sealed overhead structure, or in any type of enclosed area such as a garage, shed, or breezeway. Keep clear of trees and shrubs. • Do not place the Power Burner under or near windows or vents that can be opened into your home. • The Power Burner is not intended for installation in or on recreational vehicles or boats.
Safety Instructions 2 Operation • Do not use the Power Burner for other than its intended use. • Never use the Power Burner if the drip pan is not in place. The drip pan should be pushed all the way in under the Power Burner. Fire or explosion can result from an improperly installed drip pan. • Keep all electrical supply cords away from the heated areas of the Power Burner. • Never use the Power Burner in windy conditions. If used in a consistently windy area a windbreak will be required.
3 • When using the Power Burner, do not touch the grate or immediate surroundings as these areas become extremely hot and can cause burns. • Only use dry pot holders and do not use a towel or other bulky cloth in place of pot holders. Moist or damp pot holders used on hot surfaces can cause burns. • Do not heat any unopened glass or metal container of food on the Power Burner.
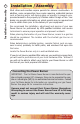
Installation / Assembly 4 Installation / Assembly Most cities and counties require permits for exterior construction. In addition, some communities have codes requiring residential barriers such as fencing and/or self-closing gates on property to prevent unsupervised access to the property by children under the age of five. Your dealer can provide information on which permits may be required and how to obtain them prior to the delivery of your equipment.
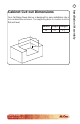
5 Your Cal Flame Power Burner is designed for easy installation into a non-combustible enclosure. The supporting deck or counter must be flat and level. Width Depth Height 18” WIDTH 20” 9 ¼” DEPTH HEIGHT Power Burner LTR50001100, Rev. A www.calflamebbq.
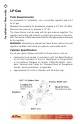
Installation / Assembly 6 LP Gas Tank Requirements For plumbed-in LP installation, use a convertible regulator and set it for LP gas. Maximum line pressure for plumbed-in propane is 14” WC (3.5 kPa). Minimum line pressure for propane is 11” WC. The Power Burner must be used with the gas pressure regulator. The regulator will control and maintain a uniform gas pressure in the manifold. The burner orifices have been sized for the gas pressure delivered by the regulator.
7 Place the dust cap on the cylinder valve outlet whenever the cylinder is not in use. Only install the type of dust cap on the cylinder valve outlet that is provided with the cylinder valve. Other types of caps or plugs may result in leakage of propane. LP Gas Hook Up An enclosure for an LP gas cylinder shall be vented by openings at level of the cylinder valve and at floor level. The effectiveness of openings for purposes of ventilation shall be determined with the gas supply cylinder in place.
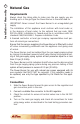
Installation / Assembly 8 Natural Gas Requirements Always check the rating plate to make sure the gas supply you are hooking up to is the gas type the Power Burner is manufactured for. IMPORTANT: Never connect the Power Burner to an unregulated gas supply. The installation of this appliance must conform with local codes or, in the absence of local codes, to the national fuel gas code, ANSI Z223.1a-1998. Installation in Canada must be in accordance with the standard CAN/CGA-B149.
9 Perform a leak test at least once a year whether the gas supply cylinder has been disconnected or not. In addition, whenever the gas cylinder is connected to the regulator or whenever any part of the gas system is disconnected or replaced, perform a leak test. As a safety precaution, remember to always leak test your Power Burner outdoors in a well-ventilated area. Never smoke or permit sources of ignition in the area while doing a leak test. Do not use a flame, such as a lighted match to test for leaks.
Installation / Assembly 10 Placing the Power Burner in a Built-in Enclosure You may need a second person to help you to avoid damaging the Power Burner or your enclosure. Before installing the Power Burner in an enclosure, make sure that the opening is not bigger than the outside frame of the Power Burner. The Power Burner should rest on the lip of the frame. Pay careful attention to the location of the gas line. It should be routed away from sources of heat and should make as few bends as possible.
Using Your Power Burner 11 We recommend you wash the Power Burner thoroughly with soap and water prior to lighting it for the first time. Oils are used during the manufacturing process and some residual oil may still be on the stainless steel parts of your Power Burner. Washing will reduce the possibility of discoloration. We also recommend you keep your Power Burner covered when not in use. This will minimize the amount of dust and dirt that accumulates on your Power Burner and extend its life.
Using Your Grill 12 Basic Operation Before lighting, make sure all burner controls are off. Do not attempt to light the burners if the smell of gas is present. Check the connection with a soap and water solution after attaching the hose. For LP units, make sure there is gas in the tank and it is sitting upright. For natural gas units, make sure the shut off valve is on. Make sure the drip tray is in place. Light the burners using the instructions on the next page.
13 Electronic Ignition 1. Lift the cover. 2. Keep your face as far away from the burners as possible. 3. Turn the burner knob counter clockwise past the light position to HIGH. You will hear a loud click as the electronic lighter produces a spark. 4. Listen for the sound of the gas igniting. If the burner does not light on the first try, repeat immediately. 5. If the burner does not light after three attempts, turn the control knobs to the OFF position.
Using Your Grill 14 Power Burner Lid We strongly recommend you remove the lid for your Power Burner before each use. The Power Burner lid is attached to the unit by two hinges on each side. Each hinge has a detachable spring-loaded hinge pin that removes easily when pulled out. NEVER put the lid down while using the Power Burner! Doing so can cause excessive heat to accumulate under the lid, resulting in fire, explosion, damage to property, personal injury, or death. Power Burner www.calflamebbq.
15 If you have a wok, you can use it with the Power Burner. Remove the grate and set it aside. Inside the burner area, surrounding the brass burners, is a stainless steel ring that will securely hold your wok in place while you cook with it. The stainless steel ring also functions as a baffle for the burners and must always be in place during operation. Power Burner LTR50001100, Rev. A www.calflamebbq.
Cleaning and Maintenance 16 Cleaning and Maintenance Removing and Replacing Burners The burner has three pieces plus a wok ring. If you remove the burner for cleaning, make sure to clean each piece and replace them in proper order. Wok Ring Burner Ring Burner Cap Burner Body Adjustable Air Venturis Removal 1. Disconnect or shut off the gas line connected to the Power Burner. Wait until the burners are cool. 2. Remove the grate and the wok ring. 3.
17 Cleaning and Maintenance Replacement 1. Set the burner body in place, making sure the stud in properly seated and the burner body is flat and level. 2. Set the burner ring on the burner body, making sure the pin on the burner ring is seated in the notch on the burner body. 3. Set the burner cap on the burner body, making sure the pin on the burner cap is seated in the notch on the burner ring. 4. Set the wok ring around the burner.
Cleaning and Maintenance 18 Stainless Steel Care and Cleaning All exposed stainless steel surfaces require special attention if you want to keep them looking clean and bright. Following these simple instructions will help avoid scratching or damaging the finish and keep your stainless steel attractive. To ensure safe and proper maintenance, we recommend you follow these directions carefully. Clean internal parts of the Power Burner regularly as determined by the amount of use and foods cooked.
19 Avoid using these common cleaning products and materials – they will damage the surface of your stainless steel.
Cleaning and Maintenance 20 1. Clean Thoroughly clean stains, food, and grime using a sponge or damp cloth with warm water and a mild dish soap. Use Fantastik or Formula 409 to remove heavier soil. 2. Rinse Thoroughly rinse all surfaces and dry them completely with a clean towel. Do not allow stainless steel to air dry. 3. Polish We strongly recommend that you apply a surface protectant to all exposed stainless steel surfaces.
21 It is a common misconception that stainless steel does not rust. It does not stain, corrode, or rust as easily as ordinary steel (it stains less), but it is not stain-proof. If not properly protected and maintained, it can corrode, pit, and discolor. Because salt will accelerate rust and corrosion, Power Burner owners who live near the beach need to be diligent in maintaining their stainless steel hardware.
Cleaning and Maintenance 22 from the Power Burner by carefully lifting each burner up and away from the gas valve orifice. Use a wire brush to clean the outer surface of each burner to remove food residue and dirt. Clean any clogged ports with a stiff wire such as an opened paper clip. Inspect each burner for damage (cracks and holes). If any damage is found, replace the burner and discontinue usage.
Appendix 23 Problem: Smell of gas is present Solution: Check for loose connections in the gas line. Perform a leak test following the procedure on page 9. Problem: Burner does not ignite Solution: Use the following procedure with the figure below. Check the position of the sparker tip. It should be pointing forward towards the front of the burner. • Make sure there is a blue spark at the electrode tip to the burner.
Appendix 24 Problem: Plugged orifice Solution: Unplug the orifice as follows: • Remove grate and grease tray. • Remove the burner ring and the outer burner. • Carefully lift the center burner up and away from the gas orifice. • Remove the orifice from the control valve. • Gently clear any obstruction with a fine wire. • Reinstall the orifice, reinstall the burners over the orifices, and place the burner peg into position hole at the bottom ledge of the firebox.
25 Misalignment of Igniter on Burner Solution: • Check for proper position of the electrode tip, which should be pointing forward towards the front of the burner and free of grease to allow proper sparking. • The ignition wire should be connected firmly to the valve ignition device and electrode. Replace the ignition wire if it is frayed or cracked.
Appendix 26 Converting from LP to NG WARNING! You must have an authorized service technician perform this procedure. If these instructions are not followed exactly, a fire or explosion may result causing property damage, personal injury or loss of life. LMS Inc. will not be held responsible for an improperly converted gas appliance. All Cal Flame gas appliances are manufactured to operate with standard liquid propane (LP and can be converted to burn natural gas (NG).
27 The regulator in the image below has been removed to illustrate this procedure. 1. Remove the LP gas line. 2. Remove the cap fitting from the end of the NG gas regulator. 3. Place the cap fitting over the LP gas inlet. You will need: • • • 13 mm open end wrench Male flared fitting (not provided) Pipe compound suitable for natural gas 4. Insert a male flared fitting (not provided) in the NG gas regulator. NOTE: A flared fitting is NOT included.
Appendix 28 Step 2: Changing the burner orifices 1. Remove the grate, burner ring, and burner from the Power Burner. 2. Locate the gas orifices. They will be directly behind the gas valves. 3. Using a 6mm socket or nut driver, remove the orifice. Rear view of Power Burner You will need: • • • • 6 mm socket or nut driver One 1.93 mm orifice (for inner burner) One 2.
29 5. Screw in the orifice until it is finger tight. 6. Tighten the orifice with the 6mm wrench. 7. Repeat the above steps for the remaining burners. 8. Replace the burners and the grate. Mark the rating plate After conversion has been completed, mark the rating plate as NG with an indelible marker. Orifice sizes Inner burner Outer burner NG 1.93 mm 2.44 mm LP 1.18 mm 1.54 mm Power Burner LTR50001100, Rev. A www.calflamebbq.com Appendix 4.
Appendix 30 Limited Warranty LMS warrants the Power Burner and associated hardware from defects in material and workmanship for a period of one year from the original date of purchase. This includes deterioration and corrosion of burners, mountings, and lid and body. Extent of Warranty This limited warranty is only valid on Cal Flame models delivered in the United States or Canada and extends through the selling dealer to the original purchaser at the original site of installation.
31 This limited warranty applies only to barbecue grills and associated hardware used for personal, family, and outdoor household purposes. This warranty does not apply to labor charges on grills, replacement parts and hardware. This limitation is retroactive and applies to all grills and hardware manufactured from 2000 and hereafter. Examples of common acts invalidating this warranty include but are not limited to: • • • • • • • Scratches caused by normal use.
Appendix 32 Legal Remedies This limited warranty gives you specific legal rights. You may have other rights, which may vary from state to state. Customer Service For customer service, contact the authorized selling dealer immediately. If you need additional information or assistance, please contact the LMS Customer Relations Department at 1462 E. Ninth St., Pomona CA 91766 or call (800) 225-7727.
33 Appendix Power Burner LTR50001100, Rev. A www.calflamebbq.
Locating the Product Serial Number The serial number of your Cal Flame Power Burner is located on the side and is visible before you place it in the barbecue island cut-out. You will need this number to properly register your Power Burner and activate coverage. Write this information in the space provided below.