LTR50001038, Rev.
Safety Instructions Placement and Location . . . . . . . . . . . . . . . . Set-Up . . . . . . . . . . . . . . . . . . . . . . . . . . . . . . Operation . . . . . . . . . . . . . . . . . . . . . . . . . . . Maintenance and Repair . . . . . . . . . . . . . . . Storage . . . . . . . . . . . . . . . . . . . . . . . . . . . . . Precautions Regarding Children . . . . . . . . .
1 Safety Instructions Placement and Location • Cal Flame™ grills are designed for outdoor use only. • Never locate this appliance in an enclosed room, under a sealed overhead structure, or in any type of enclosed area such as a garage, shed, or breezeway. Keep clear of trees and shrubs. • Do not place this grill under or near windows or vents that can be opened into your home. • Cal Flame™ grills are not intended for installation in or on recreational vehicles or boats.
Safety Instructions 2 • Never use the grill or side burner in windy conditions. If used in a consistently windy area a windbreak will be required. Always adhere to the specified clearances listed in this manual. • When using the grill, do not touch the grill rack, burner grate, or immediate surroundings as these areas become extremely hot and can cause burns. Use handles or knobs. • Never line the grill or side burners with aluminum foil.
3 Built-in Construction LMS Inc. will not be held responsible for property damage, injury, or death as a result of locating a grill enclosure in a non-approved location or using non-approved construction materials. We strongly recommend that grill owners hire a contractor to construct the built-in enclosure.
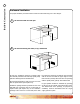
Built-in Construction 4 DEPTH WIDTH Built-in Dimensions Minimum Clearance DEPTH Plan the installation so that the electrical connection, gas shut-off valve, and pressure regulator are accessible inside the base enclosure. The gas valve shall be readily accessible for hand operation. A door on the enclosure to gain access to the gas valve is DEPTH acceptable, provided it is non-locking and can be opened without the use of tools.
DEPTH 5 HEIGHT Built-in Construction Built-in Dimensions cont. Minimum Clearance WIDTH WIDTH The dimensions shown below are for Cal Flame appliances only.
Built-in Construction T 6 Screen Vents Enclosure Ventilation For proper ventilation, the base structure must be constructed using one of two designs: Minimum Clearance 1 An enclosure with one side open Screen Vents 2 An enclosure having four sides, a top, and bottom At least two ventilation openings at cylinder valve level shall be provided in the side wall, equally sized, spaced at 180 degrees and unobstructed.
the back of the grill. (Use gas rated tape seal on all connections). Connect the last open line to the side burner C (Use gas rated tape seal on all connections) NOTE: You will need to use a gas rated sealer on gas connectors that are not flared. 7 Built-in Construction Plumbing for Side Burners 1. Assemble a 3/8” pipe nipple to the 3/8” pipe tee using Teflon tape or pipe sealant. Use only sealant that is approved for use on LP gas. 2. Install the pipe tee assembly to the GAS LINE grill intake pipe.
Installation 8 Installation Installing the Transformer All grills with electrical components such as lights or a convection fan will require the transformer to be installed and plugged in before you can use it. This needs to be done before the grill is inserted in the island. When the transformer is attached to the grill chassis, use care in placing the grill in the island cutout to avoid hitting the transformer. 1. Remove the transformer and the metal screws from the plastic bag. 2.
9 You will need a second person to help you to avoid damaging the grill, the transformer, or your barbecue island. Before installing a grill or side burner in any island or cut out, make sure that the opening is not bigger than the outside frame of the grill unit. The grill should rest on the lip of the frame. For drop-in accessories, adequate cross ventilation must be designed into enclosure to ensure the drop-in grill or side burner does not become overheated.
Gas Connection 10 Gas Connection Gas Requirements and Connection IMPORTANT: The Cal Flame grill is manufactured to operate on liquid propane (LP). However, it can be converted to operate on natural gas (NG) by an authorized service technician. Consult your Cal Flame dealer for information on converting your gas grill. Owners must not convert their grills themselves. Attempting to convert the grill from LP to NG may result in serious injury and will void the warranty coverage.
11 Gas Connection LP Gas Tank Requirements For plumbed-in LP installation, use a convertible regulator and set it for LP gas. Maximum line pressure for plumbed-in propane is 14” WC (3.5 kPa). Minimum line pressure for propane is 11” WC. The grill unit must be used with the gas pressure regulator. The regulator will control and maintain a uniform gas pressure in the manifold. The burner orifices have been sized for the gas pressure delivered by the regulator.
Gas Connection 12 Natural Gas Requirements Always check the rating plate to make sure the gas supply you are hooking up to is the gas type the grill is manufactured for. IMPORTANT: Never connect the grill to an unregulated gas supply. The installation of this appliance must conform with local codes or, in the absence of local codes, to the national fuel gas code, ANSI Z223.1a-1998. Installation in Canada must be in accordance with the standard CAN/CGA-B149.2, Propane Installation Code. Connection 1.
Locating the product serial number The serial number of your Cal Flame grill is located on the back and is visible when the hood is down. You will need this number to properly register your grill and activate coverage. Write this information in the space provided below.