
Installation Guide


156 90000-508 G3
Installation Guide
4
- Dynamite blasting caps may explode
when transmitting radio operation takes
place within 500 feet. Always obey the
“Turn Off Two-Way Radios” signs
posted at sites where dynamite is being
used.
If transporting blasting caps:
a) Carry the blasting caps in an appropriate
metal container having a soft cushioning
lining.
b) Suppress transmissions whenever the
blasting caps container is being loaded
or unloaded into or from the vehicle.
Check applicable local bylaws.
2.2.5 Installation in vehicles pow-
ered by liquefied gas.
G3
installations in vehicles powered by
liquefied petroleum gas with the LP-gas
container in the trunk or other sealed-off
space within the interior of the vehicle must
conform to the National Fire Protection As-
sociation Standard NFPA 58 which requires:
- Space containing radio equipment shall
be isolated by a seal from the space con-
taining the LP-gas container and its fit-
tings.
- Outside filling connections shall be used
for the LP-gas container.
The LP-gas container space shall be vented
to the outside of the vehicle.
2.3 Physical Unit
2.3.1 Recommended tools and
supplies
• Electric drill for mounting holes
• Hammer and center punch
• Tie-wraps
• Drills and circle cutters as needed ac-
cording the size of screws (or nuts and
bolts) used.
• In-line “Power meter” capable of meas-
uring forward and reflected power at the
operating frequency of the radio.
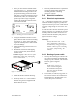
2.3.2 Physical mounting of G3
Start by running all the cables (DC power,
PC RS-232, USB or RJ45 as well as all an-
tennas cabling) prior to mounting G3
to
assure the feasibility of the planned cable
routing. Be sure to leave sufficient slack in
each cable so the G3
may be removed
from the mounting bracket for servicing
with the power applied and the antenna at-
tached.
G3
is ready for installation.
Cautions:
• When drilling mounting
holes, be careful to avoid dam-
aging some vital part of the ve-
hicle such as fuel tanks, trans-
mission housing etc. Always
check how far the mounting
screws extend below the mount-
ing surface prior to installation.
• Use of drill bit stops is
highly recommended.
• After drilling, remove all
metal shavings before installing
screws.
• Do not overtighten self-
tapping screws.