LMU0200G Hardware and Installation Guide Version 1.0.
License Agreement FOR SOFTWARE, APPLICATION PROGRAMING INTERFACES (APIS) & DOCUMENTATION IMPORTANT: DO NOT INSTALL OR USE THE SOFTWARE OR DOCUMENTATION UNTIL YOU HAVE READ AND AGREED TO THIS LICENSE AGREEMENT. This is a legal agreement between you, the Customer, and CalAmp DataCom Incorporated (―CalAmp‖). By installing and/or using the software or documentation, you are consenting to the terms of this License.
Customer agrees to include the notice ―Copyright © 1999 – 2009 CalAmp DataCom Inc., All Rights Reserved‖ in Applications developed with the Software. Customer agrees to include the following CalAmp Copyright and Government Restricted Use notice in all documentation and in any Application on-line help or readme file. ―Portions of this computer program are owned by CalAmp DataCom Inc., Copyright © l999 – 2009, CalAmp DataCom Inc., All Rights Reserved.
Limited Warranty COVERING THE PHYSICAL MEDIA AND PRINTED MATERIALS: CalAmp warrants to you, the original licensee, that the media on which the Software is recorded are free from defects in materials and workmanship under normal use and service FOR A PERIOD OF NINETY (90) DAYS FROM THE DATE OF DEVELOPER LICENSE PURCHASE.
Regulatory Information Human Exposure Compliance Statement Pursuant to 47 CFR §24.52 of the FCC Rules and Regulations, personal communications services (PCS) equipment is subject to the radio frequency radiation exposure requirements specified in §1.1307(b), §2.1091 and §2.1093, as appropriate. CalAmp DataCom Inc.
Table of Contents License Agreement ................................................................................................................................................. ii Limited Warranty ..................................................................................................................................................iv Regulatory Information..........................................................................................................................................
6.1.3 Status LEDs ......................................................................................................................................... 31 6.2 Installation Verification .............................................................................................................................. 32 6.2.1 Comm Verification .............................................................................................................................. 32 6.2.2 GPS Verification ................
1 Introduction Welcome to the LMU0200G Hardware and Installation Guide. This manual is intended to give you information on the basic setup and installation of the CalAmpLMU0200Gproduct including hardware descriptions, environmental specifications, wireless network overviews and device installation. This device complies with FCC Rules and Industry Canada‘s licence-exempt RSSs. Operation is subject to the following two conditions: (1) This device may not cause harmful interference.
1.2 About The Reader In order to limit the size and scope of this manual,the following assumptions have been made about the reader.
1.3 About CalAmp CalAmp is a leading provider of wireless communications products that enable anytime/anywhere access to critical information, data and entertainment content. With comprehensive capabilities ranging from product design and development through volume production, CalAmp delivers cost-effective high quality solutions to a broad array of customers and end markets. CalAmp is the leading supplier of Direct Broadcast Satellite (DBS) outdoor customer premise equipment to the U.S.
1.4 About the CalAmp Location Messaging Unit-200 (LMU0200G) The LMU0200G is an economical vehicle tracking product designed for easy and reliable installation in automobiles. The LMU0200G is an ideal solution for automotive insurance, stolen vehicle, vehicle finance, auto rental and other automotive tracking applications.
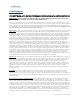
2 System Overview 2.1 Overview The entire purpose behind a fleet management system is to be able to remotely contact a vehicle, determine its location or status, and do something meaningful with that information. This could include displaying the vehicle location on a map, performing an address look-up, providing real-time driving directions, updating the vehicles ETA, monitoring vehicle and driver status or dispatching the vehicle to its next pick up.
Figure 1 - Basic System Architecture -6- CalAmp Proprietary & Confidential
2.2 Component Descriptions 2.2.1 Wireless Data Network The Wireless Data Network provides the information bridge between the LM Direct™ server and the LMU0200Gs™. Wireless data networks can take a variety of forms, such as cellular networks, satellite systems or local area networks. At this point in time, only GSM networks available to the LMU0200G. 2.2.2 LMU0200G The LMU0200G is responsible for delivering the location and status information when and where it is needed.
2.2.5 PULS™ PULS™ (Programming, Update and Logistics System) is CalAmp‘s web-based maintenance serveroffering out-of-the-box hands free configuration and automatic post-installation upgrades. PULSTM provides a means for configuration parameters, PEG scripts, and firmware to be updated Over-The-Air(OTA) and allows CalAmp customers to monitor unit health status across your customers‘ fleets to quickly identify issues before they become expensive problems. 2.2.
2.3 Wireless Data Primer This section is meant to give an overview of the wireless data technologies employed by the CalAmp LMU0200G. 2.3.1 SMS (Short Message Service) ―The Short Message Service (SMS) is the ability to send and receive text messages to and from mobile telephones. The text can comprise of words or numbers or an alphanumeric combination. SMS was created as part of the GSM Phase 1 standard.
3 Hardware Overview 3.1 Location Messaging Unit-200™ (LMU0200G) 3.1.1 LMU0200G Handling Precautions 3.1.1.1 Electrostatic Discharge (ESD) Electrostatic discharge (ESD) is the sudden and momentary electric current that flows between two objects at different electrical potentials caused by direct contact or induced by an electrostatic field. The term is usually used in the electronics and other industries to describe momentary unwanted currents that may cause damage to electronic equipment. 3.1.1.
3.1.1.4 Packaging Anytime the sub assembly is shipped and it is not fully packaged in its final housing it must be sealed in an ESD safe bag. 3.1.1.5 Electrical Over-Stress (EOS) The GPS receiver can be damaged if exposed to an RF level that exceeds its maximum input rating. Such exposure can happen if a nearby source transmits an RF signal at sufficiently high level to cause damage. 3.1.1.
3.1.2 Environmental Specifications The LMU0200Gis designed to operate in environments typically encountered by fleet vehicles, including wide temperature extremes,voltage transients, and potential interference from other vehicle equipment. To ensure proper operation in such an environment, the LMU0200G was subjected to standardtests defined by the Society of Automotive Engineers (SAE). The specific tests includedtemperature, shock, vibration, and EMI/EMC.
Power Consumption Active Standby: 70mA at 12VDC Sleep on Network: 10 mA at 12VDC Deep Sleep: 1mA at 12VDC GPS 50 channel WAAS capable GPS Receiver 2m CEP (with SBAS) -160 dBm tracking sensitivity Communications (Comm) Quad Band Class 12 GPRS Modem 850 MHz (Class 4) – 2W 900 MHz (Class 4) – 2W 1200 MHz (Class 1) – 1W 1900 MHz (Class 1) -1 W GPRS Packet Data (UDP) SMS RoHS Compliant - 13 - CalAmp Proprietary & Confidential
3.2 Primary Connector The LMU0200G uses 8 22AWG leads for its power and I/O connections.
3.3 GPS Receiver The LMU0200G‘s GPS receiver has the following specifications: 50 channel GPS receiver Accuracy: 3 meter CEP (with SA off) -160dBm Tracking Sensitivity 3.
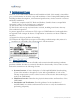
4 Configuration and Activation 4.1 Configuration Quick Start Guide This section details how to quickly get an LMU0200G provisioned and configured to point at a specific server. It is assumed that a PEG script has already been created and is being managed through LMU Manager or PULS, the CalAmp Maintenance System. We are making three assumptions to simplify the setup process: You have created, installed and configured an LM Direct™ Server to receive messages from the LMU0200G.
4.2 Quick Start — General Config All LMU0200Gs™ must go through a common step during the configuration and provisioning process. Specifically, this is pointing the LMU to the LM Direct™ server, either via IP or a URL This configuration process is accomplished via a series of AT Commands. 1. Power up the LMU0200G 2. Power up your handset 3. From the handset, send an SMS message to the LMU0200G‘s phone number: !RP,768,0,ddd.ddd.ddd.ddd where ddd.ddd.ddd.
4.3 Auto provisioning of GSM LMUs For certain operators, the LMU can auto-populate the APN, username and password settings based on the Mobile Country Code (MCC) and the Mobile Network Code (MNC) of the SIM. Upon inserting a new SIM the APN, username and password will switch to the new SIM card's defaults if the MCC and MNC values change.
Telstra Australia (MCC 505, MNC 01, 11, 71, 72) o APN 0 & 1: telstra.internet Vodafone Ireland (MCC 272, MNC 01) o APN 0 & 1: isp.vodafone.ie o Username: vodafone o Password: vodafone Vodafone New Zealand (MCC 530, MNC 01) o APN 0 & 1: internet o Username: guest o Password: guest Vodafone UK (MCC 234, MNC 15) o APN 0 & 1: internet o Username: web o Password: web Unless otherwise stated, the username and password will be set to ―dummy‖.
4.4 Activating a GSM LMU using SMS For a GSM/GPRS operator3 you will get the LMU in one of two varieties, one with a SIM and one without. If you get an LMU without a SIM (which is the typical case) the operator will simply ask for the IMEI of the LMU. The IMEI (International Mobile Equipment Identifier) is printed on the bottom of the LMU under the LMU‘s ESN. Again, DO NOT give the operator the ESN.. The operator will provide you with a SIM for each account activated.
The last item an operator may provide is a SIM PIN. The PIN is effectively a password to the device. The main difference here is that the PIN will restrict all the capabilities of the GSM device, where the SPC is used just for configuration. The activation sequence for a GSM LMU would therefore use the following SMS messages: !RP,2306,0,“myAPN.myOperator.
5 Installing the LMU The installation of the LMU and its antennas can have a major impact on the LMU‘s performance. It is recommended that installers be familiar with the installation of GPS and cellular devices and are comfortable in a vehicle environment. 5.1 Preparing for Installation Be sure you have received all the LMU components you need. This must include: The LMU to be installed A power harness Optional Components: o Input cables 5.2 Plan The Installation Verify Power, Ground and Ignition.
5.2.1 Size and Placement of LMU Unit The dimensions of the LMU should be taken into account, particularly when installing in a vehicle: Whether you intend to place the LMU under a seat or into a cavity behind the vehicle‘s interior molded trim, be sure the LMU will fit before drilling any holes or running cable Be certain that the cables running to the LMU will not be bent or constricted. Damage to the cables may impede the LMU‘s performance.
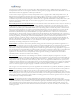
3 Examples OK(Yellow) and Poor(Red) internal antenna placements Figure 4 - Examples of Good (Green), OK(Yellow) and Poor (Red) Combination antenna placements The received signal levels at the GPS antenna from the satellites are very low in power (approximately -136 dBm), so any blockage of the antenna can affect the quality of the location computed by the receiver. 5.2.
At some future time, you might need or want to replace the SIM card with a different one, so try to install the LMU in such a way that the cover can be removed to make the SIM card accessible. 5.2.3 Protection from Heat It is best not to place the LMU unit in an unusually warm location such as directly near heater vents, near hot engine components or in direct sunlight. The maximum temperature that can be tolerated by the LMU is described in the LMU Environmental Specifications section. 5.2.
5.3 Installing the LMU in a Vehicle This section provides instructions for installing an LMU in a vehicle. Be sure to consider the design decisions described in the previous sections. When you are ready to begin installing the LMU, follow these steps: 5.3.1 Place the LMU unit in the vehicle. LMUs with internal antennas should be placed to maximize their GPS performance. A typical location include under the dash close to the front wind-shield.
6 I/O Descriptions The LMU0200G provides the following I/O: Digital Inputs Input 0: Ignition Sense (always biased low) Input 1: Generic Digital Input (Biased high or low/ S-158 Bit 1) Input 2: Generic Digital Input (Biased high or low/ S-158 Bit 2) Output Output 0 : Standard Open Collector Relay Output Output 1: Standard Open Collector Relay Output Output 2: Standard Open Collector Relay Output - 27 - CalAmp Proprietary & Confidential
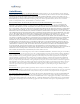
6.1.1 Ignition and Inputs The LMU0200G provides up to 5 external inputs and one internal. The external inputs are protected from typical vehicle transients and can be directly connected to most vehicle level logical inputs from 4 volts up to the vehicle power input level (typically 12 VDC). Their input impedance is approximately 10k. One of these inputs is dedicated to sensing the vehicle‘s ignition status to provide for flexible power management.
Figure 6 - Sample Input Wiring - 29 - CalAmp Proprietary & Confidential
6.1.2 Outputs The LMU‘s outputs are designed to drive external relays. These outputs provide a highcurrent, open-collector driver that can sink up to 150 mA each. These drivers may be used to drive external relays that can then control vehicle functions such as door locks, fuel shut-off valves, sirens and lights. If additional current is required to drive the relays, external circuitry can be added to source the current. This diagram is a typical use of an output to drive a relay.
6.1.3 Status LEDs The LMU0200G is equipped with two Status LEDs, one for GPS and one for COMM (wireless network status).
6.2 Installation Verification In many cases it is desirable to verify that an installed LMU0200G is working properly. That is, installers should verify that the GPS and communications functions of the LMU0200G are working properly before departing the installation site. In more robust cases, some key configuration settings such as the Inbound Address and URL should also be verified. Note that these processes are all based on issuing SMS messages to the LMU0200G.
6.2.2 GPS Verification The next step is to verify that the GPS receiver is seeing enough satellites to obtain a valid GPS position. Again, installers have two choices on how to perform this verification. First, like the Comm Verification, there is a GPS status LED (i.e., the one closest to the SMA connector). If this LED is solid, then the LMU has found GPS service.
6.2.3 Inbound Verification The last item to verify is that the LMU0200G is sending data to the correct server. In general, this is a two-step process that will need the aid of an observer on the back end. That is, a technician will have to be logged in so they can monitor data coming into the backend mapping/vehicle management application. First, verify that the LMU0200G is using the correct Inbound IP address by using: !R0 The response should be similar to: APP:106 1.3c COM:-91 D.. m2m.t-mobile.