
Installation Guide
131908/2 C+A
7
GENERAL INSTALLATION GUIDELINES
CAUTION - EXTREME DANGER - OVERHEAD WIRES
When installing any outside antenna, be very aware of all overhead electrical wire
and service feeds. Contact with power lines could be catastrophic and INJURY or
DEATH may result. When faced with a difficult antenna installation location, do
not proceed - contact your supervisor at once.
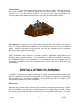
The following sections list installation procedures for various types of mounting
schemes. The order of preference is as listed in these instructions. In other words, wall
and eave mounts are preferable over roof mounts, and so on for aesthetic reasons.
Note that you will need to evaluate various of the installation and mounting procedures
listed in this guide in order to determine the one which provides the best aesthetics and
still provides adequate signal quality for proper reception of signals.
SAFETY NOTE: Aluminum ladders are not to be used for field installation or
repair service. Only ladders that have fiberglass rails may be used because of the
possibility of contact with electrical wires or other energized conductors.
Ladders should be checked weekly to make sure that they are in good repair and
safe working order.
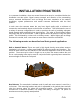
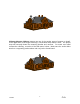
Instructions:
1. Determine the location of antenna. Choose a location and height for the antennas
so that the radio frequency propagation path is not obstructed by tall trees,
buildings, freeway overpasses, or any other large obstacle that may interfere or
disperse the radio frequency signal. Refer to the network operator’s coverage
guidelines to determine coverage range where this product may be used.
2. Install a tripod or mast to the structure on which the antenna will be mounted. Refer
to operator guidelines on allowable mount types and criteria to determine which is
appropriate.
3. Mount the planar antenna to the mast using the mounting hardware provided. Be
sure to observe the polarity indicating arrow cast into the antenna radome to ensure