
User Manual
P/N: 131908/A
Revised: 9/1/00
C+A
8
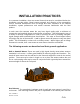
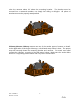
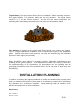
3. Mount the planar antenna to the mast using the mounting hardware provided. Be
sure to observe the polarity indicating arrow cast into the antenna radome to ensure
correct antenna polarization. Do not over-tighten the antenna mounting hardware
as damage to the antenna may result.
4. Connect the transceiver to a signal level meter and apply power to the unit (through
the signal level meter internal power source). Align the antenna by peaking the
signal level reading measured on the meter. If available, a QAM analyzer should be
used to record the signal level, signal to noise ratio and the Bit Error Rate (BER).
Always record these values on the work order.
5. Run a cable from the transceiver into the customer premises. Note: There are a
number of established methods of running cables from outdoor installations to
indoor locations while eliminating the potential for moisture ingress. It is beyond the
scope of these instructions to recommend a method. Please check with the system
operator’s installation guidelines for recommended procedures.
6. Once inside the customer premises, the cable must be run to the location of the
cable modem. At this location, add powering by connecting the cable to the power
passing side of the power inserter and plug in the power supply into an appropriate
outlet. Note: It may be advisable to use an uninterruptable power supply or surge
suppressor to power the transceiver, to minimize power supply transients affecting
the performance of the desired link.
7. The cable modem then is connected to the other end of the power inserter, the side
that does not pass DC.
Important:
do not apply DC power to the cable modem.
Refer to the system operators’ instructions or cable modem supplier’s instructions
on proper operation and verification of cable modem functionality.
See attached diagram for connection configuration.