2 Bay SATA 3Gb RAID Solution Performance, Protected, JBOD User Manual CalDigit, Inc. 1941 Miraloma Ave, Unit B Placentia, CA 92870 USA www.caldigit.com The information of the products in this manual is subjected to change without prior notice and does not represent a commitment on the part of the vendor, who assumes no liability or responsibility for any errors that may appear in this manual. Copyright © 2006, CalDigit, Inc.
Table of Contents Introduction ………………………………………………………………………………………………. Features and benefits of the S2VR DUO ……………………………………………………………... Specifications …………………………………………………..…………………………………………. 2 2 2 Firmware Update …………………………………………………………………………………….………… 2 Opening the Box ……………………………………………………………………………………….……… Package Contents ………………………………………………………………………………….…….. Front Panel LED Indicators ………………………………………………………………………..……. Back Panel View of S2VR DUO ………………………………………………………………….…..
Introduction Thank you for purchasing your CalDigit S2VR Duo. CalDigit was established in North Orange County, California, with a team of world class software and hardware engineers and support personnel. This team working in close conjunction, developed an unparallel hardware product line in the S2VR series SATA 3Gb/s RAID solution. CalDigit engineers emphasize the use of quality components to produce products that would both lessen the chances of component failure, and loss of productivity.
Remove all components from the shipping container. Retain all boxes and packaging materials In the event that you have to return the product to the manufacturer. Examine the package contents for any shipping damage. Contact the freight carrier immediately should damage exist. Important Reminder: Please keep carton, all contents & packing materials in case you need to return unit. Package Contents • • • • • • • S2VR Duo 2 Hard drives in tray modules FASTA-4e HBA or FASTA-4x HBA depending on model.
• PC or Mac with an available PCI-e or PCI-x slot 500 Mhz or faster** • CD-ROM drive • 1GB of RAM minimum **Note: You may be able to install the S2VR solution into an older Mac or PC, however the overall performance will be slower than with newer systems. For uncompressed HD video editing, we recommend a Dual G5 or newer CPU with1GB machine or better. Installing the Host Controller Card FASTA-4e or FASTA-4x Your S2VR HD comes with a Host Adapter card, PCI-e or PCI-x.
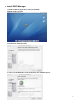
. Next, CLICK Install. 7. Finishing Installation, CLICK Continue. 8. Installation complete, CLICK CLOSE.
Verify System Profiler Check to make sure that the card has been installed under System Profiler. Informational Factoid: Did you know that there are demonstration videos available on the CalDigit website that will show you some of the technical aspects & real life usage of the S2VR product line? Go to: http://www.caldigit.com/S2VRDuoOnlineDemo.asp for more information. CalDigit, Professional Grade Products.
Install S2VR Manager 1. Double CLICK the application on the provided CD, CalDigit S2VR v1.0.1.pkg. 2. Introduction, CLICK Continue. 3. Select your OS Hard Drive as the destination, then CLICK Continue.
4. Installation Successful, CLICK Close. 5. Find the S2VR Manager. Directory: OS drive > Applications > Utilities > CalDigit S2VR > S2VR Manager 6. Drag S2VR to the Launcher. 7. Restart your computer for the S2VR Manager Installation to be complete.
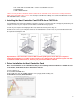
Installing the Hard Drive Tray Modules Note: Your S2VR Duo is shipped with the drive modules packaged separately to prevent them from damage. 1. Slide tray drives into enclosure, lift lever, tighten the thumbscrew 2. After drives have been installed, check all levers & make sure thumbscrews are locked down. 3. Repeat with all other drives. Connecting the S2VR to the HBA Controller The S2VR Duo RAID contains 2 configurable hard drives.
Go to “Management Tab” setup password, Voice & E-mail notification Password (Changing the Password) 1. Select Change Password from the File menu. 2. Enter the current password (or use admin if you have not changed the default password). 3. Enter the new password within the provided fields. The entered password must be a combination of 5 or more characters. 4. Click OK to implement the new password. 5.
Advanced Mode 1. Select S2VR (Box with serial #) 2. CLICK on Configure RAID 3. CLICK on Advanced tab Video: By changing the settings in this section, your S2VR manager will automatically provide a calculated data rate for the selected settings. Audio: as above, select the desired settings, and the audio data rate will be calculated. Storage: Your S2VR manager will calculate the approximate capacity of the 2 sections above. Your S2VR manager will also provide a suggested RAID type for your project/task.
TURBO Mode You can choose from 30 – 100% of the hard drive capacity, to remain at the desired performance level. Important Note: As is the nature of any hard drive, the performance of the drive will decrease as you fill up the drive with the data. Please note that this is not a performance issue with your S2VR. Your OS will only be showing the capacity of your current S2VR Duo Turbo mode setting. For example: 100GB RAID system with Turbo @ 80%, your system will only display 80GB.
Configure RAID Level Important Note: You can only modify the Raid settings for you S2VR by using the S2VR Manager software. The hardware RAID changing function on your S2VR Duo back panel is disabled as default. SOFTWARE RAID CHANGE YOU MUST DELETE YOUR S2VR RAID SET ON DISK UTILITY WHENEVER YOU ARE CONFIGURING YOUR S2VR INTO A NEW RAID SETTING. OTHERWISE YOUR SYSTEM WILL STILL READ THE OLD SETTING FROM SYSTEM MEMORY, WHICH WILL CAUSE FALSE INFORMATION ON DISK UTILITY.
JBOD Mode Your data will be lost as this process will reformat your drives. Backing up your data on another S2VR Duo is highly recommended. Your S2VR Duo comes reconfigured in Performance mode. (Out of the box) If you want to change the project & format into JBOD function, follow these steps. Please delete your original S2VR’s RAID setting via Disk Utility 1. Open S2VR Manager, Select JBOD mode & follow prompt to format your S2VR to JBOD mode.
2. The Following system messages will appear, click Ignore. 3. Open the Disk Utility. 4.
5. After you initialize, this is what you should see. (Your S2VR will now serve as an enclosure for 2 individual Hard Drives) 6. Restart your computer, and your newly configured S2VR is ready to use! Informational Factoid: The FAQ section on our website has answers to the most common questions and or potential problem(s) that you may encounter, please go to http://www.caldigit.com/faq.asp for more information. CalDigit, Professional Grade Products.
Performance Mode Your data will be lost as this process will reformat your drives. Backing up your data on another S2VR Duo is highly recommended. Your S2VR Duo comes pre-configured in Performance mode. (Out of the box) If you want to change project and format into Performance function, follow these steps. Please delete your original S2VR’s RAID setting via Disk Utility 1. Open S2VR Manager, Select Performance mode & follow prompt to format your S2VR to Performance mode.
2. After you change your S2VR’s setting into Performance mode, you S2VR Manager will be showing as below. 3. Create Partition via Disk Utility, remember to choose ‘Mac OS Extended’ for maximum performance.
4. Restart your computer, and your newly configured S2VR is ready to use! Protected Mode Your data will be lost as this process will reformat your drives. Backing up your data on another S2VR Duo is highly recommended. Your S2VR Duo comes pre-configured in Performance mode. (Out of the box) If you want to change the project and format into Protected function, follow these steps.
1. Open S2VR Manager, Select Protected mode & follow prompt to format your S2VR to Protected mode. 2. After you change your S2VR’s setting into Protected mode, you S2VR Manager will be showing as below.
3. Create Partition via Disk Utility, remember to choose ‘Mac OS Extended’ for maximum performance. 4. Restart your computer, and your newly configured S2VR is ready to use! Informational Factoid: The FAQ section on our website has answers to the most common questions and or potential problem(s) that you may encounter, please go to http://www.caldigit.com/faq.asp for more information. CalDigit, Professional Grade Products.
Protected Mode, rebuild information Protected mode combines the best features of striping and mirroring to yield large arrays with high performance in most uses and superior fault tolerance. CalDigit S2VR Duo comes with the world-leading technology to ensure the safety of your important data. You can rest free knowing that your data is protected by the best technology in the market.
Demonstration of HDD failure 1. Your S2VR manager will monitor your S2VR Duo and will notify you in the event of a problem. 2. Your S2VR manager will provide a real time monitor of the rebuilding progress. 3. Service your drive ASAP. Important Note: Always back up your important data! Having another copy of your important work is always and highly recommended.
Troubleshooting In the event that your S2VR Duo is not working correctly, please refer to the 3 items below to find out where the problem is coming from. Should the steps below not remedy the situation, please check the FAQs on our website www.caldigit.com. One of these FAQs should provide the solution to your specific problem. If you need further assistance, please contact your Century Global reseller. 1. Inspect your S2VR Duo Make sure the power source of your external SATA device is connect properly. 2.
Serviceability The S2VR Duo is designed to provide easy disk drive replacement, should a disk drive module need to be serviced, simply unscrew the thumbscrew, pull down on the tray handle and pull the drive out. Replace the bad drive module with a new module, sold as a separate accessory item through CalDigit or your authorized reseller/dealer. Glossary Daemon - A component of the S2VR manager responsible for status tracking and SAFE volume rebuilds.