with Thunderbolt™ 2 User Manual For more information visit www.caldigit.
Contents 1. Introduction 03 Package Contents 06 T3 Diagram 07 2. Using the T3 08 Connecting the T3 08 Create a RAID 09 Mac OS X 10 Windows 7 & 8 13 Create a RAID by CalDigit Drive Utility (Optional) 17 Replacing the T3 Drive Module 20 Turning off the T3 22 3. CalDigit Drive Utility (Optional) 23 4.
1. Introduction The CalDigit T3 is a compact 3-bay storage solution for users who not only require outstanding performance, but also the ultimate protection for their important data. The T3 is a RAID 0, 1 & JBOD device. Priced similarly to dual bay RAID solutions, the extra drive in the T3 adds additional performance with a minimal footprint increase. The T3 is equipped with Thunderbolt 2 and is compatible with both HDDs and SSDs, making it the ideal solution for 4K workflows.
General Use Warnings Please read the T3 manual thoroughly and familiarize yourself with the product before use. Only use the T3 in an area with sufficient ventilation. Make sure that the fan is not obstructed to ensure proper air flow, which is essential for heat dissipation. Do not leave or use the T3 near a heat source or direct sunlight. Avoid using the T3 in extremely hot or cold environments as it will increase the likelihood of premature drive failure.
The T3 unit comes with a standard, 5 year limited warranty. The HDDs come with a 3 year limited warranty. Burst transfer rates will vary from one computer to another. Depending on the host configuration, average speeds are usually lower. Weight varies by configuration and manufacturing process. IMPORTANT The use of this product is subject to acceptance of the software license agreements included. This product contains electronic documentation. 1TB (Terabyte) = 1000GB (Gigabyte) = 1,000,000,000 bytes.
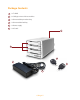
Package Contents 1 1 x T3 RAID 2 3 x CalDigit universal drive modules 3 1 x Drive module pin release key 4 1 x Drive module lock key 5 1 x Power supply 6 1 x AC cord 1 2 4 5 3 6 CalDigit 6
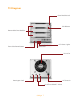
T3 Diagram Drive Module Lock PIN Release Removable Drive Module LED Status Lights Front Side Power Button Power LED Smart Fan Kensington Lock AC Power In Dual Thunderbolt™ 2 Ports CalDigit 7
2. Using the T3 Connecting the T3 1 Turn on the computer, make sure you have logged into the OS. 2 Connect a Thunderbolt cable* from your computer to the T3. 3 Connect the power supply to the T3. 4 Press the T3’s power button and it will boot. You will see it mount and it will be ready for use. PC users will need to format the T3 for Windows OS before the device mounts. 3 4 *Thunderbolt cable sold separately.
Create a RAID NOTE The T3 comes formatted as a software RAID 0 using Mac’s HFS + file system. Windows users must recreate the RAID in the T3 using Window’s disk management software using the NTFS format. Creating a RAID will delete any information on the hard drives so make sure to back up all your data before proceeding. Striped RAID Set - RAID 0 - distributes data evenly across all drives in RAID 0. Use this mode for increased performance. RAID 0 provides no protection against drive failure.
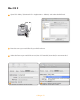
Mac OS X 1 Open “Disk Utility” (Macintosh HD > Applications > Utilities) and select the RAID tab. 2 Enter the name you would like for your RAID volume. 3 Select the format you would like to use, Mac OS Extended (Journaled) is recommended.
4 Select the RAID type you would like to use. Striped RAID Set - RAID 0 - distributes data evenly across all drives in RAID 0. Use this mode for increased performance. RAID 0 provides no protection against drive failure. It is highly recommended to have a backup when using the T3 in RAID 0. Mirrored RAID Set - RAID 1 - creates identical copies of data across all drives in the RAID 1 volume. RAID 1 is ideal for back up and archiving.
5 Locate the three CalDigit disks on the left panel. Drag and drop each one onto the list on the right. 6 Select the “create” button and Disk Utility will create the RAID. 6 5 7 The volume will mount on your desktop and it will be ready for use.
Windows 7 & 8 1 Click on the start button, right click on “Computer” to bring down the drop down menu and select manage. 2 After the “computer management” window opens, select “disk management” on the left side.
3 If the T3 drives have existing volumes on them, they must be deleted prior to setting up the RAID. All of the current volumes will be listed in the top portion of disk management. You can delete the volumes by right clicking on the corresponding T3 drives and selecting “Delete Volume...” 4 The drives should be showing on the bottom portion of the disk management window with their space as unallocated.
5 Right click on the first T3 disk that you want included in your RAID. You will be presented with several options on how to configure your drives. New Simple Volume - JBOD mode, non-RAID - creates a normal volume. Use this mode if you wish to use your T3 as a JBOD (just a bunch of disks) storage device, letting you create individual partitions on each of the drives. You can create a new simple volume on one of the drives and RAID the remaining two if you wish.
6 Once you select which RAID you want to use, select the drives that you want and add them to the list on the right. 7 Assign a mount letter and name the new volume. Select the settings you would like to format the volume with and select next. The RAID will be created and your volume will mount and be ready for use.
Create a RAID by CalDigit Drive Utility (Optional) If the T3 is currently in a RAID set, users will need to delete the current RAID before creating a new RAID set. If your T3 is not configured into a RAID set you can skip to step 4. 1 Launch the CalDigit Drive Utility Software 2 Click on the “Disk Utility” button on the left hand side of the window. 3 Click the “RAID Management” button and then click on “Delete RAID Sets”. Then click on “Yes” to proceed and the current RAID set will be deleted.
4 Go back into the “Disk Utility” tab and select “Create New RAID Set”. Select the RAID mode you would like to create. 5 Check all of the drives that you would like to include in the RAID set and select “create”. Drives are numbered from top to bottom (A0 top, A1 middle, A2 bottom).
6 The RAID will be created and the T3 will mount on your computer. CalDigit Dri ve Utility Device List Disk Utility Preferences Disk Benchmark Quit RAID -Type Device 3 Description CalDigit T3 003D000700000040 RAID 0 ...... ...... Events Device 2 ...... ...... ...... ...... Notification Device 1 Drive in formation Model GUID Healthy A0123456789 -Volume Size -Status -Disk s Slot A0 Information -Disk Status -Serial Number CalDigit 19 3.
Replacing the T3 Drive Module 1 Insert the drive key into the lock on the front of the drive module and turn clockwise to unlock it. 2 Insert the drive pin into the pin release until the handle of the drive module pops open.
3 Pull the drive module from the T3 enclosure. 4 Insert the new drive in the same orientation as the drive you removed. The key holes should be on the same side as the drive labeling. Push the drive in all the way and then press in the drive module handle until it locks securely into place. Please do not use excessive force to insert the drive or you can damage it. The new drive will mount onto your OS.
5 To lock the new module into place, insert the drive key into the lock and turn counterclockwise. Turning off the T3 1 Right click on the T3 volume icon and click “Eject CalDigit T3”. It is important that the T3 is ejected prior to shutting down to prevent directory/data corruption. 2 After the T3 dismounts, press and hold the power button until the power LED turns off.
3. CalDigit Drive Utility The CalDigit Drive Utility is a powerful tool that allows users to configure, monitor, and diagnose their CalDigit Thunderbolt RAIDs. CalDigit Dri ve Utility Device List Disk Utility Preferences Disk Benchmark Quit RAID -Type Device 3 Description CalDigit T3 003D000700000040 RAID 0 ...... ...... Events Device 2 Drive in formation Model GUID ...... ...... ...... ......
4. Technical Support & Warranty Information Technical Support If you run into any issues while using your T3, please contact CalDigit Technical Support: Phone: 1-(714) 572-6668 Email: support@caldigit.com Website: www.caldigit.com/support.
CalDigit Limited Warranty Policy CalDigit, Inc. (“CalDigit”) warrants, to the original purchaser, that this equipment shall be free of defects in materials and workmanship for a period of one (1), three (3), or five (5) years, depending on the model, from CalDigit’s date of original shipment when the equipment is used normally and is properly serviced when needed.
without the written permission of CalDigit; or (VIII) if any CalDigit serial number on the product has been removed or defaced. No CalDigit dealer, agent, or employee is authorized to make any modification, extension, or addition to this warranty. Any loss, corruption or destruction of data while using a CalDigit drive is the sole responsibility of the user, and under no circumstances will CalDigit be held liable for the recovery or restoration of this data.
For products purchased in the United States, you may contact CalDigit US Headquarters. Address: CALDIGIT INC. 1941 E MIRALOMA AVE STE B PLACENTIA, CA 92870-6770 United States Email: sales@caldigit.com Website: www.caldigit.com Customer service: 714-572-9889 x1 For products purchased in the European, you may contact CalDigit UK office. Address: Unit 3, Glenmore Business Centre Witney, Oxfordshire OX29 0AA Email: eusales@caldigit.com Website: www.caldigit.
CalDigit T3 www.caldigit.com © 2014 CalDigit, Inc.