
Specifications

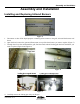

Assembly and Installation
Page 16 2006 Barbecue Owner's Manual
LTR20061004, Rev. A
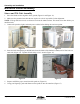
Rock / Stone Assembly
For Models G-2500, G-2500F, G-2600, G-3000, G-3500F, G-3600
1. Place the island sections together on the ground.
2. Make sure the ground where the barbecue is place is as level as possible for best alignment.
NOTE: If the ground is not level, use shims to level out the island sections. This needs to be done before you
place the bolts.
3. Connect the speakers, lights, and main power cables before sliding the sections together.
4. Insert the bolts through the pre-drilled holes from the inside of the barbecue island (total of four bolts on
each side). Tighten all bolts using a 9/16” wrench.
5. Prepare mortar in a container.
6. Apply mortar to the gaps left open between the island assembly (front and back).
7. Let it dry for 15 to 30 minutes and brush the area where the mortar mix was applied.
8. Prepare grout in a second container.
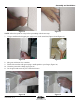
9. Fill the tile seam with grout using a small spatula or your finger.
10. Clean the grout with a damp rag.
11. Let the grout and mortar dry for at least three hours.
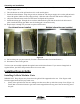
Granite Kit Instructions
Granite kits come in the following colors. Each contains various tinting colors as listed below:
Sapphire Brown New Venetian Gold Uba Tuba (Labrador) Giallo Veneziano
Black White Black Red-Brown
White Yellow White Yellow
Blue Blue Green Black
Brown White
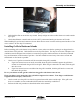
1. Pour a small amount of epoxy resin and a small drop of each tint color on a piece of a cardboard.
NOTE: Refer to the granite tint color reference chart
2. Apply a small amount of the first tint color to the epoxy resin using a mixing stick and mix well.
3. Apply a small amount of the second tint color to the epoxy resin and mix well.
4. Apply a small amount of the next tint colors, one at a time to the epoxy resin and mix well.
5. Compare color of mixed epoxy resin with the color of the counter top.
6. If the colors do not match, add small amounts of tint color (one at a time) and mix until the resin mixture
matches the color of the granite top.
7. Add a small amount of hardener to the matching resin mixture and mix well.
8. Quickly fill one portion of the seam line with the epoxy mixture. Remove the excess epoxy material from
the seam line using a razor blade.
9. Let the epoxy material cure for five minutes.
10. Pour a small amount of epoxy and hardener separately on a piece of cardboard.
11. Mix the epoxy material well with the hardener.