
Installation Guide


Questions? (888) 788-2254
www.CaliFloors.com
Solid Bamboo Flooring
Installation Guide
Installation
Floating T&G Installation Method
Recommended Floating T&G Floor Tools
Floating T&G Installation Steps
1. Use Titebond® Tongue & Groove Flooring Glue for floating applications.
2. Before you start, ensure that the job site, subfloor and environmental conditions
are acceptable for installation of Cali Bamboo® flooring. All requirements
specified in Cali Bamboo’s Installation Guidelines must be met.
3. Seal concrete subfloor with Titebond® 531+ Moisture Control System prior to
installation.
4. Allow at least a 1/2” space for expansion around the perimeter of the room
and all vertical objects using spacers. Also see section: “Expansion Space is
Required”.
5. It is recommended to install the planks parallel to the longest wall.
6. Dry lay (do not glue) a few rows before installation to confirm your layout plan.
7. Begin by laying the first plank in a corner with the long grooved side toward the
long wall.
8. Apply a small continuous consistent bead of Titebond™ T&G flooring glue along
the bottom side of the flooring groove.
9. Connect short side of second plank together with mating side of the first plank.
10. Cut the last plank and complete the row. Use the remaining plank to start the
second row.
11. Make sure to offset the end joints of consecutive rows by a minimum of 6 inches
for best appearance.
12. Continue second row by connecting short edges of planks first with long edges.
13. The last row may require rip cutting the planks to size, be sure to cut enough to
maintain proper expansion space.
14. As with the other rows, complete the last row by connecting the short edges first
and using a pull bar to tap the long edges together.
After Installation
• Always remove any adhesive from the surface of the flooring (smudges,
fingerprints, etc.) before it dries. Use Bostik’s™ Ultimate Adhesive Remover
Towels to immediately remove any adhesive on flooring surface as you go.
• Allow the newly installed floor to fully cure based on adhesive recommendations
before walking or moving furniture onto the floor.
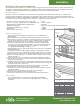
Wood or plastic
spacers (1/2”)
Stagger End Joints Avoid “H” Joints
Glue Groove
• Titebond® Tongue & Groove Flooring Glue
• Undercut or jamb saw
• Underlayment (see “Moisture Barrier Requirements”)
• Hammer
• Tapping block (trimmed piece of flooring)
• Tape Measure
• Wood or plastic spacers (1/2”)
• Pencil
• Flat bar or pull bar
• Chalk line
• Miter saw (chop-saw) with carbide blade 80 tooth
or higher
• Earplugs & safety glasses