TruOrganics Installation Guide (888) 788-2254 www.CaliBamboo.
The Collection Decking Systems TRUORGANICS 3G 5-7/16” Wide Plank Dims: 192”L x 5-7/16”W x 7/8”H TRUORGANICS 3G WIDE 8-1/4” Wide Plank Dims: 96”L x 8-1/4”W x 7/8”H TRUORGANICS SQUARE EDGE 5-7/16” Wide Plank Dims: 192”L x 5-7/16”W x 7/8”H Decking Accessories 3G END CAP 3G WIDE END CAP UNIVERSAL HIDDEN FASTENERS UNIVERSAL BUTT SEAM CLIPS STARTER CLIPS Available Colors SEDONA GLACIER TruOrganics Installation Guide DENALI YOSEMITE MOJAVE CARIBOU Questions? (888) 788-2254 www.CaliBamboo.
Pre-Installation Before you begin installation, remember to take your T.I.M.E. with the checklist below. Full installation instructions and maintenance guidelines can also be found online at www.CaliBamboo.com T IME BUILDING TAKE TIME TO READ T I ME INSTALL VENTILATION CODES GROUND Take time to read the local building codes for any special requirements or restrictions. TI ME MEASURE YOUR JOIST Install 4 inches of continuous net free area under the decking surface for adequate ventilation.
Pre-Installation IMPORTANT: Pre-Installation Guidelines Note: Decking not used for its intended purpose will not be covered under warranty. For the most up-todate information, please visit our website at CaliBamboo.com Prior to installing any composite decking it is recommended that you check with local building codes for any special requirements or restrictions.
Pre-Installation Construction TruOrganics decking is NOT intended for use as columns, support posts, beams, joist stringers or other primary load-bearing members. TruOrganics must be supported by a code-compliant substructure. While TruOrganics products are great for retrofits, they should not be installed on existing decking boards. Static Static build-up is a natural occurring phenomenon that can occur with many plastic products.
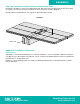
Installation Face Fasteners When fastening TruOrganics products all screws that are face fastened must be driven in at a 90 degree angle to the decking surface. See Diagram 1. An extra (sister) joist should be added if a 90 degree angle cannot be driven into the board. Never toe/edge screw the deck boards. All screws that are face fastened must be stainless steel. To ensure structural integrity of the boards maximum overhang should be 5/8” as shown in Diagram 1.
Installation TruOrganics Universal Hidden Fastener Installation HOUSE 1. Installing First Row Fasten one edge of the first board at each framing support using a quality 2-1/2” (64mm) deck screw. It is important that this board is straight and well secured. 2. Position Fasteners Fully insert Universal Hidden Fastener into grooved edge of deck board. Screw hole should line up with the center of support joist. JOIST 3.
Installation Universal Butt Seam Clip Installation 1. Determine Location of Seam Determine upon which joist your next row of boards will have a seam. If this is not known ahead of time it may be necessary to adjust clip when butt seam location is determined. Be sure to install a Universal Hidden Fastener and Butt Seam Clip at the joist where the next seam will land. If this is not known ahead of time it may be necessary to adjust clip when butt seam location is determined. 2.
Installation End Joint Installation without Universal Butt Seam Clips All fasteners should be on their own independent joists. When two board ends meet each other, there must be a sister joist. The end of each board must sit on its own joist as shown in Diagram 5. All end joints need a minimum of 1/4” expansion gap from board to board. Diagram 5 Sister Joist Additional Installation Information Metal Framing Cali Bamboo considers metal framing to be a custom installation.
Installation End Cap Installation - Installing the End Caps 1. Place the end cap in front of the TruOrganics 3G boards holes and push in as shown in Diagram 5. If additional pressure is needed to install the end caps a rubber mallet should be used. 2. Silicone (shown in Diagram 5) should be used on the end cap or inside the holes of the board in order to secure the end caps and seal the end of the deck board. 3. When finished, the ends of the boards should look like Diagram 6 below.
Installation Breaker Board Installation When a length of more than two boards is needed to install the deck, we recommend adding a breaker board as shown in Diagram 9. This will help minimize the appearance of normal expansion and contraction. Diagram 8 and 9 show the framework and installation of the breaker board respectively. Diagram 8 framework uses a ladder joist installation where the user is building a frame perpendicular to the board that will be running down it.
Installation Sleeper System Installation • Make sure to fix any water run-off or pooling problems that may exist on the patio • The system must be solid, no floating systems allowed • Predrill holes for concrete screws • Sleepers need to be at least 1-1/2” in both width and height • Do not install sleepers on any lose substance such as dirt, concrete pavers or sand • Solid surface must be flat and level • Spacers are permitted (highly recommended) between sleeper system and concrete to improve drainage • Ma
Installation Stair Tread Installation Diagram 12 Stair treads built with TruOrganics must meet requirements set forth by major national building codes. Consult your local municipality for specific requirements. Review Diagram 12 and reference the table below with the maximum spacing from center to center for stair tread installation. A minimum of four (4) stringers are required. Overhang on a stair tread should not exceed more than 5/8”. Remember to pre-drill before face fixing into the board.