
Installation Guide


Questions? (888) 788-2254
www.CaliBrands.com
Odyssey Flooring Installation Guide
Installation
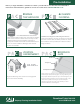
Nail-Down Installation Steps
1. Use a vapor retarder designed for wood subfloors (see “Moisture Barrier
Requirements”).
2. When nailing, the flooring should be always laid perpendicular to the floor joist.
3. Allow at least a 1/2-inch space for expansion around the perimeter of the room and
all vertical objects using spacers. Also see section: “Expansion Space is Required”.
4. Dry lay (do not nail) a few rows before installation to confirm your layout plan.
5. Test the air pressure and angle of your pneumatic nailer with a sample plank to
check for correct air pressure before installation. If you note any surface damage
(face dimpling), tongue damage (splitting), etc., adjust the air pressure/angle
accordingly. Test until dimpling no longer occurs.
6. Begin installation next to an outside wall. This is the best reference for establishing
a straight working line. Starting in the middle of a room is typically reserved for
Professional installer only.
7. Starter row may need to be rip cut depending on measurements of room. It is a
best practice to measure your room and divide by the plank size to ensure your last
piece does not end up less than 2-inch. The ideal outcome is your first row and last
row have the same width size.
8. Hold starter row in place by blind nailing using 6d finish nails or gluing.
9. Connect short side of second plank together with the mating side of the first plank
10. Cut last plank and complete row. Use the remaining plank to start the second row.
11. Be sure to offset the end joints of consecutive rows by a minimum of six (6) inches
for best appearance.
12. Continue second row by connecting short plank edges first with the long edges. The
second row may still need to be face nailed depending on size of plank and nailer
being used.
13. After the first two rows are secured, start the next row by nailing directly above the
tongue at a 45 degree angle.
14. Carefully monitor nailer pressure to ensure that the nail head enters the tongue only
as deeply as required to allow the adjacent plank to fit properly. Ensure that the nail
head rests cleanly in the “pocket”.
15. Recommended nail schedule is 6 to 8-inches along the length of each board. If
installing wide+ 7-1/4-inch the schedule should be tightened to 4 to 6-inches.
16. Avoid nailing closer than 2 to 3-inches from the end of the plank.
17. As with the other rows, connect the short edges first and use a pull bar to tap the
long edges together.
18. Always check your working lines to be sure the floor is still aligned.
19. The last row may require rip cutting the planks to size.
20. The last one to two rows will need to be secured in the same manner as the first two.
After Installation
• The newly installed floor is complete and can be walked on immediately.
• Use wood filler or putty to fill any nail holes or to correct minor flooring damage if
any occurred during install.
Nail-Down T&G Installation Method
The nail-down method is suitable for wood subfloors. Before you start, ensure that the job site, subfloor and environmental
conditions are acceptable for installation of CALI engineered hardwood flooring. All requirements specified in CALI’s Installation
Guidelines must be met.
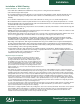
Recommended Tools
The selection and use of any nailer is at the discretion and responsibility of the installer/ homeowner. Choose a nailer model that
is specifically designed for tongue and groove applications. We recommend a Pneumatic 18 Gauge Flooring Nailer (such as the
PowerNail 50p flex, 50F, Primatech 550 or similar ). It is the installer’s responsibility to determine the correct pressure for their
nailer, and to ensure that the nail is properly seated. Dimpling of the flooring face or edge is not a manufacturing defect. CALI does
not recommend using staples as they do not have the same holding power that cleat nails provide.
• Pneumatic 18-gauge tongue-and-groove flooring nailer • Use 1-1⁄2-inch to 1-3/4-inch long, 18 gauge cleats
• Underlayment (see “Moisture Barrier Requirements”) • Earplugs & safety glasses
• Tapping block (trimmed piece of flooring) • Tape Measure
• Wood or plastic spacers (1/2-inch) • Pencil
• Flat bar or pull bar • Chalk line
• Miter saw (chop-saw) • Hammer
• Undercut or jamb saw • Table saw
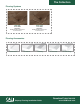
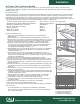
Wood or plastic
spacers (1/2”)
Stagger End Joints Avoid “H” Joints
No Nails
Nail Spacing
Note: Although H joints do not void
a warranty, they can decrease the
overall structural strength of the
flooring therefore Cali never
recommends H joint installation.