
Installation Guide


Questions? (888) 788-2254
www.CaliFloors.com
Cali Vinyl Pro Flooring Installation Guide
Installation
Page 8
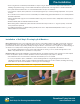
Installing the First Two Rows:
1. Start with a plank cut at least 8” in length. (Cut the right side of the plank off, and save the excess for another row.)
Starting from the right (when facing the wall), position the first board with the exposed lip facing you. Planks should be
staggered in a brick-laid pattern for the first 2 rows to ensure proper engagement (see diagram A, plank 1). It is very
important that this first row is installed straight and even.
2. Select a long, uncut plank (see diagram A, plank 2) and angle it down slightly to position in place. Use a tapping block to
confirm the long side of the plank fits snugly with no gapping.
Quick tip! Tapping blocks must be used gently, as excessive force can cause plank seams to peak.
3. Select another long plank and backfill it into position 3 (see Diagram A). Use the rubber mallet to gently tap the butt end
seams and secure the planks together. Butt end seams will be smooth to the touch when engaged properly and have no
visible gaps. The long side of the plank should also fit snugly with no gapping.
Quick tip! A rubber mallet must be used on the butt ends (short ends) to fully secure the planks. Failure to fully engage the flooring
may result in gapping or misaligned planks.
4. Throughout the entire installation process, remember to check that your spacers are maintaining the ¼” expansion space
along room perimeter or next to any fixed objects.
Starting the first two rows
Plank 1
1
2
1
2
3
135
24
910
8
7 6
Diagram A
For row three onwards, installation does not require alternating rows.