
Installation Guide


Questions? (888) 788-2254
www.CaliFloors.com
Cali Vinyl Pro Classic Flooring Installation Guide
Installation
Page 9
Next Steps:
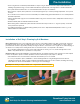
1. Continue alternating planks on rows 1 and 2 to avoid misalignment. For row 3 onwards, installation does not require
alternating rows. Install one row after another by angling down on the long side of the plank, sliding until the butt end
seams are in contact, and then gently tapping all seams into place.
Quick tip! Be sure to inspect the long and short edges of the plank for any gapping before moving on to the next plank. If you notice
a gap, always reinstall the board to ensure a snug fit (see diagram on plank disassembling).
2. Install remaining boards and rows in the same manner. Use cut pieces at least 8” in length from previous rows as starter
boards to reduce waste and avoid repeating patterns. Butt end seams should be staggered at least 8” between rows for
optimum engagement of planks and overall appearance. This will help you avoid “H” joints.
3. Continue to use the rubber mallet and tapping block to ensure all seams are snug. Double check ¼” expansion spaces
throughout the installation process.
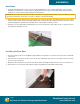
Rubber Mallet
Installing the Final Row:
1. The last row may need to be cut lengthwise (ripped). Make sure ripped piece is at least 1/3 the size of the overall width
of the plank.
2. Place the last row of boards to be fit on top of the last row of installed boards. Use a piece of plank or tile as a scribe to
trace the contour of the wall.
3. Mark where the board will be cut. If the fit of the wall is simple and straight, simply measure for the correct fit and cut.
4. After boards are cut, position boards and tap all joints (long AND short ends) with the rubber mallet.