RCD 1 2 0BT MANUAL o (# o
RCD 120BT MANUAL Installation . . . . . . . . . . . ...................................... . 02 Additional information ................................. 04 General operations ...................................... 05 Radio operations ......................................... 09 CD/SD/MMC/USB Operations ................... .. 11 RDS operation ............................................. 14 BLUETOOTH ...............................................15 MP3 WMA overview .............................. . . . .
RCD 120BT MANUAL INSTALLATION PRECAUTION S Cho os e the moun ting loc at ion whe re the un it wi ll no t int er fer e wi th the no rmal driving function of the driver. Bef or e final ly ins tal ling the uni t, co nne ct the wi ring tem por ar ily and mak e su re it is all connected up properly and the unit and the system work properly. Use onl y the par ts incl uded wi th the uni t to ens ur e pr oper inst al lat ion. The use of unauthorized parts can cause ma lfunctions.
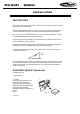
RCD 120BT o MANUAL INSTALLATION 1 Removing the unit 6 1 7 4 2 5 2 3 3 ( Fig . 2 ) ( Fig . 3 ) 1. Dashboard 2. Nut (5mm) 3. Spring Washer 4. Screw (5 x 25mm) 5. Screw 6. Strap Be sure to use the strap to secure the back of the unit in place. The strap can be bent by hand to the desired angle. 7. Plain Washer 2.Insert fingers into the groove in the front of frame and pul l out to remove the frame. (When reatt achi ng the frame , point the side wi th a groove dow nwards and attach it.) 3.
RCD 120BT o MANUAL ADDITIONAL INFORMATION B. T.
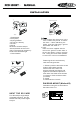
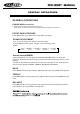
RCD 120BT o MANUAL GENERAL OPERATIONS FRONT PANEL LAYOUT 2 4 3 6 5 10 DISP 9 1 AMS MENU MODE MU BND 1/ 19 2/INT 3/RPT 4/RDM 12 13 14 11 15 16 21 20 7 8 17 1. Power / Mode / Next / Previous Button 2. Release Button 3. 4. 5. 6. 7. 8. Menu / Volume Button Mute / Button Display Button LCD Display Flashing LED Reset Button 9. Band/ switch /ID3 select 10. Automatically memory storing 11. Play / Pause & Preset Button 1 18 12. Intro & Preset Button 2 13.
RCD 120BT o MANUAL GENERAL OPERATIONS GENERAL OPERATIONS POWER /MOD conversion 2. Under power off status,short press is power on, Under power on status,short press is switching mode,long press is power off. FRONT PANEL RELEASE Press REL button (2) to detach the removable front panel SOUND ADJUSTMENT Turn on (3) can adjust the desired volume quality. A).Press MENU button (3) will change in the following order.
RCD 120BT o MANUAL GENERAL OPERATIONS MENU/VOL DSP OFF/ON AREA EUR/USA LOUD OFF/ON VOL ADT/LAST MENU/VOL MENU/VOL DEMO OFF/ON DX/LOCAL AEM OFF/ON BEEP ON/OFF MONO/STEREO SEEK
RCD 120BT o MANUAL GENERAL OPERATIONS DISPLAY Press DISP button (5) to operate as the conversion of each display mode as follow: - Time is displayed for 5sec when DISP key is pressed, and it returns to its previous display ( Folder, File name...) unless DISP key is pressed again. 3) From the clock mode, when DISP Key is pressed for longer than 1sec, clock mode switches to clock Adjusting mode and the clock display begins flashing. At this time clock can be changed by pressing (+/-), or the ENCODER VOLUME.
RCD 120BT o MANUAL GENERAL OPERATIONS MENU/VOL DSP OFF/ON AREA EUR/USA LOUD OFF/ON VOL ADT/LAST MENU/VOL MENU/VOL DEMO OFF/ON DX/LOCAL AEM OFF/ON BEEP ON/OFF MONO/STEREO SEEK
RCD 120BT o MANUAL RADIO OPERATIONS LOCAL RADIO STATION SEARCH Press MENU button repeatedly to choose LOCAL(DX).Rotate VOL regulator or press VOL+/- buttons on the RCto switch between LOCAL and DX.When the LOCAL function is on the local stations(stations with weak radio) Press MENU button repeatedly until LOUD ON is displayed.Rotate VOL regulator on the front panel or press VOL+/VOL- buttons on the RC to select loudness ON or OFF.
RCD 120BT o MANUAL CD/SD/MMC/USB OPERATIONS Discs for playback: This unit can play disc types: CD/CD -R/-RW. Compatible with formats: CDDA/MP3/WMA. Loading and ejecting a disc 1. Turn the power on. 2. Insert the disc with the printed side facing upward into the slot. 3. Press EJECT button to eject the disc. Multi-media card MMC/SD card slot Support MP3/WMA ID3 format music only. Detach the front panel. Carefully insert the SD/MMC card into the card slot on the inner panel. Attach the panel.
RCD 120BT o MANUAL CD/SD/MMC/USB OPERATIONS Id3 Tag information This unit supports ID3 tag ver2.0. If an MP3/WMA file has ID3 Tag information, it will be displayed on the LCD. If there is no ID3 Tag information, nothing will be shown on LCD. The ID3 Tag information may include File, Folder, Music,Album or Artist data. NEXT/PREVIOUS Rotate the NEXT/PREVIOUS button to choose next or previous track. Press longer than 1 sec., to choose forward playback or backward playback.
RCD 120BT o MANUAL GENERAL OPERATIONS DISPLAY Press DISP button (5) to operate as the conversion of each display mode as follow: - Time is displayed for 5sec when DISP key is pressed, and it returns to its previous display ( Folder, File name...) unless DISP key is pressed again. 3) From the clock mode, when DISP Key is pressed for longer than 1sec, clock mode switches to clock Adjusting mode and the clock display begins flashing.
RCD 120BT o MANUAL Long press SEL key,select AF and TA ON, AF flashing on display TA appears on display. SEL Press SEL key,PTY flashing on display when select PTY.
RCD 120BT o MANUAL BLUETOOTH 1.Pairing connect. Turn on car unit, put your mobile near the unit, activate your mobile bluetooth function.Soon the phone will find the new bluetooth device "CAR AUDIO" . Input the pairing password “8888” and clik OK. The phone will prompt the matching successful.When the pairing connect is successful,on the LCD, it shows BT ON, and the bluetooth logo “ ”will stop blinking .Then you may perform the bluetooth operation.
RCD 120BT o MANUAL MP3 is short for MPEG Audio Layer 3 and refers to an audio compression technology standard. · This product allows playback of MP3 files on CD-ROM, CD-R or CD-RW discs. · The unit can read MP3 files written in the format compliant with ISO 9660. However it does not support the MP3 data written by the method of packet write. · The unit can not read an MP3 file that has a file extension other than “.mp3” · If you play a non- MP3 file that has the “.mp3” extension, you may hear some noise.
RCD 120BT o MANUAL GENERAL OPERATIONS FRONT PANEL LAYOUT 2 4 3 6 5 10 DISP 9 1 AMS MENU MODE MU BND 1/ 19 2/INT 3/RPT 4/RDM 12 13 14 11 15 16 21 20 7 8 17 1. Power / Mode / Next / Previous Button 2. Release Button 3. 4. 5. 6. 7. 8. Menu / Volume Button Mute / Button Display Button LCD Display Flashing LED Reset Button 9. Band/ switch /ID3 select 10. Automatically memory storing 11. Play / Pause & Preset Button 1 18 12. Intro & Preset Button 2 13.
RCD 120BT o MANUAL BEFORE PLAYING DISCS Cleaning the CD Before playing a CD, wipe it off with a clean, dust-free cleaning cloth. Wipe the disc in the direction of the arrow. Always insert the CD with the label side facing upwards. If the CD is inserted with the printed side facing downwards, the device may be damaged. Note: If there is already a CD in the CD slot , do not try to insert a second CD. This may damage the device. Always hold CDs by the edge.
RCD 120BT o MANUAL TROUBLE SHOOTING Before going through the check list, check wiring connection.
W W W.C A L I BE R .