IMPORTANT SAFETY INSTRUCTIONS When used in the directed manner, this unit has been designed and manufactured to ensure your personal safety. However, improper uses can result in potential electrical shock or fire hazards. Please read all safety and operating instructions carefully before installation and use, and keep these instructions handy for future reference. Take special note of all warnings listed in these instructions and on the unit. Water and Moisture The unit should not be used near water.
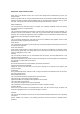
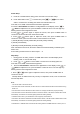
11 12 1 10 ALARM TIME RPT - MODE + 2 9 3 OFF/ON 14 4 5 6 7 8 OFF/ON 15 16 17
1. ALARM Button .In off mode: press ALARM to set the alarm. 2. TIME Button .In off mode: press TIME to set the clock time 3. RPT/SLEEP Button . In USB/SD mode, press RPT button to select REPEAT ALL or REPEAT single track. It is defaulted at REPEAT ALL. . In on mode: to select the time duration of the sleep timer from “90/80/70/60/50/40/30/20/10/00”minutes .4. MODE Button .In on mode: press MODE to select different play modes: RADIO/IPOD/USB/SD/AUX 5. Button .In off mode: press to turn this unit on .
INSTALLATION BATTERY BACK UP SYSTEM This unit uses 2pcs UM-4 AAA’ batteries (not included)to maintain the time and alarm settings in the event that it is accidentally unplugged, or you experience a temporary power failure. We recommend that you install a well-known brand of Alkaline battery for longest life and best performance. To keep the battery back up system operational you should install a pair of new batteries every 6 to 9 months. The battery back-up compartment is located at bottom of the unit.
WARNING: Do not apply power to the unit until all of your connections are made. Please turn off your iPod/iPhone before docking. Check your iPod/iPhone manual for the proper procedure to turn your model off. 1. Insert the AC cord into AC wall outlet. 2. The display is ON and showing the time. 4. Press the Play button to turn on the unit. 5. Remove the AC cord out of the wall outlet if you want to switch off the main voltage completely. BASIC OPERATION 1.
Alarm Setup 1. Press the “ALARM” button during power off mode to access time setup. 2. Press Alarm Button until “ ” icon flash then press or button to select wake to sound source circularly (the Alarm1 and relevant alert icon: from radio, iPod, USB, Card to Buzzer with Alarm1 appeared. 3.Press the Alarm Button until alarm hour digit flashes on the display. Press or Button to adjust the hour, press ALARM to confirm the hour. The hour digit stop flashing and the minute digit start to flash.
iPod/iPhone/USB/SD is detected), the buzzer will sound instead. -if the unit is power off, the alarm will sound in Buzzer mode. -If the alarm sound in Buzzer, the sound will last 10 Minutes as Alarm. If the alarm sound in Radio/iPod/USB/SD, the sound will last 1 hours. Arming and Disarming Alarm (Turn Alarm Function On and Off) To arm the alarm or to disarm the alarm, just press OFF/ON AL1 or OFF/ON AL2 button as needed during power on and off mode.
Recalling Stored Preset Stations -Press button on the unit, the memory channel number ”01” will flash, press again to select the channel number you desire station. iPod/iPhone Docking -Dock your iPad, iPhone or iPod through the iPod dock connector. Note: - Please be careful when seating the iPad/iPhone/iPod into the docking to avoid damaging the 30-pin connector on the iPod/iPhone or in the docking system. Button to turn on the unit.
Symptom The main unit does not respond (no power) iPad/iPod/iPhone does not respond to the unit iPad/iPod/iPhone does not charge up Possible problem AC cord is not plugged into a wall outlet. Wall outlet is not functioning. Plug the AC cord into a wall outlet. Plug another device into the same outlet to confirm the outlet is working. iPad/iPod/iPhone is not installed properly. Remove your iPad/iPod/iPhone from the dock and check for any obstruction on the connectors in the docking and on your iPod.
“Made for iPod”, ”Made for iPhone”, “Made for iPad” mean that an electronic accessory has been designed to connect specifically to iPod, iPhone, iPad, respectively, and has been certified by the developer to meet Apple performance standards. Apple is not responsible for the operation of this device or its complicance with safety and regulatory standards. Please note that the use of the accessory with iPod, iPhone, iPad may affect wireless performance.