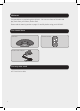
Welcome Congratulations on purchasing this HSG 401i. You can now listen to FM radio and play music from your iPhone, iPod or iPad. Please read the warning section on page 13 carefully before using your HSG 401i. You should have HSG 401i AC/DC Power Adapter You may also need • 3.
Contents Your HSG 401i 01 Setup 02 Everyday use 03 Advanced use 04 Troubleshooting 05 Maintenance 06 Warnings 07 Technical specifications 08 3
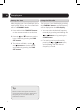
01 Your HSG 401i iPhone/iPod/iPad DOCK STANDBY button SOURCE button LED display PLAY/PAUSE button PRESET button FM aerial AUX cable input 4 VOL+ button SKIP BACK button SKIP FWD button DC POWER input POWER switch VOLbutton
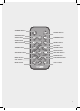
STANDBY button SOURCE button SNOOZE button SCAN button DIMMER button SLEEP button TIME SET button PRESET button UP button ALARM button REPEAT button SELECT button SKIP BACK button SKIP FWD button DOWN button MENU button VOL- button PLAY/PAUSE button MUTE button VOL+ button 5
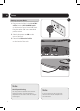
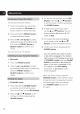
02 Setup 1 Setting up your Dock 1 Plug one end of the included AC/DC cable into the DC POWER input on the back of your Curve iPad Dock. Plug the other end into a standard power socket. 2 Switch the power to ON on the rear of the unit. 3 Extend the FM aerial cable on the back of the unit. 2 3 Note: Aerial positioning You may need to reposition the aerial for optimal reception. The best position is dependent on the station and the strength of the signal.
The remote control battery The remote control comes fitted with a 3V battery. The battery is already inserted into the remote control and blocked by a plastic sheet. Note: Remove the plastic sheet before operating the remote control. Battery replacement When the battery becomes weak, the operating distance of the remote control is greatly reduced and you will need to replace it as described below. 1 1 Slide the battery draw out from the bottom of the remote.
03 Everyday use Setting the time Using the FM radio After plugging your Curve iPad Dock into a mains power socket, your Curve iPad Dock will be in STANDBY mode. Turn on your Curve iPad Dock by pressing the STANDBY button. An FM frequency will be displayed on the LED display. 1 Press and hold the TIME SET button on the remote control to set the time 1 You can select the desired frequency manually by pressing and holding the or button or by pressing the SCAN button.
05 Troubleshooting Problem What to do iPhone/iPod/iPad System does not turn on Make sure AC/DC power adaptor is secure in the outlet and the outlet has power. iPod/iPhone/iPad in place but unit won’t play Make sure that your iPhone/iPod/iPad is working properly before docking into the unit. Please refer to your iPhone/iPod/iPad manual for details. Make sure the volume is not set to the minimum level. Pause mode is activated.
07 Warnings This product was designed and manufactured to meet strict quality and safety standards. There are, however, some operation precautions that you should be aware of: CAUTION RISK OF ELECTRIC SHOCK DO NOT OPEN CAUTION: TO REDUCE THE RISK OF ELECTRIC SHOCK, DO NOT REMOVE COVER (OR BACK). NO USER SERVICEABLE PARTS INSIDE. REFER SERVICING TO QUALIFIED SERVICE PERSONNEL. • Read all warnings. Follow all instructions.