CD/MP3 CAR RADIO WITH RDS FUNCTION MCD-263 Instruction Manual DISP EQ AMS < PUSH SEL CAR CD/MP3 PLAYER MCD263 VOL ST R MOD BAND LOUD 1 SCN RPT SHF 2 3 4 REG 5 6 TA AF PTY FM Stereo Radio PLL Synthesizer Tuner RDS (Radio Data System) Function Anti-Shock Mechanism USB Port & SD/MMC Card Slot LCD Digital Display Telephone Mute Function AUX IN & RCA Output Socket Remote Control Full Detachable Front Panel 4 x 70W High Power Output ISO Connectors for Power Supply and Speaker Outputs AU
Page CONTENTS 01 Contents 02 Installation 04 Using the detachable front panel 05 Wiring Diagram 06 Operations 06 Location and Function of Keys 07 Using the Remote Control 08 General Operations 10 Radio Operations 11 RDS (Radio Data System) Operations 13 CD/MP3 Disc Operations 14 Mixed-CD Operations 14 AUX in Operations 15 SD/MMC Card Operations 15 USB Device Operations 16 Disc Notes 17 Specifications 18 Trouble Shooting
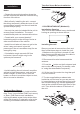
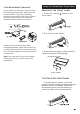
Installation Notes: Take Out Screw Before Installation Before install the unit, please remove the two screws. - Choose the mounting location where the unit will not interfere with the normal driving function of the driver. - Before finally installing the unit, connect the wiring temporarily and make sure it is all connected up properly and the unit and the system work properly. - Use only the parts included with the unit to ensure proper installation. The use of unauthorized parts can cause malfunctions.
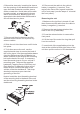
6. Mount the sleeve by inserting the sleeve into the opening of the dashboard and bend open the tabs located around the sleeve with a screwdriver. Not all tabs will be able to make contact, so examine which ones will be most effective. Bending open the appropriate tabs behind the dashboard to secure the sleeve in place. 10. Reconnect the cable to the vehicle battery's negative (-) terminal. Then replace the outer trim ring and install the unit's front panel (see the steps of 'to install the front panel').
2. DIN REAR-MOUNT (Method B) If your vehicle is a Nissan, Toyota, follow this mounting instruction. Use the screw holes marked T (Toyota), N (Nissan) located on both sides of the unit to fasten the unit to the factory radio mounting brackets supplied with your vehicle. Using The Detachable Front Panel REMOVING THE FRONT PANEL 1 . Press the release front panel . button on the 2 . Pull off the front panel . Fasten the unit to the factory radio mounting brackets.
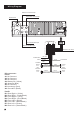
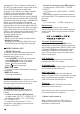
Wiring Diagram White to Front Lch RCA output White to Rear Lch RCA output Antenna Socket L R FUSE ISO CONNECTOR Red to Rear Rch RCA output Red to Front Rch RCA output ORANGE TO TEL.
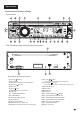
Operations Location and function of keys Front panel : 1 10 16 3 < DISP 5 2 PUSH SEL 6 4 CAR CD/MP3 PLAYER MCD263 15 21 EQ 8 VOL AMS ST R MOD BAND LOUD 9 13 1 17 22 SCN RPT SHF 2 3 4 23 24 14 25 REG 5 26 6 TA AF PTY 27 19 18 20 AUX IN 28 The front facet after removing the front panel: 5 7 11 12 Descriptions of Function Controls (1) Power( ) Button (2) LCD display (3) Encoder Volume Control/ SEL Button (4) Release ( ) Button (5) Disc slot (6) Eject ( ) key
General Operations Switching on/off the unit Switch on the unit by pressing any button (except button and button) or inserting a disc to disc slot. When system is on, press the button to turn off the unit. Sound adjustment - Rotate the volume knob on the head unit to adjust volume level. - Press the SEL button to enter into the audio selecting mode.
searches AF. The unit doesn't search this AF (DIP) for few minutes. In the case of the AF of NO RDS signal with high field strength, if the real AF is wrongly masked as DIP by some interference, the unit hesitates to search real AFs. For this reason, the unit has the user option (MASK DPI) which doesn't mask the AF of NO RDS signal with high field strength.
2. When the call ends Hang up the phone. 'TEL CALL' disappears from the display. The original source (i.e. the one used before the phone call) is returned to automatically and the volume restored gradually. Reset function RESET button must be activated with either a ballpoint pen or thin metal object. The RESET button is to be activated for the following reasons: - Initial installation of the unit when all wiring is completed. - All the function buttons do not operate. - Error symbol on the display.
RDS (Radio Data System) Operations Setting RDS mode Press the AF/REG button and release immediately to switch on or off RDS mode. Whenever RDS is switch on, symbol “ AF ” appears on the display. Program name is displayed on receiving a RDS station. “ AF ” starts blinking if the broadcasting signals getting worse.
mute sound for a while. radio is switched back to current station again. In above operation, a customer listens to a wrong program or mute sound for a while. EON TA LOCAL mode When the filed strength level of EON linked is less than threshold level, the radio does not switch that station, and a customer can hardly listen to any disturbances. When EON TA LOCAL mode is selected, “EON TA LO” on numeric display is indicated for a few seconds.
CD/MP3 Disc Operations Switching to CD/MP3 mode 1. If there is no CD/MP3 disc inserted in the player: Gently insert a CD/MP3 disc with the printed side facing up into the disc slot until you feel some resistance. The disc is draw into the driver automatically. The CD/MP3 playback begins. 2. If a CD/MP3 disc is already inserted in the player, press MODE button to switch to the CD/MP3 mode.
shown “ D-DIR ”. Rotate the volume knob to list all files, then press the BAND button to play the selected file. * Repeat above steps if the selected title is a directory again . Searching from current directory Press the AMS button for four times to enter “ Searching from current directory ” mode. 1).Rotate the volume knob to browse file or directory in current directory. 2). Press the BAND button to confirm. To start playback if the selected title is a file.
SD/MMC Card Operations This unit equipped with a memory card slot. Using the SD/MMC card: When you insert a SD/MMC card into the memory card slot, the player will reading the SD/MMC card automatically. The unit gives first priority to the latter. If insert a disc into the disc slot while read the SD/MMC card, the unit will playing the disc. You can presses MODE button to select SD/MMC mode. SD/MMC memory card playing operation is the same with the MP3 operation described above.
Disc Notes A. Notes on discs: 1. Attempting to use non-standard shape discs (e.g. square, start, and heart) may damage the unit. Be sure to use round shape CD discs only for this unit. 2. Do not stick paper or tape, etc, onto the label side or the recording side of any discs, as it may cause a malfunction. Dirt, dust, scratches and warping discs will cause disoperation. B. Notes on CD-Rs (recordable CDs)/CDRWs (rewritable Cds): 1. Be sure to use discs with following marks only for the unit to play: 2.
E . Preparing New Discs with Rough Spots A new disc may have rough edges on its inside and outside edges. If a disc with rough edges is used, the proper setting will not be performed and the player will not play the disc. Therefore, remove the rough edges in advance by using a ballpoint pen or pencil as shown on the right. To remove the rough edges, press the side of the pen or pencil against the inside and outside edges of the disc. Specifications 1.
Trouble Shooting The following chart will help in solving most problems that may occur. If you still have questions after going through the checklist, please consult your local customer service representative. Before going through this check list, refer the wiring and operating procedures. Symptom Cause The car ignition switch have not turn on. If the power supply is connected to the car accessory circuits, but the engine is not moving, switch the ignition key to “ACC”. The fuse has been blown.