
User Guide

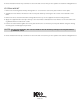

Amplified Speaker
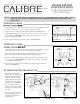
1. Route the amplified speaker cable around a panel edge
and reattach the under dash panel per DIAGRAM D1.
2. For maximum audio output and concealment, mount the
amplified speaker to the outside of the under dash panel
with the supplied screws per DIAGRAM D1.
DIAGRAM D1
DASH PANEL
SPEAKER
SCREWS
SPEAKER
CABLE
Remote Control
1. Consult with vehicle owner about the wireless Remote Control location. For optimum accessibility, choose a mounting
location on the dash or center console within easy reach of the driver.
2. Before mounting the Remote Control to the dash or console, clean both the Remote Control surface and desired
mounting location with rubbing alcohol.
3. Position the Remote Control to the dash or console with the provided double stick tape.
If the vehicle is not equipped with an under dash
panel (e.g., Porsche), mount the amplified speaker
to existing factory wire looms, brackets, or support
structures with the supplied cable ties.
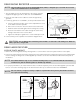
Front Radar Receiver
1. Choose a mounting location in the front of the vehicle per DIAGRAM E1. The radar receiver can be mounted horizon-
tally or vertically provided the arrows are pointing forward, towards the road ahead.
2. Mount the front radar receiver with the supplied screws or wire ties to the vehicle’s structure per DIAGRAM E1.
3. Route the wires to the desired connection point and connect per the separate enclosed block diagram sheet.
RADAR
RECEIVER
SELF-
TAPPING
SCREWS
METAL
SUPPORT
RADAR
RECEIVER
SELF-
TAPPING
SCREWS
All radar receivers can be mounted behind plastic, rubber, or fiberglass up to 1/4” thick. Do not mount
radar receiver behind metal or chromed plastic.
DIAGRAM E1
VERTICAL MOUNT
HORIZONTAL
MOUNT
NOTE:
NOTE: