
User Guide


Front Laser Defuser
®
(Optional Add-On System)
License Plate Mount
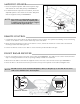
1. Remove the mounting bolts and any existing frame or cover from the license plate. Remove license plate.
2. Position the Laser Defuser around the existing front license plate and mount it against the factory license plate brack-
et. Use the existing mounting bolts or K40 supplied nylon bolts to secure the Laser Defuser frame and license plate to
the bracket.
When integrating the K40 Laser Defuser with Calibre, the Laser Defuser will utilize the same warning
light(s)/speaker as Calibre.
On vehicles that have only one set of bracket mounting holes, it is recommended that the Laser Defuser and
the license plate be bolted together to eliminate any vibration.
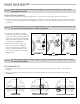
DIAGRAM F1
LASER
DEFUSER
FACTORY
MOUNTING
LOCATION
MOUNTING NUTS
LASER
DEFUSER
FACTORY
MOUNTING
LOCATION
NO
CORRECT
LASER
DEFUSER
FACTORY
MOUNTING
LOCATION
NO
3. For proper performance, the Laser
Defuser must be mounted completely
level. Use the K40 supplied nylon nuts
and bolts to correct the mounting angle
of the Laser Defuser either up or down
as needed. See DIAGRAM F1.
4. Route the black and clear zip cord
wires into the engine compartment
either through the grill or under the
bumper. Connect with radar receiver
wires per the separate enclosed block
diagram sheet.
On some vehicles, it may be necessary to adjust or reposition the factory license plate bracket to achieve
the desired level installation.
CUSTOM Mount
1. Separate the Laser Defuser module from the license plate frame by removing the two screws on the backside of
the frame.
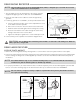
2. Choose a mounting location near the center of the vehicle that has a clear, unobstructed view of the road. See
DIAGRAM G1.
DIAGRAM G1
CENTERED &
UNOBSTRUCTED
DO NOT PUT BEHIND GRILL
DO NOT OBSTRUCT VIEW
DO NOT MOUNT OFF CENTER
NOTE:
NOTE:
NOTE: