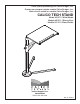
Thank you for purchasing our Calico Designs, Inc. Gracias por comprar nuestro mueble Calico Designs, Inc. Merci d’avoir acheté un meuble Calico Designs, Inc. CALICO TECH STAND Model #51211 / White/Maple Modelo #51211 / Blanco/Acre Modèle #51211 / Blanc/Érable Product Support Line: 866.942.0492 Office: 562.942.0492 Rev. 11.29.
ASSEMBLY INSTRUCTIONS - IMPORTANT: Carefully unpack & identify each component before attempting to assemble. Refer to parts list. Please take care when assembling the unit and always set the parts on a clean, soft surface. If you require any assistance with assembly, parts, or information on other products, please visit our website: www.calico-designs.com or call or write us.
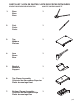
PARTS LIST / LISTA DE PARTES / LISTE DES PIÈCES DÈTACHÉES DESCRIPTION / DESCRIPCIÓN / DESCRIPTION QUANTITY / CANTIDAD / QUANTITÉ 1. Base Base Base 1 2. Post Poste Poste 1 3. Top Madera Plateau 1 4. Arm Brazo Bras 1 5. Bracket Ménsula Support 1 6. Top Clamp Assembly 1 Conjunto de Abrazadera Superior Pince de montage Haut 7. Bottom Clamp Assembly Conjunto de Abrazadera Bajo Pince de montage Bas 1 p.
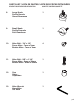
PARTS LIST / LISTA DE PARTES / LISTE DES PIÈCES DÈTACHÉES DESCRIPTION / DESCRIPCIÓN / DESCRIPTION QUANTITY / CANTIDAD / QUANTITÉ 8. Large Knob Perilla Grande Grand Pommeau 1 9. Small Knob Perilla Pequeño Petit Pommeau 1 10. Allen Bolt - 1/4" x 1/4" Perno Allen - 7mm x 7mm Boulon Allen - 7mm x 7mm 4 11. Allen Bolt - 5/8" x 1 1/4" Perno Allen - 8mm x 30mm Boulon Allen - 8mm x 30mm 1 12. Cap Gorra Capuchon 1 13. Allen Wrench Llave Allen Clé Allen 1 p.
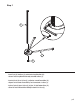
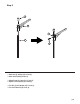
Step 1 2 1 11 • Insert Post (2) into Base (1) and attach using Allen Bolt (11). • Secure Post using Allen Bolt already attached to Base (1). • Insertar Poste (2) en la Base (1) y adjuntar usando Perno Allen (11). • Seguro Poste usando Perno Allen ya está conectado a la Base (1). • Insérer Poste (2) dans la Base (1) et fixer à l'aide Boulon Allen (11). • Sécurisé Poste utilisant Allen Bolt déjà attaché à la Base (1). p.
Step 2 12 4 4 2 9 • Attach Arm (4) and Cap (12) to Post (2). • Attach Small Knob (9) to Arm (4). • Adjunte Brazo (4) y Gorra (12) a Poste (2). • Adjunte Perilla Pequeño (9) a Brazo (4). • Fixer Bras (4) et Capuchon (12) à Poste (2). • Fixer Petit Pommeau (9) à Bras (4). p.
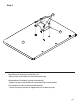
Step 3 10 5 3 • Attach Bracket (5) to Top (3) using Allen Bolts (10). *Make sure the slot in Bracket faces towards the pencil ledge. • Adjunte Ménsula (5) a Madera (3) usando Perno Allen (10). *Asegúrese de que la ranura de Ménsula está orientada hacia el borde del lápiz. • Fixer Support (5) à Plateau (3) utilisant Boulon Allen (10). * Assurez-vous que la fente dans le support orienté vers le rebord de crayon. p.
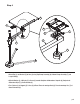
Step 4 3 6 6 7 5 4 4 8 • Attach Top (3) and Bracket (5) to Arm (4) using Top Clamp Assembly (6), Bottom Clamp Assembly (7) and Large Knob (8). • Adjunte Madera (3) y Ménsula (5) a Brazo (4) usando Conjunto de Abrazadera Superior (6), Conjunto de Abrazadera Bajo (7) y Perilla Grande (8). • Fixer Plateau (3) et Support (5) à Bras (4) utilisant Pince de montage Haut (6), Pince de montage Bas (7) et Grand Pommeau (8). p.
LIMITED WARRANTY Calico Designs (the “Company”) warrants to the original purchaser that this product will be free from defects in its workmanship and materials, under normal residential use and service conditions, as described herein.