
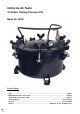
Instruction Manual


WARNING!
Risk of tank explosion.
1. Modifications to the tank’s design or construction could weaken it. Assemble tank components in
accordance with the service instructions. Do not drill into tank, or weld attachments, or alter its
design in any manner.
2. Substitution of unauthorized non-standard components could weaken tank or cause component
failure. Use only those components furnished with the tank. Assembled in accordance with
instructions in the service literature.
3. Damage to the tank or its components could weaken the
tank. Never attempt to repair a damaged tank. Replace it with a new one.
4. Improper cleaning
or maintenance could block air passages to the safety valve, gauge or outlet, allowing pressure
to rise to dangerous levels and preventing the lowering of tank pressure. Following each use,
clean and dry tank and lid in accordance with maintenance instructions. Ensure ports to safety
valve, gauge and outlet are free of hardened paint or other materials which could prevent free
movement of air.
6. Tampering with the safety valve could allow tank pressure to rise to dangerous levels. Never
attempt to adjust safety valve to change its pressure setting or defeat its function in any way.
Operate the valve before each use to assure that it functions properly.
7. Removal of the lid while the tank is under pressure could result in the lid being propelled violently
8. from the tank. Before releasing clamp force to remove the lid, shut off the supply of tank inlet air
and turn the regulator knob counterclockwise to relieve air pressure. Check by pulling the safety
valve ring.
7. Use of reactive chemicals could attack the lid gasket and safety valve seal, allowing tank
pressure
to rise to dangerous levels. If this reaction occurs within an enclosed structure such as this tank,
it may cause explosion. Do not use reactive chemicals in your tank such as acids, caustic
solutions, or halogenated hydrocarbon solvents.
9. Over tightening clamps, causing them to weaken and fail could result in the lid being propelled
violently from the tank. If the lid gasket leaks, relieve the tank pressure and clean or replace the
gasket.
Operation
1. Open the compressor’s valve or turn it on
2. Turn the regulator knob clockwise to increase the pressure material. Turn it counterclockwise
to decrease pressure. The maximum tank pressure is 60 PSI.
3. The spray gun is adjustable by means of a valve adjustment or air regulator
4. Before using the gun make sure that all connections one tightened properly check that the air
gun works with air, also check that neither gun nor hose have dirt or impurities
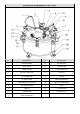
5. Connect the materials hose to coupling A and the air hose to coupling B.
6. Adjust the required size range; completely closing the lead screw, which is located on the
side of the gun, and opening it slowly until it reaches the desired array pattern.
7. Adjust the amount of material applied by completely closing the lead screw, which is located
in the rear, and opening it slowly until it reaches the desired amount of material.
8. Always paint at a uniform distance (15 t0 30 cm) and parallel to the surface you are applying
the material to.