ULTRA QUIET & OIL FREE AIR COMPRESSOR MOTOR/PUMP Ow n ER'S MAn UAL SP-9413 WWW.CALIFORNIAAIRTOOLS.
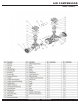
AIR COMPRESSOR TAb Le OF CONTe NTS INTROd u CTION In t r o d u c t Io n __________________________________2 ImPo r t a n t Sa f e t y In St r u c t Io n S _______________3 Lo c at Io n S o f ImPo r t a n t La b e LS _______________6 a Ir c o mPr e SSo r c o mPo n e n t S__________________8 Pr e -o Pe r at Io n c h e c k LISt ______________________9 Package c ontents & a ssembly____________________9 Inspect for d amage ____________________________10 Save Packaging _______________________________10 c ompre
AIR COMPRESSOR h ow to find a local service center: DANGER even quality built equipment might need service or repair parts. Contact the California Air Tools Customer Service d epartment: Phone: 1-866-409-4581 Online: WWW.CALIFORNIAAIRTOOLS.COM Please provide the information below: Model number and Serial number and specifications shown on the Model number/Serial number plate. Part number or numbers shown in the parts list section of the owner’s manual for your air compressor model.
AIR COMPRESSOR WARNING RISK TO BREATHING Dust or dust-like particulates caused by power-sanding, sawing, grinding, drilling or any other construction-like activities can contain contaminants that are harmful to breathe. Always use your air compressor in a well-ventilated and clean area. WARNING FLYING OBJECTS Flying objects can cause injury to the eyes, head and other parts of the body.
AIR COMPRESSOR WARNING EXPLOSION Improper care could lead to the air tank bursting or exploding. Drain air tank daily or after each use to prevent moisture buildup in the air tank. Rust can weaken the air tank and cause leaks or bursting. If rust is detected, replace tank immediately. Do not try to repair the air tank by welding, drilling or modifying it in any other way. These modifications can weaken the air tank and cause a hazardous condition.
AIR COMPRESSOR PROd u CT LAbeL LOCATIONS OF IMPORTANT LAb e LS Read these important labels before operating. These labels provide important safety and maintenance information. These labels should be considered as permanent parts of the air compressor. Should any of these labels become illegible, damaged or removed, please contact California Air Tools Customer Service department at 1-866-409-4581 for replacements.
AIR COMPRESSOR model: SP-9413 Customer Support: 1-866-409-4581 7
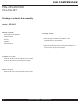
AIR COMPRESSOR PRe -OPe RATION Ch e Ck LIST Package c ontents & a ssembly model: SP-9413 Package contents: a ssembly - Power: Air Compressor Pump/Motor Owner's Manual 1. Attach the (2) blue Wires from the Motor to the Air Filter (2) White Wires on the Capacitor. Capacitor Shock Struts (4) 2. Attach the Green/yellow wire and the (2) black Wires to a Power Cord or Plug for Power Supply a ssembly - a ir f ilter: Attach the air filter to the top right side of motor head.
AIR COMPRESSOR Inspect for d amage maintain a c lear a rea before using the air compressor motor inspect all parts for damage. It is very important that the air compressor is positioned so that there is adequate airflow around the machine. There must be at least 2 feet of obstacle-free space surrounding and above the air compressor. d o not use the air compressor motor if any damage is found.
AIR COMPRESSOR OPe RATING Th e AIR COMPRe SSOR e lectrical Power e lectrical Power r equirements DANGER SHOCK There is a danger of electric shock. Use only undamaged electrical cords. DO NOT touch bare wires or receptacles. DO NOT operate air compressor in wet weather or in wet conditions. DO NOT touch air compressor or cords if hands or feet are wet. Ensure that all cords are free of damage before connecting to the power supply.
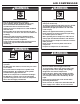
AIR COMPRESSOR MAINTe NANCe WARNING c hanging the a ir f ilter The air filter is designed to reduce noise and help prevent particulates in the air from entering and damaging the air compressor. After being used for a period of time, the air filter will become clogged. This will reduce the air intake capabilities of the air compressor, reducing performance. Therefore, the air filter must be replaced regularly. 1. Open the lid on the air filter, then remove the old filter. 2.
AIR COMPRESSOR TROu b Le Sh OOTING Pr o b Le m Po SSIb Le c a u Se Po SSIb Le So Lu t Io n S . Overloaded because of motor overheating. Check that the main voltage corresponds to specifications. An extension cord that is too thin or too long can cause a voltage drop and cause the motor to overheat. Allow the motor to cool down. u se heavy duty extension cords. ensure that the compressor is plugged into a socket as close as possible to the consumer unit or fuse box. Motor windings are burned out.
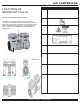
AIR COMPRESSOR SPe CIFICATIONS e lectrical c ircuit Pressure switch Electric cord for motor Overload protector (MAX temperature 135°C) Motor Red cords for Capacitor Solenoid valve Electric cord for motor Earth wire (Green) a ir Passage d rawing Air intake Pressure switch Drain valve Safety valve Pressure gauge Regulator Compressor Tank Check valve Solenoid valve 13 Pressure gauge Filter Ball valve Customer Support: 1-866-409-4581 13
AIR COMPRESSOR CALIFORNIA AIR TOOLS INC. LIMITe d WARRANTy This warranty is limited to Air Compressors distributed by: California Air Tools, Inc. 8560 Siempre Viva Road, u nit 3 San d iego, CA 92154 Limited Warranty California Air Tools Inc. will repair or replace, free of charge, to the original retail customer who purchased a California Air Tools, Inc. Air Compressor from an authorized dealer, distributor or distributor’s dealer in North America. This warranty does not transfer to subsequent owners.
AIR COMPRESSOR e xclusions In addition to the foregoing disclaimers, limitations and terms, this limited warranty shall not apply to and does not cover accessories, nor does it cover products that are in any way subject to any of the following: 1. Improper setup, installation or storage. 2. Lack of proper maintenance and service. 3. Accident, damage, abuse or misuse. 4. Abnormal operating conditions or applications. 5.
AIR COMPRESSOR PROd u CT Re GISTRATION To register your product, please complete the information below and mail to the mailing address at the end of this page. 1.