™ StyleDrain decorative shower drain systems (Patent Pending) INSTALLATION INSTRUCTIONS Model #9170 #9170-3 #9170-ABS #9170-PVC-2 Model #9171 #9171-3 #9171-ABS #9171-PVC-2 9170_INSTL_090619.doc Pg.
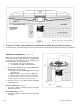
All figures show cast iron no-hub connection • • California Faucets recommends this product be installed by licensed contractor(s) To avoid damage, store decorative grid in safe and secure place, Grid should be installed after all flooring is completed. CONNECTING TO DRAIN PIPE (see figure 1 & 2) Note: Sub floor height and depth may vary depending on location and type. Install the drain according to type of application.
WATERPROOF MEMBRANE/ SHOWER PAN LINER INSTALLATION (see figure 3) Waterproof membrane/Shower pan liner shall be installed per manufacturer instructions and local building & plumbing codes. 1. Waterproof membrane/shower pan LINER [4] material should be between drain BODY [1] and COLLAR [5]. 2. Place COLLAR [5] over BOLTS [6] in up or down position (based on flooring material thickness and/or local building & plumbing codes) and rotate to lock COLLAR [5] in place.
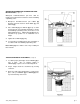
GRID INSTALLATION (see figure 5, 6 & 7) 1. After completion of finished flooring, remove plastic MUDGUARD [10] by drilling a hole in the center and pull out. 2. Place decorative GRID [11] onto drain THROAT [8]. 3. Find location of the four SETSCREWS [12] and tighten all screws securely with supplied ALLEN KEY [13]. SERVICE ACCESS (see figure 6 & 7) 1. Find location of the four SETSCREWS [12] and loosen screws with supplied ALLEN KEY [13] by turning counter clockwise and remove GRID [11]. 2.