
Installation Sheet

CF-KXX-110_ii_150901 Pg 3
4
3
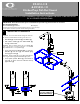
FINAL CONNECTIONS
Tighten CHECK ASSEMBLY (12) onto end of
SHANK (1a)
Attach SPRAY-HOSE (5) onto end of CHECK
ASSEMBLY (12)
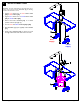
CHECK ASSEMBLY MAINTENANCE
o Disconnect CHECK ASSEMBLY (12) from
SPRAY-HOSE (5) and SHANK (1a)
o Unscrew UPPER HOUSING (12a), remove
both CHECK VALVES (12b) by gently pushing
through hole in LOWER HOUSING (12c)
o Flush both CHECK VALVES (12b) clean water
o Assemble CHECK VALVES (12b) back into
LOWER HOUSING (12c)
Important: Both CHECK VALVES (12b) must be placed into
the LOWER HOUSING in the water flow direction as shown (o-
ring on the top side) and ensure that plumbers grease is applied
to o-ring.
o Apply thin film on plumbers grease to
HOUSING O-RING (12d) before assembling
UPPER and LOWER HOUSING (12a) & (12c)
and securely tighten
o Ensure that UPPER O-RING (12e) is in place
before attaching CHECK ASSEMBLY (12) onto
SHANK (1a)
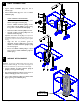
WEIGHT ATTACHMENT
Important: The placement of WEIGHT (13) shall be at the lowest
portion of the SPRAY-HOSE (5). The area below hose/weight needs
to be cleared of all items that may affect movement of hose/weight.
Separate FEMALE and MALE WEIGHT (13a) &
(13b) by loosening SCREWS (13c)
Place FEMALE WEIGHT (13a) at lowest portion of
SPRAY-HOSE (5) just above curve of hose
Secure MALE WEIGHT (13b) onto SPRAY-HOSE
(5) by tightening both SCREWS (13c)
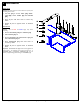
KEEP AREA
CLEAR of ITEMS