secret▲ QUICK REFERENCE GUIDE PR900 DIGITAL REPEATER All rights reserved.No spreading abroad without permission of Caltta.
secret▲ PR900 Edition Date V1.0 2019/3/20 Author Reviewer All rights reserved.No spreading abroad without permission of Caltta.
secret▲ Legal Information © 2019 Caltta Technologies. All rights reserved. 2019 Copyright Caltta Technologies Co.,Ltd. All rights reserved Copyright statement: The copyright of this document belongs to Caltta Technologies Co.,Ltd. Text contains proprietary information owned by Caltta Technologies Co.,Ltd., without the written permission of Caltta Technologies Co.,Ltd.
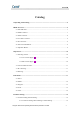
secret▲ Catalog 1 Unpacking and Checking............................................................................................................6 2 Radio Overview............................................................................................................................6 2.1 LED Indicators................................................................................................................... 7 2.2 MMP Connector..................................................................
secret▲ 5.1.2 Common Setting-General Setting-Digital Setting............................................ 20 5.1.3 Common Setting-General Setting-Analog Setting............................................22 5.2 Common Setting-UI Setting.............................................................................................23 5.2.1 Common Setting-UI Setting..............................................................................23 5.2.2 Common Setting-UI Setting-Backlight............................
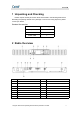
secret▲ 1 Unpacking and Checking Please unpack carefully and check all the items listed in the following table before discarding the packing material. If any damage or loss occurs during shipment, please contact your dealer. Standard Accessories Item Quantity Repeater 1 Instruction Manual 1 Power cable 1 2 Radio Overview No. Part Name No. Part Name 1 Cooler 9 100~240V AC Cable Connector 2 Channel/Volume Button 10 13.
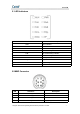
secret▲ 2.1 LED Indicators Indicators Description ALM Alarm indicator PWR Power indicator TXA Slot 1 transmitting indicator RXA Slot 1 receiving indicator TXB Slot 2 transmitting indicator RXB Slot 2 receiving indicator Ana Analog mode indicator Dig. Digital mode indicator Data Repeater signal indicator IP IP interconnection status indication 2.
secret▲ 5 GND GND 6 MMP10_USB_D+ USB_D+ signal 7 MMP10_USB_D- USB_D- signal 8 MMP10_USB_Vbus 9 MMP10_DET1 Accessory detection 1 10 MMP10_DET2 Accessory detection 2 USB_VBUS +5V DC power 2.
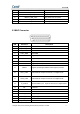
secret▲ 20 TX_UART_RXD 21 TDMA TX UART RXD Transmit trigger signal 22 ACC_MAP_DET1 It is used for test 23 ACC_MAP_DET2 It is used for test 24 SWB+ Output the system supply voltage,max current 1000mA 25 Ext_Alarm Programmable alarm output,Output the system supply voltage,max current 300mA 26 Power_GND Power GND 2.4 AC Cable Connector Press I to power on the AC power.Press O to power off the AC power. 2.5 DC Connector 2.6 Power ON/OFF Button Power ON/OFF the repeater 2.
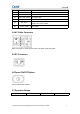
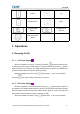
secret▲ Return Up Menu/Confirm Down Programmable button 1 Programmable button 2 Channel/Volume Switch 3 Operations 3.1 Powering On/Off 3.1.1 AC Power Supply When the repeater is turned off , press the back panel (AC power switch )to turn on the power,the AC power indicator lights up, and then press the front panel (power button) to power on the repeater .The “PWR” indicator lights up, and the LCD will enter the operation interface after the system is working normally.
secret▲ 3.2 Voice and Data Transfer The receiving and transmitting frequency are different on the repeater. Repeater will turn the weak receiving signal into strong transmitting signal and transmit on the same channel. When transmitting, the “DATA”light is on. If it is analog signal, the “Ana.”light on. if it is digital signal, the “Dig.”light flashes. The receiving and transmitting frequency and CDCSS/CTCSS can be set by CPS.
secret▲ Open Template Selecting the Open Template mode to open a file can save the CPS configuration parameters that are compatible with earlier versions and update the earlier database versions to the version corresponding to the current CPS. Close This function closes the configuration file in the current window. / Save This function saves the new file or modified file by the current filename under the current path. The file is saved in .grd format and must be saved in this format.
secret▲ 4.3 Program The Program menu includes the following functions: Submenu Description Shortcut Key This function reads data from your Repeater. After powering on your Repeater, connect it to a PC and select Program > Read. The Read dialog box is displayed. Click Read OK to read data. During the data reading process, a Ctrl+R progress bar is displayed to show the progress. After programming data is read completely, a message box is displayed, showing that data is read successfully.
secret▲ configuration file. Then, click OK to clone data. During the cloning process, a progress bar is displayed to show the progress. After cloning is completed, a success message box is displayed. The target radio will be restarted automatically and then use the new configuration data. Note: The cloning process skips checking the ID , name, account number, and password of your radio, and reads and writes the password information.
secret▲ 4.4 Tools The Tools menu includes the following functions: Submenu Description Language This function sets the language of the CPS. Import DT Data This function is not supported on Repeater Model. Export DT Data This function is not supported on Repeater Model. Import DG Data This function is not supported on Repeater Model. Export DG Data This function is not supported on Repeater Model. Read Reset Log This function reads the data related to a down Repeater for analysis of developers.
secret▲ 4.5 View The Program menu includes the following functions: Submenu Tree Menu Description The tree menu is below the menu bar, and it classifies configuration functions by module in the form of a tree. To configure a function or property, you can select Edit from the menu bar or enter the function or property from the tree menu. It is recommended that you display the tree menu to facilitate your operations.
secret▲ UART Baud Rate This parameter sets the baud rate of the interface on the radio accessory when the radio communicates with a third-party device through the serial port. Default: 115200, Range:300~600000. Designated Power-on Zone/Channel This option allows users to set a power-on channel. When the radio is turned on, it will switch to this channel. If the user does not designate a power-on channel, the radio will enter the channel last used when it is turned on.
secret▲ when there is no phone request or phone call, the repeater responds to the request according to the predefined priority. Default: Unchecked Option Description: Checked: To enable the Phone Priority feature. Unchecked: To disable the Phone Priority feature. PTT Priority This option allows you to set which path of audio signal the repeater will respond to first. Default:First Come First Send Option Description: External PTT: The repeater will handle the external PTT first.
secret▲ repeater, while the PTT Input signal is the local audio signal from the front panel PTT or from the external PTT. Default:Repeat Request Option Description: Repeat Request: The repeater responds to the Repeat Request signal first. PTT Request: The repeater responds to the PTT Input signal first. First Come First Send: The first received PTT audio service will be responded to first.
secret▲ 5.1.2 Common Setting-General Setting-Digital Setting Digital Settings Repeater ID Allow users to set a unique ID to identify the repeater. This ID is used by other calling repeaters when addressing the radio, for instance, when making a private call or sending a text message. Range: 1-16775903 Default: 1 Group Call Hang Time This option allows users to set the duration the radio stays at in_call status after a group call transmission.
secret▲ Preamble is a string of bits added in front of a data message or control message (Text Messaging, Private Call, etc.) before transmission. This preamble prolongs the message in order to increase the chances of the message being detected by the receiving radio. The preambles as set in Tx Preamble Duration are sent in second attempt (that is retry) of a transmission.
secret▲ Beacon Beacon Tx Mode This option decides the interval for beacon signal transmission in IP Multi-site Connect mode. Range: Local/Network Default: Local Beacon Duration This option allows the user to configure how long the beacon signal lasts. In IP Multi-site Connect mode, the beacon signal will be transmitted when the beacon interval expires.
secret▲ it is associated with the Squelch Tight Level parameter value. The relationship is as follows: Squelch Open Level < Squelch Normal Level < Squelch Tight Level. Default: 3. Squelch Tight Level This function sets the squelch level of output Repeater. It can adjust the squelch enabling threshold of received signals. The value range of this parameter is variable, and it is associated with the Squelch Normal Level parameter value.
secret▲ This option allows users to choose whether the radio pop a dialog box to alert user when the temperature is too high for radio to work in current channel. This option only allows users to check whether to alert user, when temperature is very high. The radio will detect temperature all the time in despite of whether user has checked this option. Note: the Local Alarm On/Off is unchecked, this item can not available.
secret▲ Default value is Temperature Control. Fan on User Temperature This option allows users to set the temperature to turn on the fan if the fan is controlled via temperature. When the work temperature of the radio is higher than the preset temperature threshold, the fan will be turned on automatically in order to protect the radio. Rang:10~80℃,step 1℃,Default Value is 50℃.
secret▲ This parameter sets the programmable function of the P1 button when you press it shortly. For a description of the optional functions, refer to the function list. Default: Adjust Power Level. P1 Long This parameter sets the programmable function of the P1 button when you press and hold it. For a description of the optional functions, refer to the function list. Default: None. P2 Short This parameter sets the programmable function of the P2 button when you press it shortly.
secret▲ Monitor On/Off 5.2.4 To enable or disable the Monitor feature. Common Setting-UI Setting-Menu Menu Reset Time This parameter sets the time for automatically exiting a menu. Range: 1-60 s or Infinite; step: 1 s; default: 15 s. Menu Channel Info This parameter sets whether to display the Channel Info menu on the repeater LCD. Default: enabled. Network This parameter sets whether to display the Network menu on the radio. Default: enabled.
secret▲ Brightness This parameter sets whether to display the Brightness menu on the radio. Default: enabled. Squelch Level This parameter sets whether to display the Squelch Level menu on the radio. Default: enabled. Tones This parameter sets whether to display the Tone menu on the radio. Default: enabled. 6 Conventional Setting 6.1.1 Conventional Setting-Password Write Password CPS Write Lock This parameter allows you to enable or disable the CPS write lock.
secret▲ CPS Read Lock This parameter sets whether to enable the CPS reading password function. Default: disabled. Modify Read Password If the CPS Read Lock parameter is enabled, you can click this button to modifythe CPS reading password, which consists of 1 to 8 digits. Factory default password: 88888888. Read Password Retry If the number of times that you enter incorrect CPS reading passwords consecutively exceeds this value, you cannot perform the CPS reading operation on your terminal.
secret▲ This option allows users to specify a time slot through which the repeater transmit/receive the data to/from other repeaters in the IP Multi-site Connect network. Rx Receive Frequency[MHz] This option allows users to set a frequency for the current channel to receive signals. Range:136-174MHz. Tx Transmit Frequency[MHz] This option allows users to set a frequency for the current channel to transmit signals. Range:136-174MHz.
secret▲ This option allows users to set the CTCSS tail reversion phase for the current channel. Repeater Mode This option allows users to set the repeater mode for the current channel. Rx Receive Frequency[MHz] This option allows users to set a frequency for the current channel to receive signals. Range:136-174MHz. RX Squelch Mode This option allows users to set the Rx squelch mode for the current channel.
secret▲ This option allows users to set the TX power level for the current channel. TX CTCSS/CDCSS Type This option allows users to set the CTCSS/CDCSS type for the current channel. TX CTCSS Frequency[Hz] This option allows users to set the TX CTCSS frequency for the current channel. The CTCSS frequency is the signaling that is loaded in the carrier and is lower than the audio frequency. Range: 67.0~254.1hz. TX CDCSS Code This option allows users to set the TX CDCSS code for the current channel.
secret▲ Call alias This option allows users to set the alias for the specified member. Range:1~14 characters. Call Type This option allows users to set the call type for the specified member. Call ID This option allows users to set the call id for the specified member. Range:1~16776415. 6.1.7 Conventional Setting-Network-Network Repeater IP DHCP This option allows users to define whether to dynamically assign the IP address to the repeater.
secret▲ This option allows users to set the operation mode for the repeater. Master Domain Name On/Off This option allows users to set whether to enable the DNS feature of the salve in IP Multi-site Connect services. Through the DNS server, the slave can obtain the IP address of the master through the master’s domain names. Thus, dynamic IP address is allowed for the master, which is effective in lowering IP Multi-site Connect costs.
secret▲ This option allows users to set the UDP port to upgrade the repeater remotely. Remote Data Writing/Reading UDP Port This option allows users to set the UDP port for the remote data writing/reading. Network Management Parameter Network Management IP This option allows users to set the IP address of the Network Management. UDP Port This option allows users to set the UDP port of the Network Management. TCP Port This option allows users to set the TCP port of the Network Management. 6.1.
secret▲ This option allows users to set the password which should be the same as the dispatcher server. Server Port This option allows users to set the SIP port of the dispatcher server. Voice Service Port(Slot 1) This option allows users to set the port number for the repeater to transmit voice service via slot 1 in AIS network. Voice Service Port(Slot 2) This option allows users to set the port number for the repeater to transmit voice service via slot 2 in AIS network.
FCC Warning: Any Changes or modifications not expressly approved by the party responsible for compliance could void the user's authority to operate the equipment. This device complies with part 15 of the FCC Rules. Operation is subject to the following two conditions: (1) This device may not cause harmful interference, and (2) this device must accept any interference received, including interference that may cause undesired operation.