
Installation guide

4.1 Before connecting, consider loudspeaker placement and all cabling requirements. Some typical setups are shown here:
4.1 Schließen Sie den Lautsprecher erst an, wenn Sie sich über seinen endgültigen Stellplatz und den Kabellängen sicher sind. Einige typische Kongurationen sind hier aufgezeigt:
4.1 Avant de réaliser les raccordements, étudiez les diverses possibilités d’installation des enceintes acoustiques et les exigences de câblage correspondantes. Les schémas suivants présentent plusieurs congurations types:
4.1 Antes de realizar la conexión, planique la colocación de los altavoces y los requisitos de cableado. A continuación se muestran algunas conguraciones habituales:
4.1 Prima di effettuare le connessioni, considerare la disposizione dei diffusori e tutti i requisiti del cablaggio. Qui di seguito vengono illustrate alcune disposizioni tipiche:
4.1 Kijk, voor u begint met aansluiten, waar u de luidsprekers wilt plaatsen en wat u nodig hebt voor de bekabeling. Hieronder ziet u enkele kenmerkende installaties:
4.1 Före anslutning överväger du var högtalarna ska placeras och alla kabelkrav. Några typiska placeringar visas här:
4.1 До подключения продумайте расположение громкоговорителя и всех соединительных кабелей. Ниже показаны некоторые типовые варианты установки:
4.2 Aero 5 - position above or below screen, angled towards the listener if possible.
4.2 Aero 5 - stellen Sie ihn über oder unter dem Bildschirm auf, und zwar möglichst zum Zuhörer angewinkelt.
4.2 Aero 5 - Placez l’enceinte au-dessus ou en dessous de l’écran, orientée vers l’auditeur si possible.
4.2 Aero 5 - colóquelo por encima o por debajo de la pantalla, en ángulo dirigido hacia el oyente a ser posible.
4.2 Aero 5 - posizionare il diffusore sopra o sotto lo schermo, possibilmente inclinandolo verso gli ascoltatori.
4.2 Aero 5 - boven of onder het scherm plaatsen, gericht op de luisteraar, indien mogelijk.
4.2 Aero 5 - placeras ovanför eller nedanför skärmen, vinklad mot lyssnaren om så är möjligt.
4.2 Для Aero 5 - расположите выше или ниже экрана, по возможности, под углом по направлению к слушателю
3. Connections / Anschlüsse / Raccordements / Conexiones / Collegamenti / Aansluitingen / Anslutningar / Подключения
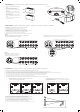
3.1 IMPORTANT! Ensure that positive (+) and negative (-) connections are matched.
3.1 WICHTIG! Achten Sie auf die richtigen Anschlüsse, also (+) an (+) und (-) an (-).
3.1 IMPORTANT ! Veillez à respecter la polarité (positif + et négatif -) des raccordements.
3.1 ¡IMPORTANTE! Asegúrese de que las conexiones de los terminales positivo (+) y negativo (-) coincidan.
3.1 IMPORTANTE! Assicurarsi che i collegamenti positivo (+) e negativo (-) corrispondano.
3.1 BELANGRIJK! Zorg ervoor dat de positieve (+) en negatieve (-) aansluitingen correct zijn.
3.1 VIKTIGT! Se till att positiva (+) och negativa (-) anslutningar stämmer överens.
3.1 ВАЖНО! Проверьте правильность подключения положительного (+) и отрицательного (-) проводников.
2. Assembling / Zusammenbauen / Montage / Montaje / Assemblaggio / Montage / Montering / Сборка
SINGLE-WIRING / SINGLE-WIRING / CÂBLAGE SIMPLE /
CABLEADO SIMPLE / CABLAGGIO SINGOLO / ENKELVOUDIGE
BEDRADING / ENKELTLEDNING / ОДНО-ПРОВОДНАЯ
Dual Monopolar Mode / Dualer Monopolarmechanismus/ Mode unipolaire double/ Modo monopolar doble/ Modalità
dual unipolare/ Dubbele monopolaire modus/ Dubbelt enpoligt läge / Сдвоенный однополюсный режим
Dual Monopolar Mode / Dualer Monopolarmechanismus/ Mode unipolaire double/ Modo
monopolar doble/ Modalità dual unipolare/ Dubbele monopolaire modus/ Dubbelt enpoligt läge
/ Сдвоенный однополюсный режим
Bipolar Mode / bipolaren Modus / bipolaire mode / bipolares modo / bipolare modalità
/ bipolair -bymodus/ bipolar-läge / биполярных режимом
Bipolar Mode / bipolaren Modus / bipolaire mode / bipolares modo / bipolare modalità
/ bipolair -bymodus/ bipolar-läge / биполярных режимом
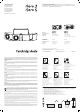
4. Positioning / Positionierung / Installation / Colocación / Disposizione / Plaatsing / Placering / Выбор размещения
SL
5.1
SR SL
6.1
SR SL
5.1
SR
SL
SBRSBL
SR
7.1
SL
5.1
SR
SL
SR
7.1
SBL SBR
2.1 Aero 5 - remove backing strip, attach rubber feet to
cabinet.
2.1 Aero 5 - entfernen Sie die rückseitige Schiene und
bringen Sie die Gummifüße am Schrank an.
2.1 Aero 5 - Retirez la bande de soutien et xez les pieds à
l’enceinte.
2.1 Aero 5 - quite la tira de protección, pegue las patas de
caucho a la caja.
2.1 Aero 5 - rimuovere la striscia di protezione ed attaccare i
piedini di gomma al mobile.
2.1 Aero 5 - verwijder de achterstrook, bevestig de rubberen
poten aan de ombouw.
2.1 Aero 5 - ta bort skyddspapperet och fäst gummifötterna
vid lådan.
2.1 Для Aero 5 - удалите ленточную прокладку, прикрепите
к корпусу резиновую опору
280mm
Aero 3
Aero 5
2.2 Aero 3