
User Manual
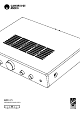

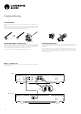
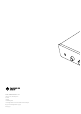
Table Of Contents

5
AXA25
Rear panel connections
Front panel controls
USB 5V 500mA
Designed & Engineered in Great Britain
Assembled in China
Power AC
Left
Loudspeaker
Right
Loudspeaker
Left
Loudspeaker
Right
Loudspeaker
Power Rating: 220–230V AC ~ 50/60Hz
Max Power Consumption: 180W
AXA25
Integrated Amplifier
A4 A3 A2 A1
A4A3A2A1
Rec Out
Loudspeaker Terminals
Impedance 8 ohms
1 2 4
3 5
1
AUDIO INPUTS (A1-A4)
These inputs are suitable for any ‘line level’ source equipment such as the audio
outputs of CD players, streaming devices such as a Chromecast Audio (RCA
Phono to jack cable required) etc.
2
REC OUT
Connect to the recording input of a CD recorder input, tape deck or other
compatible recording device etc.
This output provides a constant high level output that does not uctuate with the
volume, balance or tone controls of the main unit. For this reason, the AXA25
cannot be used as a Preamplier only or with a subwoofer.
3
USB POWER 5V 500MA
This USB connection is designed for charging or maintaining power to a device
such as a Streaming device or Bluetooth adaptor.
Note: This is not an input so will not allow you to play audio directly to the unit.
1
POWER BUTTON
Switches the unit between Standby mode (indicated by dim LED) and On (indicated
by bright LED). Standby mode is a low power mode where the power consumption is
less than 0.5 Watts.
This product has APD (Auto Power Down) enabled as default. After inactivity of 20
minutes, the product will automatically switch to Standby.
Auto Power Down (APD)
You can enable and disable the units APD setting. This can be adjusted by pressing
and holding the Power button until the LED ashes in sequence.
The two options below show which option is selected.
Standby ashes 5 times - APD disabled
Standby ashes 10 times - APD enabled
Note: Make sure the unit is On, before making changes to the APD function.
2
BASS AND TREBLE
These controls allow subtle adjustments to the tonal balance of the sound. In
the central position these controls have no eect. They only modify the sound
through your loudspeakers, and do not aect the signals sent through the Rec Out
connections. If the musical recording is of poor quality or other factors are aecting
the sound quality, it may be necessary to adjust the tone controls to compensate.
3
VOLUME CONTROL
Use to increase or decrease the audio output level of the unit.
Note: The volume control does not aect the level of the ‘Rec Out’ output as this has
a xed level
4
LOUDSPEAKER TERMINALS
Connect the wires from your left channel loudspeaker to the Left positive and
negative terminals and the wires from the right channel loudspeaker to the Right
positive and negative terminals.
In each case, the red terminal is the positive output and the black terminal is the
negative output.
Care should be taken to ensure no stray strands of wire are accidentally
connecting speaker outputs together as this may cause damage to the unit.
Please ensure that the loudspeaker terminals have been tightened adequately
to provide a good electrical connection. It is possible for the sound quality to be
aected if the screw terminals are loose.
5
AC POWER SOCKET
Once all connections are complete, plug the AC power cable into an appropriate
mains socket and turn the unit on.
Please only use the power lead supplied with the unit.
TREBLEBASS
A2
A1
A4 / AUX
A3
BALANCE
VOLUME
AUX IN
A25AX
4
BALANCE
This control allows you to adjust the relative output levels of the left and right
channels. In the central position the output from each channel is equal. This control
only modies the sound through your loudspeakers – it does not aect the signals
sent through the Rec Out connections.
5
SOURCE SELECTOR SWITCH
(A1,A2, A3 AND A4/AUX)
Select the appropriate input source component that you wish to listen to. The signal
selected is also fed to the Rec Out sockets so that it may be recorded. The input
should not be changed whilst recording.
6
AUX IN
This source input allows you to connect a portable audio device such as an MP3
player or streaming device directly into the front of the unit using a 3.5mm stereo
Aux lead.
Once plugged in, this input is automatically selected, although other inputs apart
from A4 can still be selected once a stereo-jack is plugged in. The A4/AUX option on
the front of the unit will select this input whilst a stereo-jack is plugged in.
Note:
– Plugging a source into the front panel Aux input overrides the A4 input. Simply
remove the jack from the front panel to automatically re-enable the A4 input.
1 2 3 4 5 6