
Operation Manual
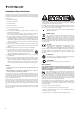
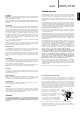
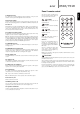

1 2 3 4 5
17 18 19 20 21
6
9 10 11 12 13 14 15 16
22
23 24
25
26
7 8
66
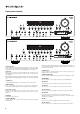
Front panel controls
1 Standby/On
Switches the unit between Standby mode (indicated by a dim power LED)
and On (indicated by a bright power LED). Standby is an eco-friendly <0.5W
low power mode. The unit may be left in Standby mode when not in use.
2 Phones
Allows for the connection of stereo headphones with a 6.35mm/¼" Jack
plug. Headphones with an impedance of between 32 and 600 ohms are
recommended.
Note: Plugging in headphones will automatically mute the main and pre-amp
outputs and select a Dolby Headphones output to be created for headphone
use.
3 Tuning +/-
Used to tune FM/AM frequencies and skip presets for the built-in Tuner.
4 Mode/Store
Press to cycle between Tuner modes. Press and hold for storing presets
(refer to the ‘Operating Instructions’ of this manual for more information).
5 Infrared sensor
Receives IR commands from the supplied remote control. A clear,
unobstructed line of sight between the remote control and the sensor is
required.
6 Display
Displays the status of the unit.
7 Tuner FM/AM
Press to select the tuner. Once in Tuner mode press to switch between FM
and AM modes.
Note: The 651R/751R remembers the audio and video input type and
processing mode for each individual source input. These are recalled each
time a source is selected.
8 Expansion
Press to select an optional expansion source module connected to the
Expansion port at the back of the unit.
9 USB (751R only)
Press to select the USB Audio source connected to the USB input at the back.
10 BD/DVD
Press to select the source equipment connected to the BD/DVD input.
11 Video 1
Press to select the source equipment connected to the Video 1 input.
12 Video 2
Press to select the source equipment connected to the Video 2 input.
13 Recorder 1
Press to select the source equipment connected to the Recorder 1 input.
14 Aux/TV
Press to select the source equipment connected to the Aux input.
With ARC enabled (see later section), press again to select Audio Return
Channel from a suitable TV.
15 CD
Press to select the source equipment connected to the CD input.
16 Recorder 2
Press to select the source equipment connected to the Recorder 2 input.
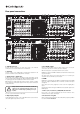
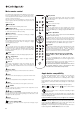
1 2 3 4 5
17 18 19 20 21
6
8 10 11 12 13 14 15 16
22
23 24
25
26
7