
Safety Instructions


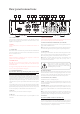

Rear panel connections
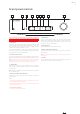
1. AC POWER SOCKET
Once you have completed all connections to the amplier, plug the
AC power cable into an appropriate mains socket then switch on. Your
amplier is now ready for use.
2. RS232C
Custom install control - a full protocol is available for the CXA on our
website.
3. CONTROL BUS
RCA sockets used to send and receive power and volume commands from
other connected CX Series products. For more information on the Control
Bus, see Control Bus section.
4. IR IN
Allows modulated IR commands from an IR repeater or multi-room
systems to be received by the amplier.
5. TRIGGER IN/OUT
The CXA can be connected to the trigger control output of home
automation equipment to control the power state of the CXA. The input
level should be 12V.
The trigger out will go high while the CXA is powered on. This can be used
to turn on other equipment that has a trigger in.
6. LOUDSPEAKER TERMINALS
Important Note: When using a banana plug, make sure the speaker
terminals are completely tightened before inserting the plug.
Two sets of loudspeaker terminals are available, A (main loudspeaker
terminals) and B (secondary loudspeaker terminals). Both sets of speakers
can be turned on and o independently. Connect the wires from your left
channel loudspeaker to the Left + & - terminals, and the wires from the
right channel loudspeaker to the Right + & - terminals. In each case, the
red terminal is the positive output and the black terminal is the negative
output.
Care should be taken to ensure no stray strands of wire short the speaker
outputs together. Please ensure that the loudspeaker terminals have been
tightened completely to provide a good electrical connection. It is possible
for the sound quality to be aected if the screw terminals are loose.
7. SUB OUT
Connect to the input on an active subwoofer if required.
8. PRE-OUT
For connection to the unbalanced inputs of a power amplier or active
subwoofer.
9. BLUETOOTH ANTENNA
Used for wireless streaming bluetooth audio capability directly from most
phones, tablets and laptops. See later section for details
10. ANALOGUE INPUTS (A1 UNBALANCED, A2, A3 AND A4)
These inputs are suitable for any 'line level' source equipment such as CD
players, DAB or FM/AM tuners etc.
Note: These inputs are for analogue audio signals only. They should not be
connected to the digital output of a CD player or any other digital device.
11. USB INTERFACE
A USB B type socket is tted to the CXA to enable the playback of audio
from a personal computer running either Microsoft Windows or Apple
Mac OS X operating systems. Some builds of Linux are also suitable.
Note: Always use a high quality USB connection cable certied as USB
Hi-Speed. USB cable connections longer than 3m may result in
inconsistent audio performance.
Always turn the volume to minimum, switch to
another input or turn the CXA o before plugging/
unplugging cables to the USB input or whilst booting
up/shutting down your PC/Mac.
GROUND/LIFT SWITCH
The Ground/Lift switch enables the USB interface earth to be disconnected
from the CXA chassis earth. Disconnecting (lifting) the earth can be useful
if electronic hum is heard through the speakers when the USB input is
selected. The switch should otherwise be left in the Ground position.
12. DIGITAL INPUTS (D1, D2 AND D3)
TOSLINK and S/P DIF co-axial digital inputs.
Coaxial – Use a high quality 75 ohm digital RCA Phono interconnect cable
(not one designed for normal audio use). This input is suitable for 16-24 bit
content up to 192kHz.
TOSLINK Optical – Use a high quality TOSLINK bre optic interconnect
cable designed specically for audio use. This input is suitable for 16-24 bit
content up to 96kHz (TOSLINK is not recommended at 192kHz sampling
rates).
Note: To obtain the best results from your system we recommend using
only high quality Cambridge Audio interconnects. This will ensure that
you hear your system as we designed it. Please ask you dealer for details.
13. A1 INPUTS
Note: Balanced (XLR) is available on the CXA81 only.
A1 inputs feature either unbalanced (phono/RCA) or balanced (XLR)
connections. The balanced connection is the higher quality option and can
reject noise and interference in the cable when used with other equipment
that supports this function. An XLR connector is wired Pin 1 - Ground; Pin
2 - Hot (in-phase); Pin 3 - Cold (phase-inverted).
1 2 3 4 5 6 7 9 11 128 10 13