CXA61/81 Manual Generated: 29/11/2022 - 01:36
Table of Contents CXA61/81 ..................................................................................................................................................................................................................... 3 Introduction ................................................................................................................................................................................................................ 4 What’s included with the CXA61/81? .......
CXA61/81 Last updated: August 2, 2022 02:03.
Introduction Last updated: May 26, 2022 09:48. Revision #4895 This guide is designed to make installing and using this product as easy as possible. Information in this document has been carefully checked for accuracy at the time of printing; however, Cambridge Audio’s policy is one of continuous improvement, therefore design and specifications are subject to change without prior notice. This document contains proprietary information protected by copyright. All rights are reserved.
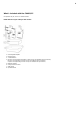
What’s included with the CXA61/81? Last updated: May 26, 2022 11:24. Revision #4894 Inside the box of your CXA you will receive: 1. 2. 3. 4. 5. 6. 7. 8.
Front panel controls Last updated: June 14, 2022 01:19. Revision #4893 1. Standby/On - Switches the unit between Standby mode (indicated by dim power LED) and On (indicated by bright power LED). Standby mode is a low power mode (0.5 Watts). The unit should be left in Standby mode when not in use. The CXA has Auto Power Down (APD) enabled by default, and the unit will automatically switch to standby after 20 minutes of inactivity. See the 'Setup menu' section for further details. 2.
Notes: Pressing the Bluetooth/USB button will toggle between the two inputs. The USB Audio is shown by the symbol being lit orange and the Bluetooth source is shown by the symbol being lit blue. There will be no sound from the amp if the correct input button isn’t selected. If an audio source is connected to the USB Audio input, for example, ensure that the Bluetooth/USB button is lit orange. 9. Volume - Use to increase/decrease the level of the sound from the outputs of the amplifier.
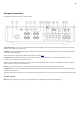
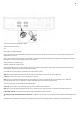
Rear panel connections Last updated: November 15, 2022 04:12. Revision #7890 1. AC power socket - Once you have completed all connections to the amplifier, plug the AC power cable into an appropriate mains socket then switch on. Your amplifier is now ready for use. 2. RS232C - RS232 is a standard serial data communication protocol, which allows devices that support RS232 to communicate with each other as part of a home automation system.
Two sets of loudspeaker terminals are available: A (main loudspeaker terminals) and B (secondary loudspeaker terminals). Connect the wires from your left channel loudspeaker to the left terminals on the CXA, and the wires from your right channel loudspeaker to the right terminals on the CXA. Always ensure that the positive connection on the amplifier is connected to the positive connection on the speaker and the negative connection on the amplifier is connected to the negative connection on the speaker.
Note: For the balanced XLR inputs, pin1 is ground, pin2 is positive and pin3 is negative. 11. USB audio in - A USB B type socket to enable the playback of audio from a computer running either Microsoft Windows or Apple Mac OS X operating systems. Some builds of Linux are also suitable. Notes: Always use a high-quality USB connection cable certified as USB Hi-Speed. USB cable connections longer than 3m may result in inconsistent audio performance.
Remote control Last updated: July 12, 2022 01:13. Revision #5136 The CXA remote control handset duplicates the front panel control functions and is also able to control other CX series products. The supplied AAA batteries must be fitted before the remote control can be used. The handset buttons function as described below: 1. Brightness - Alters the brightness of the CXA display lights. There are two brightness levels and an option to switch off the backlight.
Getting connected Last updated: November 11, 2022 10:55. Revision #7753 When designing our amplifiers, we include features that allow you to connect your system in various ways. The inclusion of features such as Pre-Out and Speaker B connections mean that you can flexibly configure your system depending on your requirements. Note: When using a banana plug, make sure the speaker terminals are completely tightened before inserting the plug.
Speaker B connections The Speaker B connections on the back of the amplifier allow for a second set of speakers to be used (i.e. speakers located in another room). The Speaker A/B button on the front panel scrolls through the selection of speaker A only, speaker B only, and speaker A and B together. Sub out connections The Sub Out is for connecting to the LFE/Sub input of an active subwoofer.
Balanced audio connections (CXA81 only) The diagram below shows how to connect the CXA81 to the CXN Network player using the Balanced Audio inputs via three pin XLR connectors. The CXA81 can also be connected to non-Cambridge Audio sources with balanced outputs. Balanced connections in an audio system are designed to reject electrical noise, from power wiring etc, and also the effects of noise currents flowing through ground connections.
Connecting a TV A TV can be connected to one of the digital inputs on the CXA, as long as the TV has the required Optical or Coaxial output. Ensure that the output audio settings on the TV are set to PCM or Stereo, as the CXA is only able to decode a Stereo signal. Please also ensure that the digital input that the TV is connected to has been selected on the front panel of the CXA (D1, D2 or D3).
Advanced connections Last updated: November 15, 2022 04:16. Revision #7901 USB audio connection The CXA USB Audio input enables the playback of audio from Microsoft Windows or Apple Mac OS X personal computers (and some Linux builds). When connected via a USB cable, the computer will identify the CXA as an audio device.
2. For the highest quality play back, ensure that the CXA is set to USB 2.0 mode. See the ‘Setup Menu’ section below for a guide on how to change USB mode. (The default configuration is USB Audio Class 2) 3. Download the Windows USB 2.0 driver. See the “How do I install the latest USB Audio driver” section below, for a guide on how to download the USB driver. 4. Select the USB Audio source on the front panel of the CXA.
4. Allow the update to progress, click next, and then finish to complete the installation. 5. Confirm the installation by opening the CA Control Panel, and checking the driver version. How to connect an Apple Mac to the CXA via the USB audio input No extra drivers are required. With the CXA switched to USB Audio 1.0 the CXA will work with the native Mac OS-X 10.5 (Leopard) or above Audio 1.0 driver and accept audio up to 24-bit/96kHz.
With the CXA switched to USB Audio Class 2 the CXA works with the native Mac OS-X 10.5 (Leopard) or above Audio 2.0 driver and can accept audio up to 32-bit/384kHz. 1. With the CXA in Standby mode and/or the volume set to minimum, connect your Mac to the CXA via a USB A to B cable, or C to B cable depending on the USB ports on your Mac. 2. Select the USB Audio source on the front panel of the CXA. You can do this by pressing the Bluetooth/USB button, which will toggle between the two inputs.
Setup menu Last updated: June 6, 2022 08:54. Revision #4888 To enter the setup menu 1. Put the CXA in standby mode. 2. Whilst in Standby mode, press and hold the Speaker A/B button until the A/B lights flash alternatively and the sources A1-A4 light up. Note: Press the Speaker A/B button once to leave the Setup menu and place the CXA back into Standby mode. See below source buttons for setup configuration: Note: Button selected is represented by Blue light.
Clipping function A3 on – Clipping function enabled. The volume nudges down if signal clipping is detected. A3 off – Clipping function is disabled. USB mode A4 on – Puts the CXA in USB Audio Class 2 mode. A4 off – Puts the CXA in USB Audio Class 1 mode. Notes: To save the setup settings and exit the setup menu, press the Speaker A/B button. Pressing the Standby/On button while in the setup menu will exit this setup menu and will not save the setup settings.
Bluetooth Last updated: June 6, 2022 08:55. Revision #4887 Bluetooth audio streaming Selecting this allows the CXA to receive Bluetooth audio from most phones, tablets and laptops. Pairing To begin streaming high quality music from your device it will first need to be paired with the CXA. Select the Bluetooth source on the CXA to enter discovery mode. Notes: Your device can only be paired and connected to the CXA while the Bluetooth source is selected.
Bluetooth troubleshooting guide If you are having problems connecting your Bluetooth device to the CXA, please try the following troubleshooting steps: Ensure that the supplied Bluetooth antenna is properly connected to the back of the unit. The CXA61/81 will be unable to connect to a Bluetooth device without the antenna connected. Try disconnecting and then re-connecting the antenna. Ensure that the Bluetooth source has been selected by selecting the Bluetooth/USB Audio button on the front panel.
Control Bus Last updated: June 6, 2022 08:56. Revision #4896 The Control Bus allows any compatible Cambridge products to synchronise when powering up the units. See the following diagrams when connecting the CXA using the provided Control Bus cable. Another added feature with this Control Bus is the use of the StreamMagic app. You can use the StreamMagic app to control the CXA via the CXN. StreamMagic app (via CXN) When using the app to turn the CXN on/off, this will also turn the CXA on/off.
CXA with CXN Note: Without using the StreamMagic app to control the CXA. When turning the CXA on/off, this will also turn the CXN on/off. Connect the CXA control bus out to CXN in. CXA with CXN and CXC When turning the CXN on/off, this will turn the CXA and CXC on/off. With all three CX devices, connect the CXN Control Bus out to CXA Control Bus in. Then connect the CXA Control Bus out to CXC Control Bus in. Note: Do not loop back from the CXC Control Bus out to the CXN Control Bus in.
If you don't want the devices to go into standby automatically, we would recommend disabling the APD feature on each device.
CAP5 Last updated: June 6, 2022 08:58. Revision #4897 Cambridge Audio has developed a proprietary protection system to ensure reliability and a long life for its amplifiers and the speakers they are connected to. This protection system comprises of five main protection methods: 1. DC detection Indication - Unit has switched off during operation. The front panel LED light flashes together in the following sequence, one flash with long pause between flashes. Read below for more information.
degrade the sound. Clipping distortion is caused at high volume levels when the output signal attempts to go outside the maximum voltage that the amplifier can provide, causing the tops of the signal to flatten off. When CAP5 detects clipping the volume will be automatically reduced down until CAP5 detects an undistorted output. Note: The clipping detection is disabled by default. The clipping detection can be enabled in the Setup menu (see 'Setup menu' section).
Troubleshooting Last updated: November 15, 2022 04:23. Revision #7911 There is no power • Ensure the AC power cord is connected securely. • Ensure the plug is fully inserted into the wall socket and is switched on. • Check fuse in the mains plug or adaptor. There is no sound • Make sure the unit is not in Standby mode. • Check that the source component is properly connected. • Check that your speakers are properly connected.
Technical specifications Last updated: June 1, 2022 08:17. Revision #4899 CONTINUOUS POWER OUTPUT CXA81: 80W RMS into 8 Ohms, 120W RMS into 4 Ohms CXA61: 60W RMS into 8 Ohms, 90W RMS into 4 Ohms DAC CXA81: ES9016K2M CXA61: ES9010K2M THD (UNWEIGHTED) <0.002% 1kHz at 80% of rated power <0.
WEIGHT CXA81: 8.7kg (19.1Lbs) CXA61: 8.3kg (18.
Frequently Asked Questions (FAQ) Last updated: November 11, 2022 11:35. Revision #7781 How do I select the Balanced or Unbalanced inputs on the CXA81? On the CXA81, pressing the A1 input selection button will toggle between the balanced and unbalanced inputs. The balanced input is shown by A1 being lit orange, while the unbalanced input is shown by A1 being lit blue. Please ensure that the correct input is selected on the CXA, depending on how your CXA81 is connected.
What is the crossover frequency on the CXA61/81? The CXA61/81 has a low pass filter of 2.3 kHz applied at the Sub Out output. This is so that there is minimal phase added by the CXA at the Sub Out frequencies. This allows you to set your own crossover frequency on the Subwoofer itself. What would the power output of the CXA be if I connect two pairs of speakers? When you connect two pairs of speakers to an amplifier, the combined impedance is halved.