
Manual


8
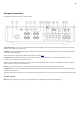
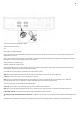
Rear panel connections
Last updated: November 15, 2022 04:12. Revision #7890
1. AC power socket - Once you have completed all connections to the amplifier, plug the AC power cable into an appropriate mains socket then
switch on. Your amplifier is now ready for use.
2. RS232C - RS232 is a standard serial data communication protocol, which allows devices that support RS232 to communicate with each other as
part of a home automation system.
Custom install control - a full protocol is available for the CXA on our website here.
3. Control bus - RCA sockets used to send and receive power and volume commands from other connected CX Series products. For more
information on the Control Bus, see 'Control Bus' section.
4. IR in - Allows modulated IR commands from an IR repeater or custom install systems to be received by the amplifier. Commands received by
the IR In socket are not looped out of the Control Bus.
Note: The IR input doesn’t provide any power, so any device connected to this input will need to have its own power source.
5. Trigger in/out - The CXA can be connected to the trigger control output of home automation equipment to control the power state of the CXA.
The input level should be 12V.
The trigger out provides a continuous 12v, this is active while the CXA is powered on. This can be used to turn on other equipment that has a trigger
in.
6. Speaker terminals
Note: When using a banana plug, make sure the speaker terminals are completely tightened before inserting the plug.