
Manual


9
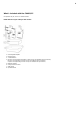
Two sets of loudspeaker terminals are available:
A (main loudspeaker terminals)
and
B (secondary loudspeaker terminals).
Connect the wires from your left channel loudspeaker to the left terminals on the CXA, and the wires from your right channel loudspeaker to the
right terminals on the CXA.
Always ensure that the positive connection on the amplifier is connected to the positive connection on the speaker and the negative connection on
the amplifier is connected to the negative connection on the speaker.
The Red terminal is the positive output.
The Black terminal is the negative output.
Care should be taken to ensure no stray strands of wire short the speaker outputs together. Please ensure that the loudspeaker terminals have
been tightened completely to provide a good electrical connection.
It is possible for the sound quality to be affected if the screw terminals are loose.
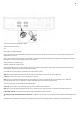
Note: The speaker terminals will need to have the round pips removed before you can insert a banana plug into them.
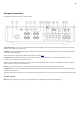
7. Sub out - Connect to the input on an active subwoofer, if required.
Note: There is a low pass filter of approximately 2.3 kHz applied to the Sub Out, no frequencies above 2.3 kHz will be sent to a subwoofer
connected to this output. This is so that there is minimal phase added by the CXA at the Sub Out frequencies.
The crossover frequency can be adjusted on the Subwoofer itself.
8. Pre-out - For connection to the unbalanced inputs of a power amplifier or active subwoofer.
Note: There is not a low pass filter applied to the Pre-Out, so the full frequency range will be sent to a subwoofer connected to the Pre-Out.
9. Bluetooth antenna - Used for Bluetooth audio streaming. See 'Bluetooth' section for details.
10. Analogue inputs (A1 Unbalanced, A2, A3 and A4) - Suitable for any 'line level' source equipment such as CD players, DAB or FM/AM tuners
etc.
These inputs are for analogue audio signals only. They should not be connected to the digital output of a CD player or other digital devices.