BASSCUBE 8S BASSCUBE 10S ™ ™ POWERED SUBWOOFERS USER MANUAL
The lightning flash with arrowhead, within an equilateral triangle, is intended to alert the user to the presence of uninsulated “dangerous voltage” within the product’s enclosure that may be of sufficient magnitude to constitute risk of electric shock to persons.
IMPORTANT SAFETY INSTRUCTIONS READ INSTRUCTIONS – All safety and operating instructions should be read before the subwoofer is operated. POWER-CORD PROTECTION – The AC power cords should be routed so that they are not likely to be walked on. No object should bring weight to bear on the AC power cords. RETAIN INSTRUCTIONS – The safety and operating instructions should be retained for future reference.
INSPECTING FOR DAMAGE Examine each part carefully for shipping damage. If there is any, do not install or use the system. Return the subwoofer to the store or merchant where you made the purchase or call Cambridge SoundWorks at 1-800-FOR-HIFI (1-800-367-4434) for assistance. SPECIFICATIONS (including feet and controls on rear panel) BassCube 10S: Dimensions: 15"H x 13 1/2"W x 14 3/4"D Weight: 35 lbs. BassCube 8S: Dimensions: 13"H x 111/2"W x 12 1/8"D Weight: 25 lbs.
OPERATING CONTROLS, INPUTS AND OUTPUTS 1. OFF AUTO ON 3. LINE LEVEL INPUTS Set this switch to AUTO for normal use. The sub- The Subwoofer Out (or preamplifier outputs) from woofer will “power up” rapidly when an audio signal your audio system connect to these inputs. is sensed. The subwoofer will revert to a standby 4. SPEAKER LEVEL INPUTS mode after about 15 minutes of no signal. The stand- If you do not have, or do not wish to use a line level by mode uses less power.
5. OUT TO SPEAKERS 7. LOW PASS FREQUENCY Connect your left and right speakers to these outputs When you connect a BassCube to the Subwoofer Out if you use the SPEAKER LEVEL INPUTS. of a 5.1 channel Dolby Digital® or DTS® audio system, 6. POWER indicator set this control at its full clockwise rotation. If you con- Glows green during normal operation. Glows red in nect a BassCube with speaker wires, or to the standby mode.
CONNECTIONS About your audio components: You can connect a BassCube to a receiver, an inteRECEIVER OR DECODER grated amplifier, a preamplifier/power amplifier combination, or other audio component. For brevity, this Subwoofer Out manual will refer only to a “receiver,” but the instructions will also apply to any audio component. You can use a line level signal output from one of these components (like a subwoofer output) or speaker level outputs, but not both types of outputs simultaneously.
Speaker Level Connection Connect speaker wire from the receiver’s left and right speaker outputs (the main or front connectors) as INTEGRATED AMP OR RECEIVER (FRONT) shown in the diagram. Connect speaker wire from the BassCube’s OUT TO SPEAKERS connectors to your SPEAKER OUTPUTS left and right speakers. Set the LOW PASS FREQUENCY control according to the guide on page 13.
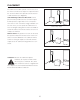
PLACEMENT The subwoofer should be placed on the floor. Its location in the room affects its output. The output increases the closer the subwoofer is placed to the intersection of walls and floors (see diagrams). Some Advantages Of Corner Placement: Corner placement also provides the most consistent output from deep bass to upper bass.
FINAL SETUP Power Connections Make sure the BassCube’s power switch is in the OFF position. Insert the BassCube’s power cable into an AC wall outlet (The switched accessory outlets on FUSE receivers are not recommended for use with a BassCube). Turn the BassCube’s power switch to the AUTO position. Test Your Setup Once all connections have been made, test your sound system to verify that the subwoofer produces bass output. Advance the SUBWOOFER LEVEL control to the 10 o’clock position.
Adjusting For Best Performance BassCube 8S control is shown. BassCube 10S control is similar. We recommend you adjust the BassCube in the following sequence: 1. 1. Set the LOW PASS FREQUENCY according to the LOW PASS FREQUENCY (Hz) guide on page 13. 120 160 100 80 2. 2. Set the SUBWOOFER LEVEL control by ear, until 200 SUBWOOFER LEVEL 5 4 6 you are happy with the overall bass balance. 3 7 2 8 1 9 10 0 3. (BassCube 10S only) Set the PHASE switch by ear, 3.
LOW PASS CONTROL SETTINGS The LOW PASS FREQUENCY control on a BassCube is continuously variable. The following recommendations describe specific settings, but feel free to choose an intermediate setting if it sounds best to you. Dolby Digital® sound systems LOW PASS FREQUENCY (Hz) A Dolby Digital decoder provides its own processing when you activate the decoder’s Subwoofer Out jack.
Cleaning the Cabinets If more than dusting is needed, the finish on the subwoofer can be cleaned with a window or vinyl cleaning product. Avoid spraying the cleaner underneath the cabinet to prevent damage to the speaker. Avoid placing the BassCube on a wet or damp carpet. Final Adjustment Note: Use a variety of your favorite program material (video We hope you enjoy the new sonic dimensions your or audio) when adjusting the subwoofer output. Once BassCube subwoofer reveals to you.
CAMBRIDGE SOUNDWORKS, INC.