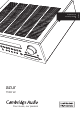
azur 751R V2 Your music, our passion POLSKI Amplituner AV Instrukcja obsługi 2
Spis treści Ważne instrukcje dotyczące bezpieczeństwa....................................................3 Ograniczona gwarancja.......................................................................................4 Elementy sterujące na panelu przednim............................................................5 Złącza na panelu tylnym......................................................................................7 Główny pilot zdalnego sterowania.....................................................
azur 751R V2 POLSKI Ważne instrukcje dotyczące bezpieczeństwa Dla własnego bezpieczeństwa przez podłączeniem urządzenia do gniazdka zasilania sieciowego należy uważnie przeczytać poniższe instrukcje dotyczące bezpieczeństwa. Przestrzeganie ich pozwoli również na uzyskanie najlepszych efektów i zwiększenie trwałości urządzenia: 1. Przeczytaj niniejsze instrukcje. 2. Zachowaj niniejsze instrukcje. 3. Przestrzegaj wszelkich ostrzeżeń. 4. Postępuj zgodnie z wszystkimi instrukcjami. 5.
Ograniczona gwarancja Wentylacja WAŻNE – urządzenie nagrzewa się podczas pracy. Nie należy ustawiać urządzeń jedno na drugim. Nie należy umieszczać w przestrzeniach zamkniętych, takich jak półki lub szafki, w których brak odpowiedniej wentylacji. Należy zabezpieczyć urządzenie przed wpadnięciem do niego małych przedmiotów przez kratkę wentylacyjną. Jeżeli tak się stanie, trzeba natychmiast wyłączyć urządzenie, odłączyć od zasilania i zasięgnąć rady sprzedawcy.
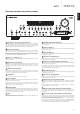
azur 751R V2 POLSKI Elementy sterujące na panelu przednim 6 7 8 9 10 11 12 25 13 14 15 16 23 24 26 1 2 3 4 5 22 17 1 18 Standby/On (Tryb gotowości/włączenie) Umożliwia przełączanie między trybem gotowości (wskazywanym przez przyciemnienie diody LED zasilania) a trybem pracy (wskazywanym przez jasno świecącą diodę LED zasilania). Tryb gotowości jest przyjazny dla środowiska (poniżej 0,5 W zużycia energii). Urządzenie można pozostawić w trybie gotowości, gdy nie jest ono używane.
20 HDMI Picture adjustment (Regulacja obrazu) Dostępne jest także wejście HDMI 1.3. Przycisk ten umożliwia wybór różnych ustawień obrazu na potrzeby urządzeń zewnętrznych, w przypadku których układ skalujący został ustawiony tylko na przetwarzanie (więcej informacji można znaleźć w rozdziale „Ustawienia urządzeń zewnętrznych” niniejszej instrukcji). Na ekranie telewizora zostanie wyświetlony pasek ustawień dotyczący bieżącej pozycji (jasność, kontrast itd.).
6 HDMI Wejścia HDMI zgodne ze standardem HDMI 1.4. Wejścia HDMI są domyślnie przypisane do urządzeń BD/DVD (Odtwarzacz BD/DVD), Video 1 (Wideo 1) i Video 2 (Wideo 2), a czwarte wejście pozostaje nieprzypisane. Wejścia te można w dowolny sposób przypisywać (więcej informacji na ten temat można znaleźć w dalszej części instrukcji). Wszystkie wejścia wideo, zarówno analogowe, jak i HDMI, są transkodowane i przesyłane przez wyjścia HDMI.
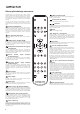
Główny pilot zdalnego sterowania Amplituner 751R V2 jest dostarczany wraz z pilotem zdalnego sterowania Azur Navigator. Przed przystąpieniem do jego używania należy umieścić w nim baterie AAA (dostarczone w zestawie). Szczegółowe informacje na temat operacji, które można wykonywać przy użyciu pilota, znajdują się w kolejnych rozdziałach niniejszej instrukcji.
azur 751R V2 Tuner AM/FM, BD/DVD, Video 1, Video 2, Rec 1, Aux/TV, CD, Rec 2, Vid 3/MP3, USB, Exp. Aby zmienić źródłowe urządzenie zewnętrzne, należy nacisnąć odpowiadający mu przycisk. Naciśnięcie przycisku Tuner AM/FM po raz drugi powoduje przełączenie między pasmami radiowymi AM i FM. Ponowne naciśnięcie przycisku Aux/TV (Urządzenie dodatkowe/telewizor) przy włączonej funkcji ARC (więcej informacji w dalszej części instrukcji) umożliwia wybór kanału TV-ARC (zwrotnego kanału audio telewizora).
Wyświetlacz na panelu przednim 1 2 HR 96/24 MSTR ES Exp SR SW SL Audyssey Neo:6 X Dynamic EQ Vol SBR SBL D TrueHD Bi AMP RoomEQ DIRECT EXPL x z C TUNED Z2 Wskaźniki kanałów wyjściowych Przedstawiają aktywne w danej chwili kanały w zależności od trybu dekodowania i sygnału ze źródłowego urządzenia zewnętrznego. Podświetlone ikony wskazują aktywne kanały wyjściowe amplitunera 751R V2. Z2 Wskazuje, że aktywna (włączona) jest strefa 2. Room EQ Wskazuje, że włączona jest funkcja Audyssey 2QE®.
azur 751R V2 POLSKI Analogowe złącza audio Uwaga: Nie należy podłączać zasilania sieciowego ani włączać urządzenia, zanim nie zostaną wykonane wszystkie połączenia. Urządzenia zewnętrzne podłącza się przy użyciu stereofonicznych kabli typu „cinch” (2RCA-2RCA). W przypadku odtwarzaczy kasetowych, nagrywarek MD oraz nagrywarek i odtwarzaczy CD wymagane są dwa zestawy kabli — jeden do nagrywania, a drugi do odtwarzania.
Złącza wejściowe HDMI Rozdzielczość obrazu 4K HDMI (High-Definition Multi-Media Interface) to interfejs cyfrowy, który umożliwia transmisję sygnałów wideo i audio za pośrednictwem pojedynczego kabla. Możliwość bezpośredniej transmisji cyfrowej sygnału audio i wideo, a także obsługa różnych rodzajów materiału wideo wysokiej rozdzielczości (HD) oraz dźwięku o wysokiej jakości sprawiają, że jest to najlepszy typ połączenia.
azur 751R V2 W amplitunerze 751R V2 dostępne są trzy rodzaje analogowych złączy wideo: 1. Zespolony sygnał wideo (Composite) — podłączenie przy użyciu pojedynczego kabla typu „cinch” (RCA-RCA) 75 omów. 2. S-Video — podłączenie przy użyciu kabla S-Video. 3. Komponentowy sygnał wideo (Component) — podłączenie przy użyciu potrójnego kabla typu „cinch” (3RCA-3RCA) 75 omów. Jeśli urządzenie zewnętrzne jest wyposażone w interfejs HDMI, jest to zawsze najlepszy wybór.
Wyjście przedwzmacniacza 7.1 Złącza wejściowe na panelu przednim Jeśli zaistnieje potrzeba podłączenia zewnętrznych wzmacniaczy mocy, można to zrobić przy użyciu kabli typu „cinch” (RCA) podłączonych do złączy wyjściowych przedwzmacniacza 7.1 na panelu tylnym. Wejście Video 3/MP3 znajdujące się na panelu przednim służy do tymczasowego podłączania konsoli do gier itp.
azur 751R V2 Informacje podstawowe Procedura konfiguracji amplitunera 751R V2 obejmuje 3 nieskomplikowane etapy. Etap konfiguracji głośników można wykonać ręcznie lub przy użyciu procedury automatycznej konfiguracji Audyssey. Odtwarzają dźwięk stereofoniczny i wielokanałowy.
Konfiguracja (ciąg dalszy) W przypadku wybrania konfiguracji głośników w systemie 5.1 pojawi się opcja umożliwiająca przypisanie tylnych kanałów przestrzennych (SBL/R Assign).
Ręczna konfiguracja kalibracji poziomu wyjściowego Amplituner 751R V2 umożliwia kalibrację poziomu wyjściowego w celu dostosowania poziomu akustycznego między głośnikami różnych typów, rozmiarów lub producentów, które mogą być stosowane w każdym kanale. Uzyskuje się to przez regulację względnego poziomu wyjściowego każdego głośnika.
2 Audyssey 2EQ Room EQ Jest to bardziej zaawansowana wersja procesu, w której drugi etap jest dłuższy, ponieważ wykonywane są trzykrotne pomiary pasma przenoszenia wszystkich głośników w trzech różnych położeniach w pomieszczeniu, po czym głośniki są kalibrowane, a ich poziom wyrównywany w celu zoptymalizowania dźwięku w rzeczywistym środowisku odsłuchowym (Room EQ). Aby wykonać automatyczną konfigurację Audyssey Autosetup bez opcji Room EQ, wystarczy wybrać z menu opcję „Audyssey Autosetup”.
Kiedy automatyczna konfiguracja zostanie pomyślnie zakończona, na ekranie amplitunera 751R V2 zostanie wyświetlony komunikat „Measurement Complete” (Pomiar zakończony), który zostanie zastąpiony ekranem zaawansowanej konfiguracji Audyssey opisanym w kolejnym rozdziale. 751R V2 Audyssey Dynamic EQ® Muzyka, filmy i gry są zwykle miksowane przy stosunkowo wysokiej głośności, a odtwarzane w warunkach domowych przy znacznie niższej głośności.
Przypisywanie wejść wideo Amplituner 751R V2 jest wyposażony w sześć wejść HDMI (z których jedno znajduje się na panelu przednim) oraz dwa wyjścia HDMI. HDMI to w pełni cyfrowy interfejs AV, który umożliwia przesłanie obrazu i dźwięku w postaci cyfrowej w celu zapewnienia najlepszej jakości obrazu. Złącza wyjściowe HDMI w odtwarzaczach Blu-ray, odtwarzaczach DVD i tunerach telewizji satelitarnej często obsługują formaty wyższej rozdzielczości, w tym formaty ze skanowaniem progresywnym.
azur 751R V2 Ustawienia przetwarzania sygnału wideo Amplituner 751R V2 obsługuje wiele trybów odsłuchiwania muzyki i kina domowego. Dźwięk, jaki może zaoferować amplituner 751R V2, zależy zarówno od podawanego do niego sygnału źródłowego, jak i od wybranej konfiguracji głośników oraz wybranego trybu dekodowania. Poniżej pokrótce opisano formaty dźwięku przestrzennego obsługiwane przez amplituner 751R V2, aby można było się z nimi zapoznać przed przeczytaniem instrukcji użytkowania samego urządzenia.
Surround sound modes cont. Format znany również pod nazwą DD (3/3) lub DD 6.1. Jest to rozszerzona odmiana formatu Dolby Digital. Poza cyfrowo zakodowanymi kanałami w standardzie 5.1 format DD EX udostępnia dodatkowy, szósty kanał (przestrzenny tylny, co pozwala na uzyskanie siedmiu kanałów — 6.1), kodowany matrycowo jako dźwięk przestrzenny tylny, co pozwala uzyskać większą głębię i dokładniejszą lokalizację źródeł dźwięku za słuchaczem. Odtwarzanie formatu DD EX wymaga płyty zakodowanej w tym formacie.
azur 751R V2 Współpraca z komputerem Mac Nie ma potrzeby instalowania żadnych dodatkowych sterowników. W trybie USB Audio 1.0 amplituner 751R V2 współpracuje z natywnym sterownikiem Audio 1.0 systemu Mac OS X 10.5 (Leopard) lub nowszym i obsługuje sygnał audio do 24 bitów/96 kHz. W trybie USB Audio 2.0 amplituner 751R V2 współpracuje ze sterownikiem Audio 2.0 systemu Mac OS X 10.5 (Leopard) lub nowszym i obsługuje sygnał audio do 24 bitów/192 kHz.
Zasady obsługi urządzenia Aby włączyć amplituner 751R V2, należy ustawić przełącznik zasilania na panelu tylnym w położeniu On (Włączony), a następnie nacisnąć przycisk Standby/On (Tryb gotowości/ włączenie) na panelu przednim. Wybór źródła sygnału 1. Wybierz żądane źródłowe urządzenie zewnętrzne, naciskając odpowiadający mu przycisk na panelu przednim lub pilocie. 2.
751R V2 POLSKI azur Tryby dekodowania — konfiguracja głośników 5.1 Wejściowy format dźwięku Natywna Dostępne tryby rozdzielczość kanału Wyjściowe kanały PCM 2 PCM PCM + Dolby Pro Logic II Movie PCM + Dolby Pro Logic II Music PCM + Dolby Pro Logic II Game PCM + Neo:6 Cinema PCM + Neo:6 Music PCM + DSP Movie PCM + DSP Music PCM + Multi channel stereo 2" >5.1 >5.1 >5.1 >5.1 >5.1 >5.1 ! >5.1 ! >5.
Zasady obsługi urządzenia (ciąg dalszy) Tryby dekodowania — konfiguracja głośników 5.1 Wejściowy format dźwięku Natywna Dostępne tryby rozdzielczość kanału Wyjściowe kanały PCM 2 PCM PCM + Dolby Pro Logic IIz Height PCM + Multi Channel Stereo 2" >5.1 + H >5.1 + H MCS Dolby Digital (2/0) 2 Dolby Digital (2/0) Dolby Digital (2/0) + Dolby Pro Logic IIz Height Dolby Digital (2/0) + Multi Channel Stereo 2" >5.1 + H >5.1 + H MCS Dolby Digital 5.1 Dolby Digital (3/2).1 Dolby Digital (3/2).
751R V2 POLSKI azur Tryby dekodowania — konfiguracja głośników 7.
Zasady obsługi urządzenia (ciąg dalszy) Tryby dekodowania — konfiguracja głośników 7.1 Wejściowy format dźwięku Natywna Dostępne tryby rozdzielczość kanału Wyjściowe kanały Dolby Digital Plus 5.1 $ Dolby Digital Plus (3/2).1 Upmix Dolby Digital Plus (3/2).1 Dolby Digital Plus (3/2).1 + Dolby Pro Logic IIx Movie Dolby Digital Plus (3/2).1 + Dolby Pro Logic IIx Music Dolby Digital Plus 7.1 $ Dolby Digital Plus (3/4).1 >7.1 # 5.1 >7.1 >7.1 7.1 Dolby True HD 5.1 $ Dolby True HD (3/2).
azur Zwrotny kanał audio (ARC) Amplituner 751R V2 obsługuje funkcję ARC (Audio Return Channel, zwrotny kanał audio), jeśli podłączony telewizor również ją obsługuje (musi mieć on wejście HDMI 1.4 oraz zaimplementowaną funkcję ARC; więcej informacji można znaleźć w instrukcji obsługi danego telewizora). Funkcja ARC umożliwia telewizorowi przesłanie z powrotem sygnału audio przez kabel HDMI do gniazda wyjściowego HDMI A amplitunera 751R V2.
Można teraz zmienić bieżący parametr obrazu za pomocą pokrętła regulacji głośności Volume lub przycisków ▲/▼ bądź też nacisnąć ponownie przycisk Pic.Adj. (Regulacja obrazu), aby przejść do kolejnego parametru. Ustawiać można następujące parametry: Brightness (Jasność), Contrast (Kontrast), Saturation (Nasycenie), Sharpness (Ostrość) oraz Y/C Delay (Opóźnienie luminancji/ chrominancji).
751R V2 Podwójny układ wzmacniaczy przedniego. Jeśli głośniki w kanale lewym przednim i prawym przednim będą ustawione jako „Small” (Mały), ustawienie funkcji podbicia tonów niskich nie będzie miało znaczenia (działanie systemu będzie identyczne jak przy wyłączonej funkcji podbicia tonów niskich). Jeśli używany jest zestaw głośników w konfiguracji 5.1 lub mniejszej, amplitunerze 751R V2 umożliwia użycie podwójnego układu wzmacniaczy („bi-amping”) dla kanałów przednich lewego i prawego.
Ponownie, we wszystkich przypadkach amplituner 751R V2 nie wykonuje konwersji między formatami, sygnały występujące na odpowiednich wejściach wybranego źródła. Jednak w przypadku złącza Recorder 2 na wyjściu może pojawić się sygnał inny niż ten, który jest aktualnie słyszany za pośrednictwem wyjść głównych amplitunera 751R V2. Możliwe jest więc słuchanie sygnału z jednego źródła i nagrywanie sygnału z innego źródła.
Korzystanie z amplitunera 751R V2 ze wzmacniaczem sygnału zdalnego sterowania Istnieje możliwość zamontowania amplitunera 751R V2 w odpowiedniej, dobrze wentylowanej szafce — w takim przypadku do zdalnego sterowania urządzeniem można użyć wzmacniacza sygnału zdalnego sterowania.
W takiej konfiguracji można sterować strefą 2 z pomieszczenia głównego, używając dostarczonego pilota głównego lub pilota strefy 2 (więcej informacji podano w następnej części). Aby ze strefy 2 zdalnie sterować tą strefą oraz źródłami w niej się znajdującymi, należy użyć dodatkowego układu wzmacniacza sygnału zdalnego sterowania (nie jest on dostarczany z zestawem).
azur 751R V2 Aby wybrać tuner w strefie 2 (Zone 2), naciśnij przycisk Zone 2 (Strefa 2), a następnie przycisk Tuner. Aby przełączyć pasmo tunera z AM na FM lub odwrotnie, ponownie naciśnij przycisk Tuner. Aby wybrać inne źródła sygnału w strefie 2, naciśnij przycisk Zone 2 (Strefa 2), a następnie przycisk wybranego źródła. Aby wybrać to samo źródło sygnału, co w pomieszczeniu głównym, naciśnij przycisk Follow Main (Zgodnie ze strefą główną).
Konfiguracja 4 — kanały 7.1: lewy, środkowy, prawy, LFE, przestrzenny lewy, przestrzenny prawy, lewy górny, prawy górny. W przypadku odtwarzania przyjmuje się, że w pomieszczeniu znajdują się głośniki ustawione w przybliżeniu zgodnie z jednym z poniższych układów. Konwencjonalny układ 5.
Automatyczne wyłączanie urządzenia Amplituner 751R V2 oferuje funkcję automatycznego wyłączania i domyślnie wyłącza się, jeśli przez 30 minut nie zostanie wykryte odtwarzanie sygnału audio. Funkcję tę można włączyć lub wyłączyć w menu Advanced Audio Setup (Zaawansowana konfiguracja dźwięku), wybierając pozycję Auto Power Down (Automatyczne wyłączanie urządzenia) i naciskając przyciski ◄ lub ► na pilocie zdalnego sterowania w celu zmiany ustawienia. Advanced Audio Setup Multi Ch.
Dane techniczne Dźwięk Moc wyjściowa Dane ogólne Wszystkie kanały: 200 W RMS na kanał, 6 omów (wysterowane 2 kanały) Wszystkie kanały: 170 W RMS na kanał, 8 omów (wysterowane 2 kanały) Wszystkie kanały: 120 W RMS na kanał, 8 omów (wysterowane wszystkie 7 kanałów) Zniekształcenia harmoniczne < 0,006% przy 1 kHz Przesłuch < -80 dB Pasmo przenoszenia 10 Hz – 20 kHz przy ±1 dB Stosunek sygnał/szum > 90 dB, A ważony Impedancja wejścia audio Czułość 47 kiloomów / 175 mV lub więcej Impedancja wejścia c
azur 751R V2 Słychać buczenie lub brzęczenie Urządzenie znajduje się zbyt blisko przewodów zasilających lub źródeł światła. Po podłączeniu wejścia analogowego nie słychać dźwięku z głośników Wejścia analogowe nie są dobrze podłączone. Wybrano cyfrowy typ wejścia audio. Naciśnij przycisk Audio Input Type (Typ wejścia audio), aby przełączyć się na wejście analogowe (sprawdź na wyświetlaczu).
Cambridge Audio is a brand of Audio Partnership Plc Registered Office: Gallery Court, Hankey Place London SE1 4BB, United Kingdom Registered in England No. 2953313 © 2015 Cambridge Audio Ltd AP33249/3 www.cambridge-audio.