
Operation Manual
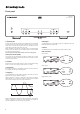


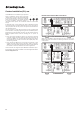


Table Of Contents

12
Conguration menu
In Standby mode, press and hold the Standby/On button to enter the
Conguration menu.
The Left and Right ‘Output’ LED will start blinking to indicate that you are
now in the Conguration menu.
Pressing the Standby/On button will shufe through these different
setting options:
Right ‘Protection’ LED - Auto power down enabled (by default).
Right ‘Protection’ and ‘Clipping’ LED - Auto power down and auto power
up enabled.
Left and Right ‘Output’ LED - All features are now disabled.
To exit the Conguration menu, press and hold the Standby/On button.
Note: If a second 851W is added to the chain, the below conguration
menu is applicable only to the second unit.
(When used in conjunction with a Pre-amplier such as the 851E through
the Control Bus, each 851W needs to be identied individually for fault
reporting.)
Left ‘Protection’ LED - Second 851W enabled.
Left and Right ‘Protection’ LED - Second 851W auto power down enabled.
Left ‘Protect’ and Right ‘Protect and Clipping’ - Auto power down and
auto power up enabled.
Powering On/Off the 851W
As well as simply using the front panel button the 851W features multiple
ways it can be automatically powered on and off.
A trigger 5-12V AC or DC input to the Trigger In on the rear panel can
power up or down the unit from custom install systems or preamps with
trigger outputs. This is an ‘edge triggered’ input so that the 851W will
power on with a zero-to-positive voltage transition and power down with
a positive voltage to zero transition.
Alternatively the 851W features a Control Bus Input for use with our
matching 851E preamp that allows a single RCA/Phono to RCA/Phono
cable to be connected between them that allows the 851E preamp to
communicate with the 851W and automatically control its power status.
For custom install situations it is also possible to send Infra Red or
Control Bus commands (see our website for the code table) to the 851W
and also affect power control.
Lastly the 851W can sense its audio inputs and will instantly cause the
unit to power up and conversely Auto-Power Down if no signal has been
present for 30 mins.
To enable/disable Auto Power Up/Auto Power Down see the next section
on the hidden conguration menu.