
Owner Manual


1
Introduction
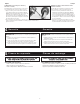
Congratulations
on the purchase of your new Cambro insulated transporter. This Owner’s Manual provides you with a step-by-step guide to assembling, operating,
and maintaining your transporter. If you have any further questions, please do not hesitate to contact your Cambro Sales Representative, visit our Web site at
www.cambro.com or call our Customer Service Line at 800 833 3003.
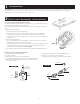
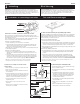
(A) Pop-up Vent Cap and Anchor Installation and Use Instructions
Lids and doors manufactured by Cambro after March, 2007, feature a large (
3
⁄
4
/ 19.05mm) opening with a Pop-up
Vent Cap & Anchor for equalizing pressure and releasing steam. *
To open vent, firmly grasp vent and pull outward until you hear a click. To close vent, push vent in until you hear a
click.
To remove the Pop-up Vent components:
1) Push the vent cap down into the non-venting position.
2) From the bottom or inner side of the lid or door, unscrew the anchor component in a counterclockwise
direction. You may need to hold the cap on the opposite side of the lid or door to stop it from turning.
3) Once the anchor component is disconnected from the cap, pull up on the cap until it comes completely out of
the vent opening.
To install the Pop-up Vent components:
1) Place the cap component into the vent opening from the top or outer surface of the lid or door, pushing it
fully into the opening until it stops (in the non-venting position).
2) From the bottom or inner side of the lid or door, screw-in the anchor component in a clockwise direction. You
may need to hold the cap on the opposite side of the lid or door to stop it from turning. When the two
components are fully connected, stop turning. Do not over tighten.
*
UPCS and toploading Camcarriers
®
feature a built-in vent, so these instructions do NOT apply to those models.
2
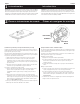
Parts and Assembly Instructions
Remove
Install
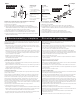
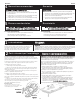
(B) Beverage Server Faucet and Spout Assembly Instructions
1. Put flat washer in groove at the end of the spout.
2. Place spout in Camtainer.
3. Put fiber washer on spout. Push it to the wall of the Camtainer.
4. Thread hex nut and tighten nut firmly, but do not over tighten. (If the flat washer inside
of the Camtainer is flattened and distorted, leaking can occur.) To tighten the hex nut,
use the wing nut as a wrench.
5. Leave the wing nut in the position used in step 4, the tightenedposition.
6. Insert metal “C” ring in front groove, in front of wing nut.
7. Insert faucet into wing nut and tighten in upright position (counter-clockwise)
Faucet Kit
Spout Kit
Faucet lever
Wing Nut
Rubber Seat Cup
(nested inside)
Body
Flat Rubber Washer
Spout
Fiber Washer
Hex Nut
“C” Ring
(stainless steel)
3